All Blog Posts - page 10
Dec 7, 2011 - 10-minute App Series Conclusion
Filed under: #daxmusings #bizappsThe 10-minute app series has been concluded. If you’ve missed one, here are the links:
• “10 minute WPF app”: a WPF app that consumes AX 2012 queries (without customization to AX). • “10 minute Windows Azure app”: send item data to an Azure site. • “10 minute Windows Phone 7 app”: get list of items on windows phone 7 app through trusted intermediary (without customization to AX)
I acknowledge to create these 10-minute apps I probably violated tons of best practices and I know I took a lot of shortcuts and skipped over things, just to make it work in 10 minutes. They are all proof-of-concepts and hopefully by taking these shortcuts you won’t be inclined to just take the code and some things to create a customer solution. You should do it the right way, and take more than 10 minutes :-)
The whole point of these 10 minute apps is to enforce Microsoft’s AX 2012 marketing buzz about “Powerfully Simple”. The continued deep merging of AX with the rest of the Microsoft stack enables a lot of possibilities. And although a lot of the marketing is focused around AX 2012 being powerfully simple for the user, hopefully this 10-minute app series shows how the power of the integration with other Microsoft technologies makes things simpler for us developers too!
Let this be an inspiration. There are wonderful things you can do with these three examples if you start mixing and matching. Perhaps a service bus between Azure and AX, making mobile apps for mobile platforms using Azure (including Windows Phone). Or, as Sashi did, apply the base code and concepts to create an Android app.
If you created any other projects based on these apps, post it in the comments or let me know on twitter, and I will gladly reference them on my blog.
Dec 5, 2011 - AX Mobile App for Android
Filed under: #daxmusings #bizappsThe Windows Phone 7 app article has drawn quite some attention and interest. And (as I had somewhat hoped), someone has taken the series and created an Android front-end. Technically that is all that would have to change: the front-end. If the intermediary is working, the WCF in between is up and running, all should work just fine. This author decided to make the WCF service RESTful, which took some extra effort.
Can’t wait to see the final result!
Visit Shashi’s blog to follow along with his article.
Dec 1, 2011 - 10-Minute App - Windows Phone 7 App
Filed under: #daxmusings #bizappsThis is the third and final article in a 3-post about the Windows Phone 7 app for AX 2012. Before we continue on I think it’s import to re-iterate that this is a proof-of-concept and you should not take this code as a basis to make a real world app. The goal is to show the potential and relative ease of making AX 2012 work with the rest of the Microsoft technology stack. That being said, if you missed the first two articles:
In this final article, we’ll build the actual Windows Phone 7. You need to have the setup and code in place of the first two articles. Before we get started, make sure you have the WCF service that we created in Part 2 running (press F5 in Visual Studio), and make sure you have the Windows Phone 7 SDK installed.
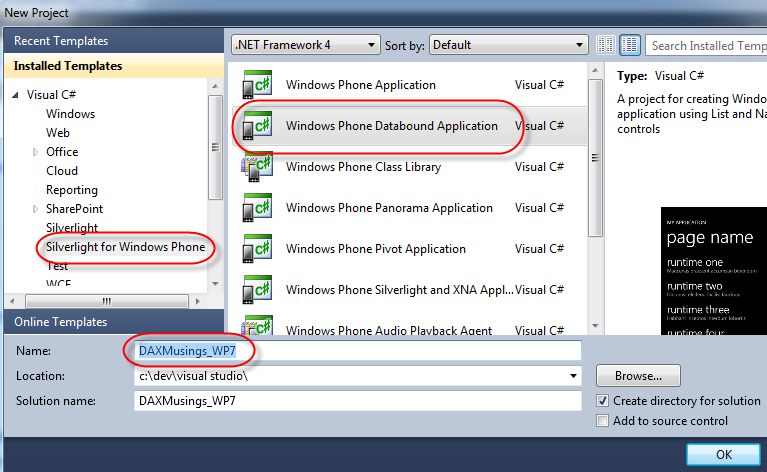
So, with the WCF service running, open a SECOND instance of Visual Studio 2010, this one does not need to run as administrator. Create a new project of type “Silverlight for Windows Phone and select the “Windows Phone Databound Application” template. I’m calling this project “DAXMusings_WP7”.
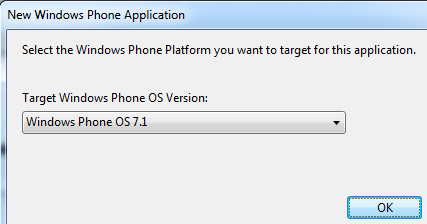
You will get a dialog asking what version of the OS you want to use. The current version as of this writing is 7.1, which is Mango. I know it’s confusing, I thought Mango was 7.5, but 7.1 is what it is. If you are a time traveler from the future reading this old blog post from November 2011, feel free to use a newer version. We’re not using any specific OS features, so as long as .NET still supports WCF when you’re reading this, I’m suspecting this code will still work :-)
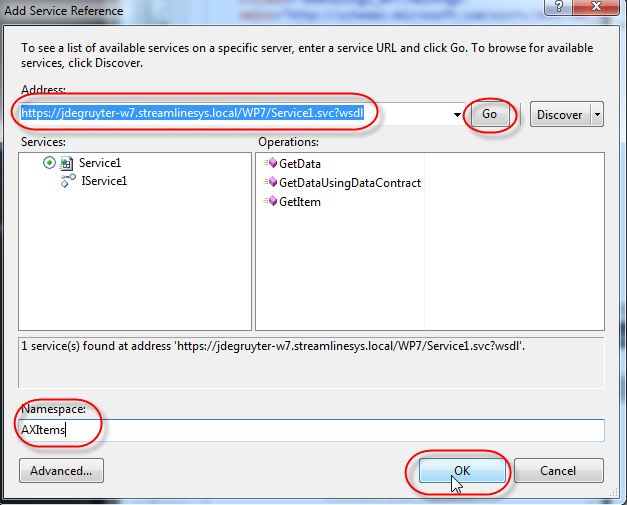
First thing we need to do is add the service reference to our WCF service. This goes back to article 1 and 2. You NEED to enter the FULL qualified domain name for your server (the server name needs to match the certificate created in part 1), and you need to know the path to your service. If you’ve followed my lead on naming of the classes and folders etc, then (except for the server name) your URL should be:
https://yourmachinename.domainname/WP7/Service1.svc?WSDL
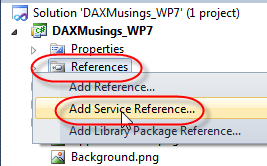
obviously replacing the “yourmachinename.domainname” with your server’s FQDN. To add the reference, right-click the “References” node and select “Add Service Reference”. On the dialog, enter the URL to your service’s WSDL and click GO. In the namespace, I called the reference “AXItems”.
The default layout defined in the XAML file contains a grid with two rows: one for the application and page title, one for the actual content grid. We’ll add a third row to go in between, where we can enter a user name and have a button to retrieve the data. In the XAML file, add a third “RowDefinition” in between the two existing ones, with Height set to “Auto”, so it looks like this:
Click here for a full code screenshot<pre>        <Grid.RowDefinitions>
            <RowDefinition Height="Auto"/>
            <RowDefinition Height="Auto"/>
            <RowDefinition Height="*"/>
        </Grid.RowDefinitions>
</pre>
Next, under the StackPanel node containing the application title and page title (you can change the TEXT attribute on those TextBlock nodes to change the title that will show in your app… for example, change it to “DAXMusings Rules”) and before the Grid called ContentPanel, we will add the following XAML. Since we’re adding a Row in between, we need to make sure the Grid.Row property of contentpanel below is changed to 2! (see the full screenshot)
Click here for a full code screenshot<pre>        <StackPanel x:Name="LogonPanel" Grid.Row="1">
            <TextBox x:Name="Logon" Text="[email protected]" /%gt;
            <Button x:Name="GetItems" Click="GetItems_Click">
                <TextBlock Text="Get Items" />
            </Button>
        </StackPanel>
</pre>
The keen eye noticed that the logon TextBox I added contains a username already ([email protected] - the user we setup in the trusted intermediary article). Obviously this is not something you want to do in your production app. However, the Windows Phone Emulator (or at least the current version of it) does not support your machine’s keyboard, so you actually have to use the on-screen keyboard for testing. So putting it in here saves you some typing. This is also a good moment to remind you this article series depends on the trusted intermediary setup, so you need to go through that for this to work.
If the hard-coded user was caught by your left keen eye, then your right keen eye may have noticed there is an event handler for the “Click” event on the button. If you are typing this in manually, the Visual Studio editor will prompt you to add that event handler method. If you just copy/paste the code from above, you can right-click the GetItems_Click text and select “Navigate to Event Handler” and this will create the method for you.
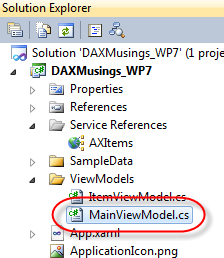
Before we can actually do something, we’ll have to add the code that actually makes the call. There is already some basic code added for that in the template, but we want to change that of course. In your solution explorer, open the “ViewModels” folder and double click the “MainViewModel.cs” file.
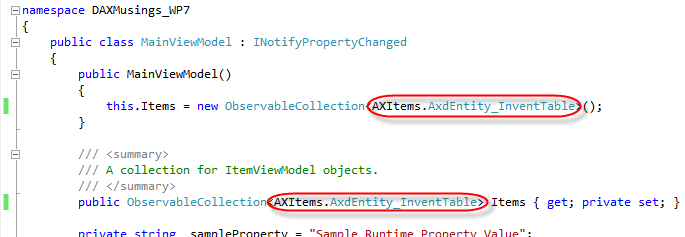
The grid on the main page uses the Observable Collection that is defined in this file. In the template, they define a new data structure. We want to actually just use the data structure returned from the WCF service. So we’ll need to make some changes to use the AXItems.AxdEntity_InventTable as the class contained in the collection:
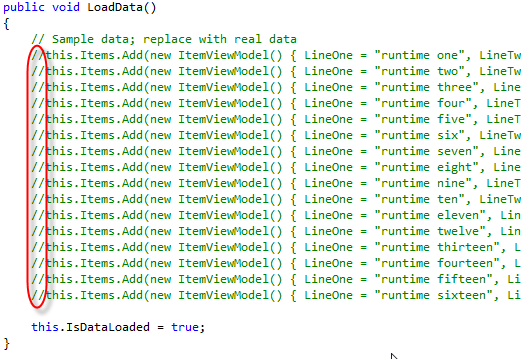
You will notice that there is a method in this file called “LoadData”, which due to this change will now contain a bunch of error lines. Just remove the error lines or comment them out:
Next, we’ll add a method at the end of this MainViewModel class, which will be used as the event handler when the results are received from our WCF app. First we’ll make sure there were no errors, if there were we will show that in a popup, and return out of the method. Next, we check to see there were items in the result set, if not we say so and return out of the method. Lastly, we loop over the items that were in fact returned, and add them to our observable collection. The isdataloaded=true is not really necessary, it’s a variable maintained by this template but it doesn’t really do much anyway.
Click here for a full screenshot<pre>void client_GetItemCompleted(object sender, AXItems.GetItemCompletedEventArgs e)
{
    if (e.Error != null)
    {
        Exception ex = e.Error;
        MessageBox.Show(ex.Message);
        return;
    }
    if (e.Result == null)
    {
        MessageBox.Show("No items found");
        return;
    }
foreach (AXItems.AxdEntity_InventTable item in e.Result)
{
    this.Items.Add(item);
}
this.IsDataLoaded = true; }
</pre></code>
Finally, we’ll add the actual code that makes the call. As mentioned a few times in this article series, the authentication is not what it should be and you should do proper WCF authentication.
Click here for a full screenshot<pre>public void GetItems(string username)
{
    this.Items.Clear();
try
{
    AXItems.Service1Client client = new AXItems.Service1Client();
    // Set the client credentials property here for proper authentication
    client.GetItemCompleted += new EventHandler<AXItems.GetItemCompletedEventArgs>(client_GetItemCompleted);
    client.GetItemAsync(username, "10000", "10005");
}
catch (Exception ex)
{
    MessageBox.Show(ex.Message);
} }
</pre></code> Another thing here is the hard coded item numbers range. We’re basically getting items 10000 through 10005. Feel free to add these as parameters on the XAML file as well. However, you need some type of limitation or you will run into the maximum message size of your WCF service. These can be changed easily in the web.config settings of the WCF service if you wish to do so. However, since we’re doing a quick prototype here we’re using mostly standard settings and a standard service too. Remember this service actually returns ALL item data, not just a few fields. Ok, so now that we have the WCF call in place, we just need to call this method from our button click event handler. You should still have MainPage.xaml.cs open, so click on that tab.
in the GetItems_Click method, we now call our new method GetItems, which was put in the main view model. We need to pass the username entered on the screen. The textbox we added we gave the x:Name=”Logon” name, so we can just call that and retrieve its property “Text” to pass to our method as the username:
<pre>private void GetItems_Click(object sender, RoutedEventArgs e)
{
    App.ViewModel.GetItems(Logon.Text);
}
</pre>
Almost there! The last thing we need to change is back in the MainPage’s XAML file:
Now that we have changed the observable collection (“Items” - which is what you see in the XAML the grid’s ItemsSource property is bound to), we need to make sure the two TextBlocks in the data bound grid actually bind to properties that exist on the AXItems.AxdEntity_InventTable class. This is the class AIF returns from the service, and the properties on it basically reflect the fields on the InventTable. In fact, it also contains some sub-tables of InventTable, so feel free to experiment with the binding. For now, we’ll just bind the two text blocks to item id and name alias (“search name”):
Click here for a full screenshot<pre><TextBlock Text="{Binding itemIdField}" TextWrapping="Wrap" Style="{StaticResource PhoneTextExtraLargeStyle}"/>
<TextBlock Text="{Binding nameAliasField}" TextWrapping="Wrap" Margin="12,-6,12,0" Style="{StaticResource PhoneTextSubtleStyle}"/>
</pre>
With all this in place, we’re ready to run the App!! Now, one thing to remember from Part 1 was the self-signed certificate issue with Windows Phone 7. Remember that to resolve this issue we added a ZIP file called certificate.zip onto the IIS website in the root folder. Press F5 to run and deploy the app to the phone emulator. Make sure the emulator is selected and it doesn’t try to deploy using Zune software (in case you actually have a windows phone or a zune player perhaps).
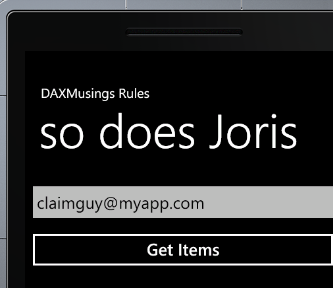
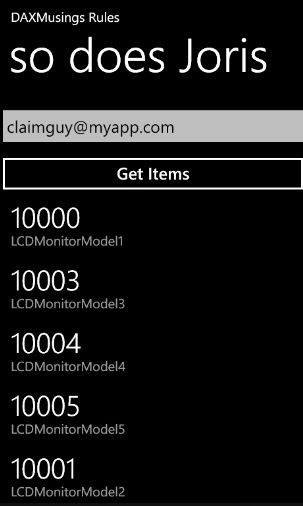
Ok, so when the emulator opens, it will load all the assemblies and then open your app, which should look like this:
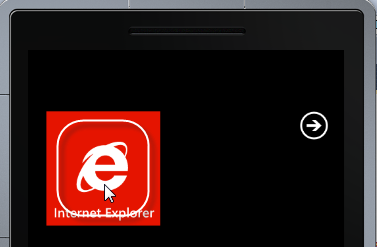
Feel free to click the “Get Items” button, but you will get the “endpoint not listening” error (see Part 2 for explanation). So use your mouse to click on the Windows button. Once in the main menu, open internet explorer.
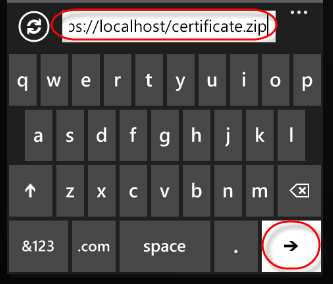
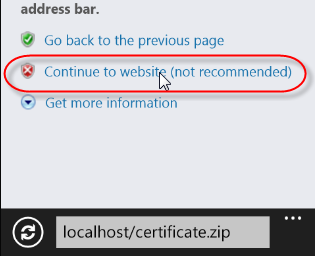
In internet explorer (after click away the privacy notice from Microsoft), click the URL bar at the bottom and type in the URL of the certificate.zip file. Now, I will save you some typing (clicking - since the windows keyboard doesn’t seem to be supported) here. For development purposes, the windows phone emulator re-routes “localhost” to your computer running visual studio, rather than localhost being the windows phone device itself. So, to get to the certificate, if you followed the naming of my articles, the URL should be https://localhost/WP7/certificate.zip (don’t forget the “S” at the end of https). Click the white button with the arrow on it. You will get a warning from IE and just click continue.
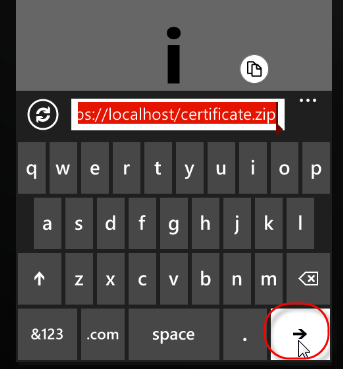
When I do this the first time, I get an error “can’t download the file”. If someone can explain why this is, feel free to leave a comment. In any case, if you click the URL bar at the bottom again, it will pop up with the URL still in it, and if you hit the white arrow again, it will actually work… (not sure what this is all about)
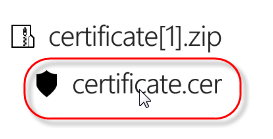
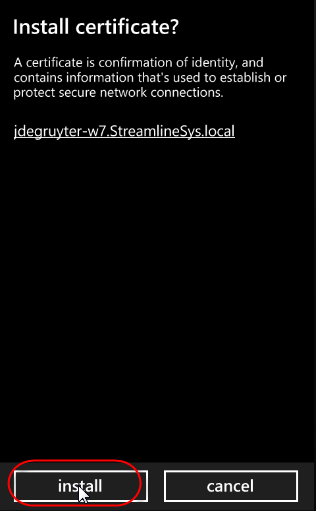
This will open the ZIP file on screen, and will show you the certificate.CER file contained within. Click the CER file, and you will be prompted with the details. Click the “Install” button at the bottom. This will confirm it’s installed, just click OK.
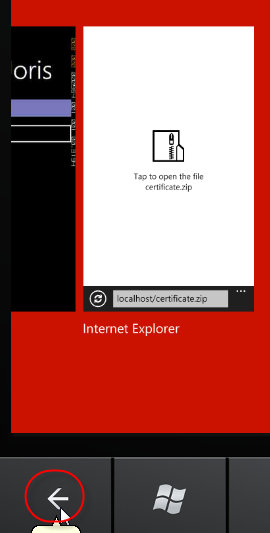
Once this is done, click and HOLD the back button at the bottom. This will bring up the task switcher. Click on your APP (you can swipe the screen to get to it) and this will switch back to your app.
Back in your app, you can now click the “Get Items” button, and after a few seconds it should display your item numbers 10000 through 10005 (assuming you have those, remember we hardcoded the range). If your app doesn’t react to clicks on the username field or the item button, make sure you have set the Grid.Row property of the Grid/ContentPanel to “2”. Else you have two overlapping controls and it gets stuck basically (guess how I know this).
A word of advice. If you close the emulator screen, you will LOSE the certificate installation and have to repeat the process every time. So rather than closing it, go to Visual Studio and STOP debugging to close the app. Next time you wish to run your app, just hit F5 again, and the emulator will just pop back up. But if you close it, you’ll have to reinstall the certificate.
So (63 screenshots and some sleep deprivation later) that concludes our Windows Phone 7 app. Your mileage may vary on the development being 10 minutes, but at least the intent was there. And the windows phone app itself was probably about 10 minutes, no? :-) The setup and potential pitfalls is what makes this tough.
Hope you enjoyed this one, I know I did (once it was working!). Please drop me a line on my blog and let me know if you have this running, if you have feedback of any kind.
Nov 29, 2011 - 10-Minute App - WCF service for Windows Phone 7
Filed under: #daxmusings #bizappsThis is Part 2 in the Windows Phone 7 app. Due to length of the articles, the “10 minutes” is split up in three articles. Part 1 talks about setting up IIS to support the intermediary WCF service.
After an explanation on the trusted intermediary in AIF, and the IIS setup needed to be able to run our WCF service for use with Windows Phone 7 (WP7), we’re ready to code! We will create two Visual Studio projects, one is the WCF service that consumes the original AIF service and exposes it back out again (translating the authentication in the process). The second project is the actual WP7 app consuming our WCF service to display the AX data.
Part of the trusted intermediary article was setting up the AIF service enhanced port for item data and allowing a trusted intermediary for that web service. We will re-use that in this article, so if you haven’t done so already, please go through the article for the setup. Also a must is the setup necessary for IIS. You need to go through this setup first, before we can get into the code below.
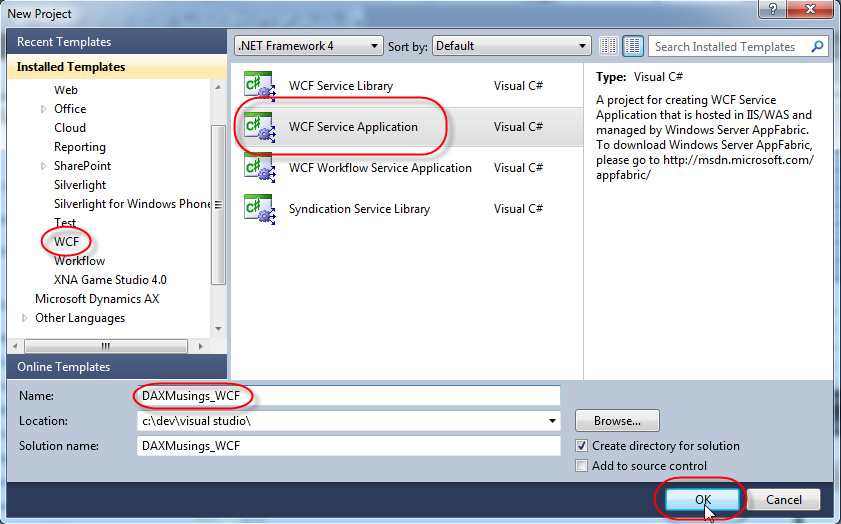
First, the WCF application. To work with the IIS setup, you will need to start Visual Studio 2010 in administrator mode. To do this, right-click Visual Studio 2010 in your start menu, and select “Run as administrator”. Once in Visual Studio 2010, create a new WCF project of type “WCF Service Application”. I called my project “DAXMusings_WCF”.
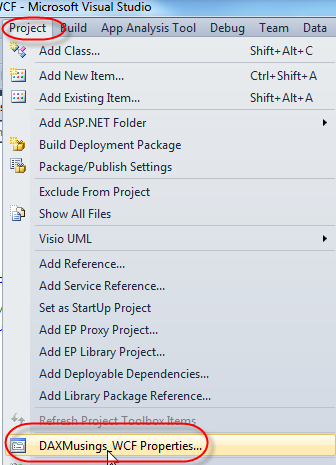
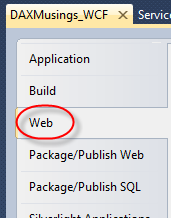
First thing is changing the setup to use our IIS setup instead of the built-in development server of Visual Studio. On the Project menu, select “DAXMusings_WCF Properties…” (if you named your project differently, you should see that here). In the properties window, select the Web tab.
Select the “Use Local IIS Web server”, and enter the URL for the website we created, including a new sub-folder (I changed the default, which is the project name, to something short: WP7). Don’t forget to use the FQDN (fully qualified domain name) that IIS used for the certificate! Also make sure you enter httpS to indicate it’s an SSL site. If you setup the website on another port, make sure to add the port (for example if you used port 80443: https://myserver:80443/WP7).
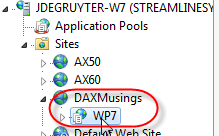
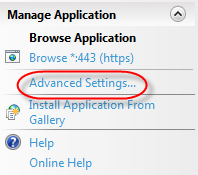
Once entered, click the “Create Virtual Directory”. This will create a new virtual sub-folder in the site, pointing to the output folder of your Visual Studio project. Unfortunately, IIS assigns the default application pool to it, so we’ll need to go back to IIS and change the application pool. Under administrative tools, open “Internet Information Services (IIS) Manager”. Under sites, browse to the site we created (if you followed to the letter, this will be called “DAXMusings”), and click on the new virtual directory called “WP7”. On the right-hand side panel, select “Advanced Settings”.
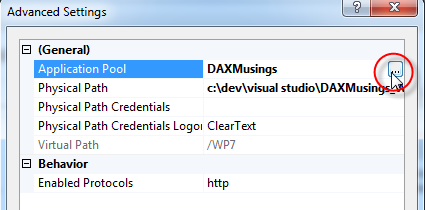
In the application pool setting, click the ellipsis and select your application pool and click OK. That’s it.
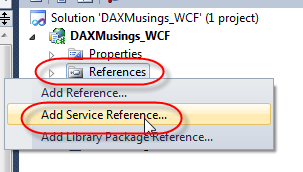
Back in Visual Studio, we’ll add a reference to the AX 2012 AIF service we’ve setup in the trusted intermediary article article. Check back there what to setup and how to find the WSDL URL to use. To add the service reference, right-click on References in your project and click “Add Service Reference”.
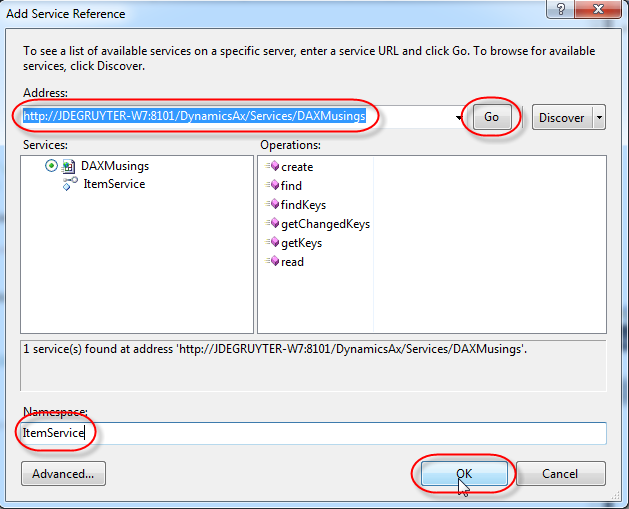
On the dialog, type in or paste in the address for the item service WSDL and click the “Go” button. In the namespace field, type “ItemService”. Click OK to add the service.
Now, there is a catch which took me a long time to figure out. By default, the proxies are generated for the item service from AX. My idea was to just re-use those objects for this WCF service. They are already a data contract, plus the service from AX will return the object, so you can just pass it along. Well, until the WP7 app tries to consume it. You will get the following error:
Inner Exception: Type 'System.ComponentModel.PropertyChangedEventHandler' cannot be serialized. Consider marking it with the DataContractAttribute attribute, and marking all of its members you want serialized with the DataMemberAttribute attribute.
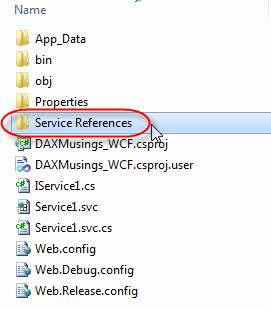
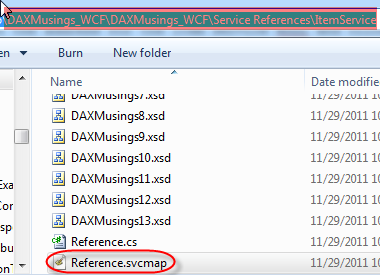
Apparently this is a SilverLight issues, but it took me a while to figure out how to circumvent it. Turns out it’s all in the proxies generated by the service reference we just added. By default, the reference tries to be helpful and adds events for property changes, so the proxy objects return from the service can be used for data binding and other cool stuff. But that is exactly what we cannot pass along to a silverlight service without making it part of the data contract. Since the data contract is auto-generated, we’re stuck. I finally found a helpful blog post explaining how to turn off the automatic addition of the events. To do this, right-click your project and select “Open Folder in Windows Explorer”. In the folder, you will find the “Service References” folder, inside of it, the ItemService folder.
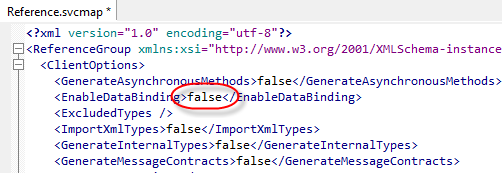
In this folder, we need to edit a file called “Reference.svcmap”. You can edit this file in notepad or even in Visual Studio, it’s an XML file. In the XML file, the second field is called “EnableDataBinding” and is set to true. Setting this to false will avoid the service proxies having the notification properties.
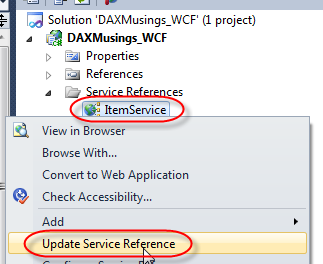
Save the file and close it. Back in Visual Studio, right-click the service reference “ItemService” and select “Update Service Reference”. This will regenerate the proxies and effectively remove the events.
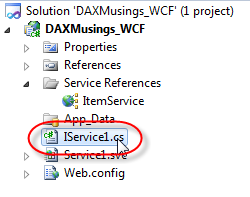
Ok, so now to the code. We need to change the service interface (IService1), and then the implementation itself as well. Open the IService1.cs file by double clicking on it in the project.
To cut things short, all we want to do is add a method to the interface (feel free to clean up the rest, we won’t use it). We’ll return an array of InventTable records coming from the AIF service, so add the following line under the “TODO: add your service operations here” comment:
Click here for full code screenshot<pre>[OperationContract]
ItemService.AxdEntity_InventTable[] GetItem(string username, string itemIdFrom, string itemIdTo);
</pre>
As you can see, we’re cheating on the authentication here by just passing in the username as a parameter to the operation. No password here either. Please look into proper authentication mechanisms for WCF (I know I am). As I said in the previous article, a good place to start is this article on MSDN.
As far as the operation, we’ll use the “Find” method of the AX service which can use a range of filters, so we’ll do a from and to value for the find range.
Next in the Service1.svc file, we want to implement this new operation inside the Service1 class, as follows:
Click here for full code screenshot<pre>public ItemService.AxdEntity_InventTable[] GetItem(string username, string itemIdFrom, string itemIdTo)
{
 ItemService.AxdItem item = null;
ItemService.ItemServiceClient client = new ItemService.ItemServiceClient(); ItemService.CallContext context = new ItemService.CallContext();
context.Company = “CEU”; context.MessageId = Guid.NewGuid().ToString(); context.LogonAsUser = String.Format(“DAXMusingsAuth\{0}”, username);
try { ItemService.QueryCriteria criteria = new ItemService.QueryCriteria(); criteria.CriteriaElement = new ItemService.CriteriaElement[1]; criteria.CriteriaElement[0] = new ItemService.CriteriaElement(); criteria.CriteriaElement[0].DataSourceName = “InventTable”; criteria.CriteriaElement[0].FieldName = “ItemId”; criteria.CriteriaElement[0].Operator = ItemService.Operator.Range; criteria.CriteriaElement[0].Value1 = itemIdFrom; criteria.CriteriaElement[0].Value2 = itemIdTo; item = client.find(context, criteria); } catch (Exception ex) { Console.WriteLine(ex.Message); throw ex; }
return item.InventTable;
}
</pre></code>
As you can see this uses the context for the intermediary user (read the article if you haven’t already!). We re-throw any errors coming back from AIF, otherwise we return the InventTable datasource coming from AIF… Ok, last thing to do is actually tell WCF we want to use https and basic authentication. To do that we need to change the Web.config file (double-click on the Web.config in your project). First, we need to add a section for basic http binding. Inside the “bindings” node, after the </netTcpBinding> node, add the following:
<pre><basicHttpBinding>
        <binding name="webBinding">
          <security mode="Transport" />
        </binding>
      </basicHttpBinding>
</pre>
Next, under behaviors/servicebehaviors we’ll add the following node after the </behavior> :
<pre><behavior name="ServiceBehaviors">
          <serviceDiscovery/>
          <serviceMetadata httpsGetEnabled="true"/>
          <serviceDebug includeExceptionDetailInFaults="false"/>
        </behavior>
</pre>
Next, we add a services node with a service setup, linking to the basic http binding, the service behavior, and the data contract. If you used any other names for the service reference namespace make sure to change the service class name and the data contract interface name (shown in bold) below:
<pre><services>
      <service name="DAXMusings_WCF.Service1" behaviorConfiguration="ServiceBehaviors">
        <endpoint name="Endpoint"
                  address=""
                  binding="basicHttpBinding"
                  contract="DAXMusings_WCF.IService1"
                  bindingConfiguration="webBinding"/>
        <endpoint kind="udpDiscoveryEndpoint" />
      </service>
    </services>
</pre>
Lastly, at the top of the web.config, we need to remove the targetFramework attribute in the compilation node, so it looks like this:
I know this was a lot, so feel free to look at the actual web.config file as I’m using it. It’s up for download here. We’re done with the WCF service. You can hit F5 to run the service. Nothing much to see, you can browse to your https site under /WP7/Service1.svc?WSDL to see if it’s working. We’ll need this URL later for the WP7 app itself.
Nov 29, 2011 - 10-Minute App - IIS Setup for Windows Phone 7
Filed under: #daxmusings #bizappsThe final 10-minute app, this time for Windows Phone 7! I will be using a trusted intermediary, so if you haven’t read that article yet, head on over here. You’ll also need the Windows Phone 7 SDK installed. As with the Windows Azure app, there were some hurdles in this setup, mainly all the setup around IIS. Therefor the article is split up in two, first is this setup article, next will be the actual code. If you missed the previous 10-minute articles, visit my blog for the Windows Presentation Foundation and the Windows Azure articles.
As I explained in the Trusted Intermediary article, mobile applications usually do not have access or support for active directory authentication. Which is exactly why we need an intermediary. For this article, we will need to create two visual studio projects: 1) A WCF service that consumes the actual AIF service using a trusted intermediary account, and exposes the AX AIF service out again with authentication of the consumer 2) A Windows Phone 7 (WP7) app that will consume our WCF service and display the results of the AIF service on the phone
The intermediary WCF service will need to authenticate the user. Unfortunately I’m still trying to figure out WCF authentication myself, and it would probably go beyond the “10 minutes” I’m aiming for anyway. A good start if you want to take this further would be MSDN. This blog article will give you all the basics, you just need to implement the authentication side properly. That being said, for basic authentication to work, Windows Phone 7 requires you to use SSL. It will effectively ignore any credentials you try to pass if you try to use a basic http site. This is a security decision and makes sense, you don’t want to be sending usernames and passwords in plain text around the internet. Unfortunately the Visual Studio built-in development web server (“Cassini”) does not support SSL. So we’ll have to change our Visual Studio solution to use IIS instead. No big deal, but a dent in my 10 minutes to go over this setup with you :-)
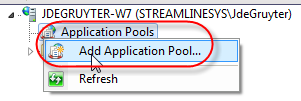
So first things first, which is setting up IIS. Our WCF service will run as whatever identity is used in the application pool for our website in IIS. Since our WCF service will call AX as a trusted intermediary, that means the application pool needs to run as the trusted intermediary user. Under administrative tools, open the Internet Information Services (IIS) Manager. Right-click on Application Pools and select “Add Application Pool”.
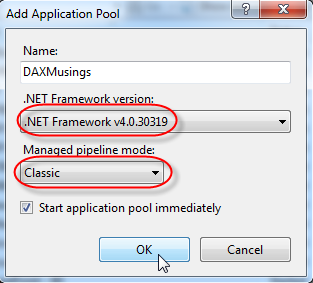
Name the application pool (I chose DAXMusings) and make sure to set the .NET Framework version to 4.0 and the pipeline mode to classic.
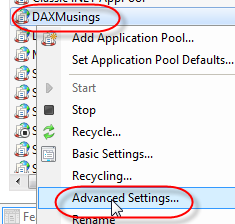
Next, right-click on your new application pool and select Advanced Settings.
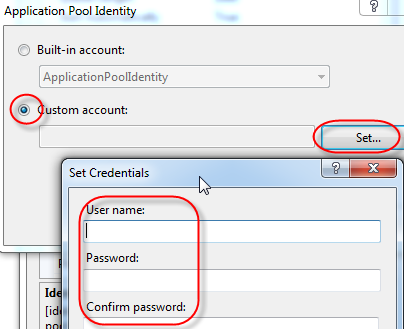
Under Process Model, click the ellipsis button on the Identity property. Select the “Custom account” and click the Set button. Set the username and password for your trusted intermediary in AX (make sure to prefix the username with the domain name and a backslash). Remember in a production environment things are different and security is top priority, and definitely don’t use your personal account for the application pool.
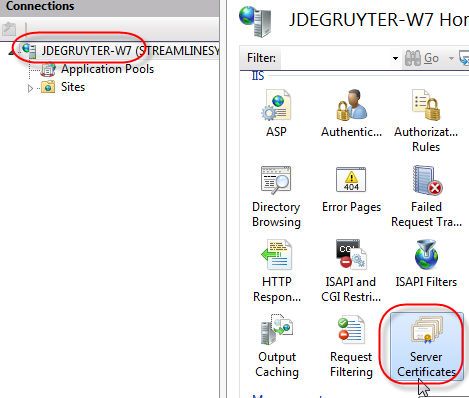
Click OK until you get back to the IIS Manager. Next we’ll need to create a certificate for our SSL site. Unless you want to shell out the big bucks for an actual certificate for your development server or laptop or whatever, we will just create a self-signed certificate. Click on the root level (the name of your server), and in the Features View, double click on the “Server Certificates” icon.
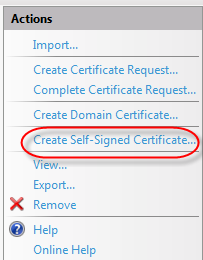
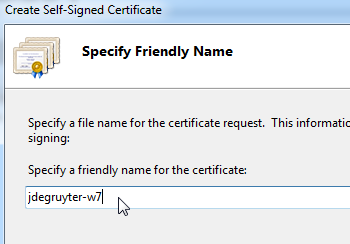
In the Server Certificate pane, click the “Create Self-Signed Certificate…” link in the right-hand side menu. In the dialog that pops up, enter a “friendly name” for your certificate. I just entered the name of my laptop (everything runs locally on my laptop). You should see the certificate show up with an expiration date. Note that under “Issued To”, IIS will have listed the FQDN (fully qualified domain name) of your server. You will need to use this later in the code, so make sure you know what the FULL name of your server is.
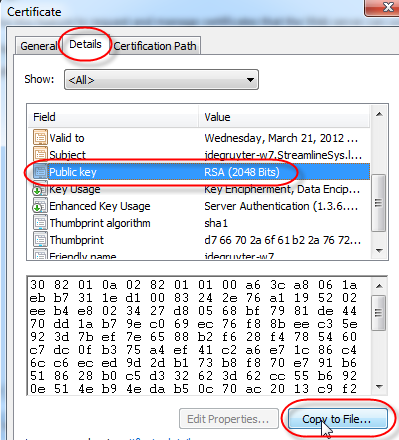
Double-click on your new certificate, or click the “View…” link on the right-hand side. On the certificate view dialog, click on the details tab. In the list, try to find the “Public key” row. When you click on it, the bottom part will show the key, and you can click the “Copy to file…” button.
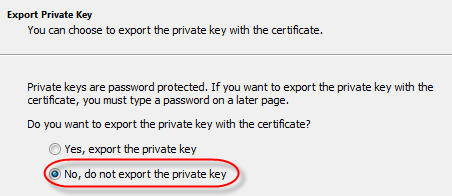
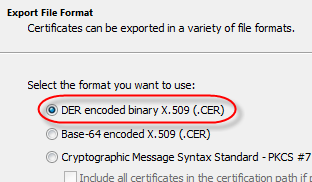
On the first wizard page, just click next. Select the default option to NOT export the private key. Click next. Select the default option “DER encoded binary”, click next. Select a location to save the .CER file, and click next. On the last page, just click the Finish button to save the file. This will save the public key to a file.
The reason we need this is a Windows Phone 7 “issue”. For security purposes, Windows Phone 7 apps can only accept certificates signed by a trusted authority. We will need to install the certificate on your windows phone device emulator for the phone to accept the certificate at all. Without it, you will get the very detailed and inspiring error message:
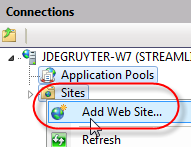
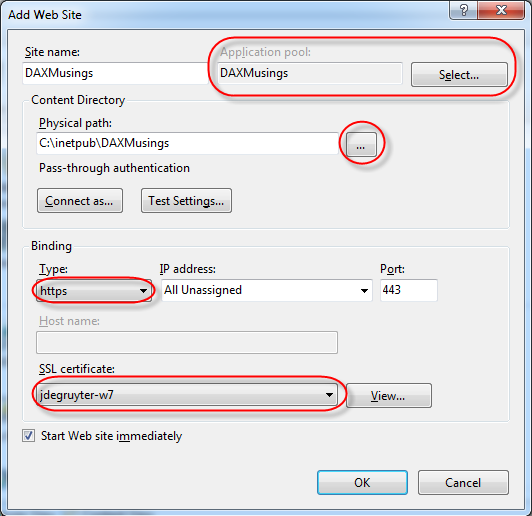
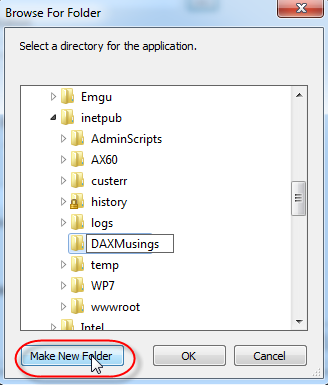
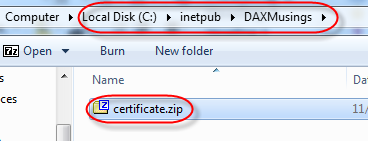
System.ServiceModel.EndpointNotFoundException : There was no endpoint listening atthat could accept the message. This is often caused by an incorrect address or SOAP action. See InnerException, if present, for more details.</i></blockquote>There is an open-source tool to install certificates on a WP7 device, but I found the easiest way to be providing the certificate file as a download on your website, so you can just download and install it on the WP7's internet explorer. As an FYI, I finally found what this error meant thanks to this blog post. Next in our IIS setup, right-click on Sites and select "Add Web Site". On the dialog, give the site a name (internal name so not an important choice), and under the "Select" button select the application pool we created previously. Under Physical Path, select the ellipsis lookup button and create a new folder. The default path for IIS sites is on C:\InetPub, so I just created a new folder "DAXMusings" underneath. If you already have a website on the default port (443), you will need to change the port. Just make sure you remember that port number, we'll need it in code later. Under "SSL Certificate", select the certificate (friendly name) we created in the previous step. Click OK. Finally in this setup, we need to put the CER file in a zip file to be able to install it on the WP7 device. Locate the .CER file we created from the server certificate, and right-click it, select "Send To", and select "Compressed (zipped) folder". If you have any other means of creating a zip file, feel free to use that instead. Move the new ZIP file (which I called "certificate.zip") to the new folder you created called "DAXMusings". I think we're finally ready to get coding!
Nov 17, 2011 - AX 2012 and TFS
Filed under: #daxmusings #bizappsDuring the beta program and even up to the last few months before the launch, I have talked a lot with Microsoft expressing the concerns and issues we were having with AX 2009 and TFS, and offering suggestions on what would ease some of the pains of the integration that existed. Unfortunately, not all of these issues have been resolved. Some are fundamental problems in the way things are architected, other issues are unique to AX compared to other IDEs that TFS integrates with. Luckily, there are nice improvements in AX 2012 as well. I will give you an overview here, and post detailed information in follow-up blog posts.
The Bad (I’m one of those people who wants to hear the bad news first)
The major issue that existed in AX 2009, unfortunately still exists today: the TFS integration in AX 2012 does NOT support multiple developers in the same environment. This is a fundamental issue that unfortunately cannot be solved easily. I’ve had numerous discussions about this with Microsoft, and there is no good solution yet. It’s part AX and part TFS that is the problem. Microsoft has come out with a whitepaper on the topic, suggesting to use public workspaces. Sad to say I had coined that idea to Microsoft back in January, but we had decided this solution would not work well. Somehow this ended up as an official whitepaper (some of the people I talked to at Microsoft were surprised about this as well). In any case, the public workspace does NOT work well. There are other workarounds (basically still the same ones I have blogged about for AX 2009) but they are not pretty. We’ve used them for quite some time now with AX 2009, and they have served us well without any problems. More on this later. The other frustrating topic is models. The beauty of models is they support the object sub-level granularity in the AOT, meaning that one method can be in one layer/model, another method on the same class can be in a different layer/model, etc. This is the basic premise for models to work: you can install a model that adds a method to a class, without needing the whole class in the model. That way you can install numerous models without having to merge the code. The TFS integration however, is file-based using XPOs. The current XPO format as it has existed in AX for a while, does NOT support this granular model. You CANNOT export just one method, you have to export the main class element with it (class properties including “extends” property etc). Yes, you can have an XPO of a class with just one method, but you’ll still have the class itself in the XPO. This effectively BREAKS the granular storage. Obviously this must have been a big consideration for Microsoft when creating the TFS integration. Since you include the class declaration itself in the XPO, how can you separate the different methods XPOs in different folders? Where will the class declaration reside? Everywhere? Nowhere? On top of that, you cannot take an export of just one method, the only “filter” available is to only export methods customized in your layer. No option to only export for a certain model (although I’m guessing Microsoft could easily add this). To “solve” the problem, AX will store the XPO in the folder of the model it was FIRST used in, and keep it there forever. So if you add a method to a never-before customized standard AX class and add it to model A, AX will place the XPO in the ModelA folder. If we now want to add another method to this class, in model B, AX considers the fact the XPO already exists, and ends up putting your model B customization in the XPO in the ModelA folder!! This effectively renders the model support in version control useless. Especially if you are wanting to automate builds, there is no more correlation between the model folders in TFS versus the actual models the code should belong to. I understand this as a fundamental problem that is not easily solved without changing the format and functionality of XPOs, so my only conclusion is that the model - TFS integration should not be used (or you put everything in one model). I gave this example with a class but it goes for any objects or changes, including forms, tables, event handlers, etc.
The Good
The TFS integration in AX 2012 now supports sub-folders. In previous releases, AX insisted on putting all the code starting at the root level in your source control tree. So if you want to do branching, this is a big issue. This was fairly easily remedied by changing every developer’s workspace settings in TFS to point to a sub-folder in the source control tree. At Streamline we have actually automated (customized) this process in AX on a developer’s first login, so it’s transparent and the developer doesn’t need to do anything. AX 2012 now supports entering a folder path in the TFS settings! The check-in dialog in AX 2012 has been extended to allow you to associate your check-in with a TFS work item. This is a great feature (one which I understand came from a Microsoft developer coding this in his spare time), although I would have liked to see support for TFS queries. Currently the query for the work items is hardcoded in a Macro in the AOT. At Streamline Systems we are extending this to have a dropdown available with your TFS queries. More on this later. The creation of the developer workspace and some other lower level TFS stuff has always been handled in assemblies. There was no way to look into or customize the behavior of how AX creates the workspaces or talks to TFS. After some discussions, Microsoft ended up putting that .NET code in the AOT as a Visual Studio project. This means if there is a need to debug or to customize the TFS proxy used by AX, you can do so in the SysVersionControlTfsFacade Visual Studio/C sharp project in the AOT.
Seems like I spent more time on the bad than the good. The main reason is I feel developers should understand the limitations of the TFS integration, and understand WHY these are big topics, and why some of those are not an easy task for Microsoft to solve. I expect we will be living with some of these issues for a while. That does not mean you cannot use the TFS integration. In fact, we use it heavily here. In the coming blog posts, I will dive into specifics of how and why these issues exist, and offer some solutions.
In other news, we are also working on new build scripts to put on CodePlex, which will be compatible with AX 2012 and its models. Keep an eye out. For general TFS and ALM information and our solutions for AX 2009, check out the TFS page.
Nov 16, 2011 - Trusted Intermediary in AIF Services
Filed under: #daxmusings #bizappsThe use of WCF as the platform for AIF in AX 2012 makes integrating relatively simple. Most recent products and programming languages support SOAP or REST services, or Odata. There is one big catch with the services in AX however… users need to be authenticated by an active directory! Obviously, this is a stumble block when considering mobile devices or cloud connections… Active Directory (AD) is usually hosted on premise behind a firewall, mobile devices probably don’t support AD authentication, and AX AIF does not support basic HTTP authentication. On top of that, in case of public services, you wouldn’t want to have to add every single user to your active directory! Fortunately, AX 2012 supports a new model, which is used for both AIF and EP, called the Trusted Intermediary.
The phrase “trusted intermediary” means you indicate that for a particular service you trust certain users or user groups enough that you allow them to impersonate another user. Basically, you trust the intermediary to have done the user authentication instead of AX. This opens up the possibility of authenticating users in your own app and, if successful, call into AX as a trusted intermediary user and run code as that authenticated user. For example, if you are building a Windows Azure site or service, you can use the built-in Azure frameworks to authenticate users against LiveId, OpenId, etc. Once authenticated you can pass that user’s ID to AX and AX will assume that you, as the trusted intermediary, have successfully authenticated and verified the user’s identity.
One could now ask, why would you need all of this? Can’t we just have one valid user in AX and run our service as that user? Well of course that works, but you would not have any of the AX security features available. Basically, your intermediary user in such a case would need administrator privileges (to support any and all requests that it could possibly get), and then YOUR intermediary service would need to filter out actions or data that the end user is not supposed to see. A lot of work, and lot of potential for security holes in your own app. With a trusted intermediary impersonating another user, AX can use the impersonated user’s AX security settings and enforce them, including XDS for example!
Of course the term intermediary implies there is something in between the end user and AX. When building a website, this is obvious, the website (which can run in an application pool identity that is a trusted intermediary) can impersonate the end user and is the intermediary between user and AX. This is how Enterprise Portal on SharePoint 2010 works with claims users. For AIF however, what does this mean? Well, it means you would need to build a service in between AIF and your end user or consuming app. We will cover the code for that in a follow-up article. In this article, I will show you how easy it is to set this up, and how to then consume this service with impersonation.
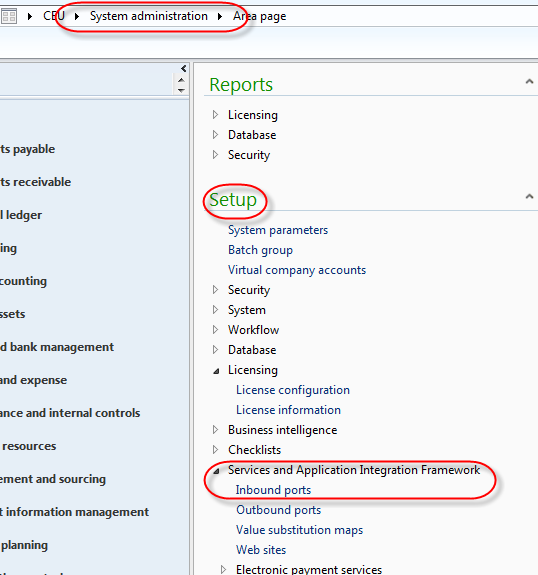
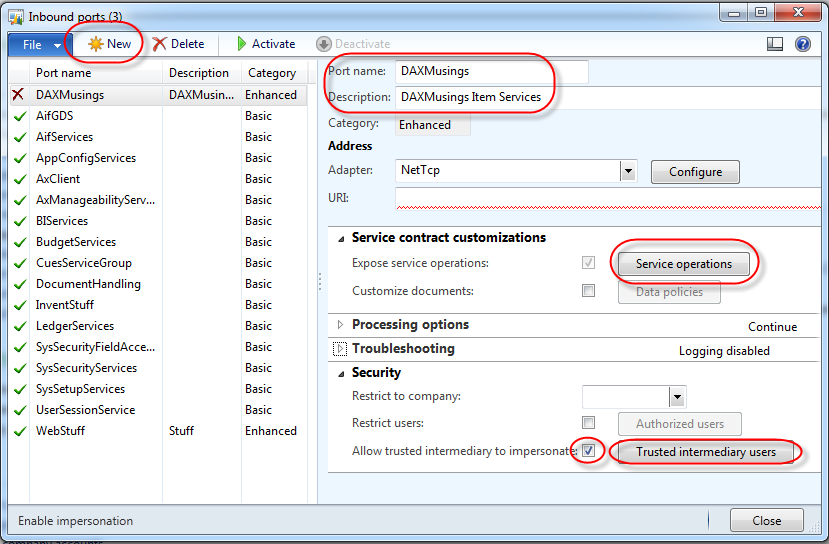
For once we will not be going into the developer workspace of AX. All we need to do is some basic setup for AIF. We’ll create an enhanced port, add some service operations, and select an intermediary user. We’ll use NETTCP so we won’t need the AIF IIS components installed. Open the inbound port definitions in the AX menu under System Administration > Setup > Services and Application Integration Framework > Inbound ports.
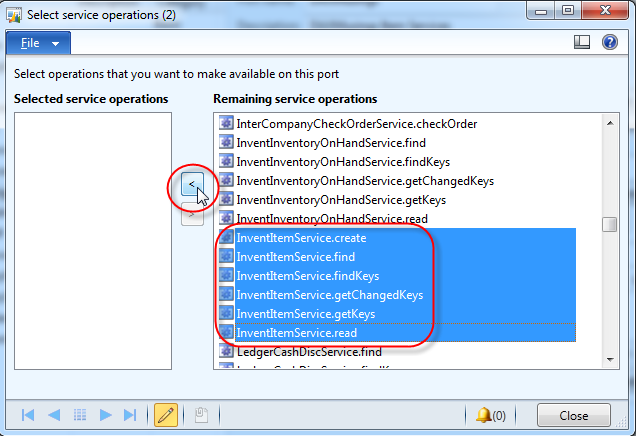
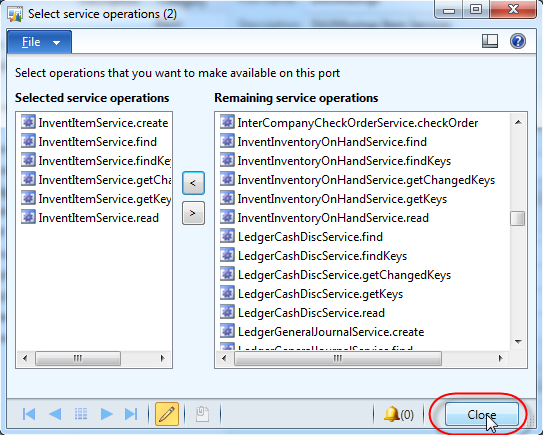
Click the NEW button to create a new enhanced port, and give it a name and description. Click on the “Service operations” button. Find the operations that start with “InventItemService.” and add then all to the list of operations for your port by clicking the “<” button in the middle. Close the screen. <div class="separator" style="clear: both; text-align: center;">
 </div><div class="separator" style="clear: both; text-align: center;">
 </div><div class="separator" style="clear: both; text-align: center;">
 </div>
Back on the inbound port screen, check the “Allow trusted intermediary to impersonate” and click the button that becomes available called “Trusted intermediary users”. For the purpose of this article, select “User” as the user type, and select your current user.
Click close on the intermediary users screen. Under the troubleshooting fast tab, enable “Include exceptions in fault”. This will output AX exceptions into the service exception, so your consuming app will actually get the AX exception message (such as “access denied” or any other exception that may get thrown). You can also enable logging if you want, I set my logging mode to “All document versions”.
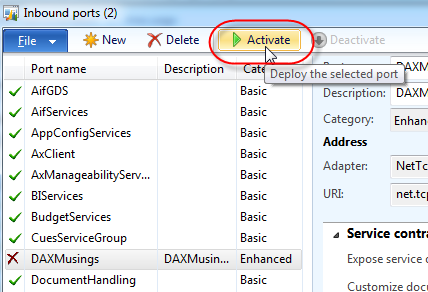
As far as the inbound port is concerned, everything is done. Click “Activate” to activate this new port. This will generate the necessary IL code and enable the port.
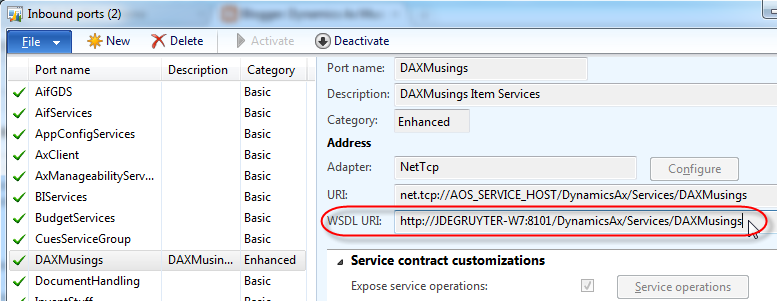
Now that the port is activated, the URL for the WSDL will appear on the screen. Write this down or copy to clipboard, we will need this later on to test the port!
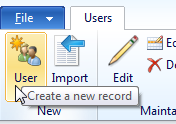
So, since we are assumed to be authenticating users outside of AX, we still need a way to setup valid AX users that don’t actually have a domain login. Go to System Administration > Common > Users and click the “User” button to create a new user.
In the “User ID” field you give the user a unique AX user id name or number. You are restricted to 8 characters there. For the “Account Type”, select “Claims user” (this indicates a non-domain user outside of AX!). The User Name field is not really important for the authentication process, but this should be the full name. Set the default company for the user. The two remaining fields, “Network domain” and “Alias” are the important ones. The network domain field for a claims user needs to be filled out, and you should put in the name of the authentication provider. It sounds more like a best practice though, you can really fill in whatever you want. For the alias, this is the actual username that will be used to log on. For a lot of authentication services these days, an email address is used, so I decided for this example to use network domain (aka provider) “DaxMusingsAuth” and alias “[email protected]” (being fully aware email addresses are not case sensitive, but it looks nice, don’t you think?).
After (!) the fields are field in, the only thing that remains is to enable the user!
The observant reader my have noticed I did not assign any roles to this claims user. And in fact, the sneaky blogger that I am, I did this on purpose! Your trusted intermediary (yourself) will have access to read the item, but this new claims user will not… This will show our calling code is actually executed as the claims user, and I also hope that proves the point that using claims users instead of just one administrator user, has clear security benefits.
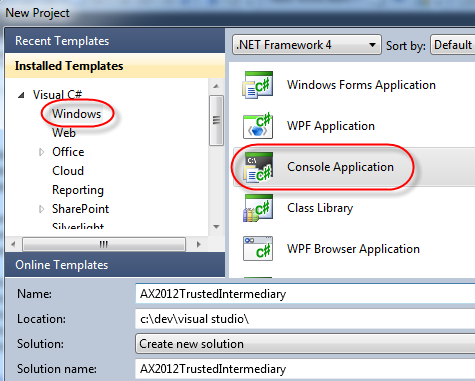
So, to test this out, we’ll create a quick console app and pretend to be [email protected]. Open Visual Studio 2010 and create a new project of type Console Application.
In your solution explorer, right-click the “References” node and select “Add Service Reference”. Enter or paste in the WSDL url from the inbound port we created earlier, and click “Go”. As a Namespace I decided to put in “ItemStuff”.
Click OK to generate the service proxies. Almost there! First we’ll ask the user to enter his username, next to enter an item number to lookup.
<pre>Console.Write("Enter username: ");
            string username = Console.ReadLine();
            Console.Write("Enter item number to look up: ");
            string itemnumber = Console.ReadLine();
</pre>
Next, we’ll create our service client to call the service, and provide the call context. The call context is where the magic happens! We specify the company, a unique message id for this call into AX (just create a quick GUID on the fly), and we pass in the user we wish to impersonate, in this case the username that was entered on the console. Note that similar to an AD username, we need to provide the provider name we filled out in the “network domain” field (I used DAXMusingsAuth), a backslash (escaped inside a string so \ in this case), and then the username.
<pre>ItemStuff.ItemServiceClient client = new ItemStuff.ItemServiceClient();
            ItemStuff.CallContext context = new ItemStuff.CallContext();
        context.Company = "CEU";
        context.MessageId = Guid.NewGuid().ToString();
        context.LogonAsUser = String.Format("DAXMusingsAuth\\{0}", username);
</pre></code>
Next we fill out the entitykeylist for the item we want to lookup, and call the service, outputting any exceptions to the console. I call ReadLine() at the end to prevent the console app from closing right away.
ItemStuff.EntityKey[] entityKey = new ItemStuff.EntityKey[1];
            entityKey[0] = new ItemStuff.EntityKey();
            entityKey[0].KeyData = new ItemStuff.KeyField[1];
            entityKey[0].KeyData[0] = new ItemStuff.KeyField();
            entityKey[0].KeyData[0].Field = "ItemId";
            entityKey[0].KeyData[0].Value = itemnumber;

            try
            {
                ItemStuff.AxdItem item = client.read(context, entityKey);

                if (item.InventTable.Length > 0)
                {
                    Console.WriteLine(item.InventTable[0].NameAlias);
                }
            }
            catch(Exception ex)
            {
                Console.WriteLine(ex.Message);
            }

            Console.ReadLine();
</code>
To see the full code, click here. That’s it! Run the code, enter username [email protected] and see what happens!
You will actually get a message that the access is denied. Feel free to try a non-existent username, and you should see a “logon failed” message.
If you want to see this work for sure, feel free to add your claims user to the system administrator or other role with access. Here’s my output:
If you enabled logging on your inbound port, you can check the logs in System Administration > Periodic > Services and Application Integration Framework > History and on the “Details” tab you will notice the “Endpoint user” showing your claims user id, and the “Submitting user” showing the trusted intermediary user.
Nov 15, 2011 - November AX news and tips
Filed under: #daxmusings #bizappsIt’s been extremely busy at work, and we’ve had the flu going around the office. It’s been a bit quiet for a few weeks on this blog, but I’m alive and kicking again. I have some very interesting posts coming up, including (yes, finally) the 10-minute Windows Phone 7 app. So get my RSS feed linked up and expect more great content. Remember all 2012 related articles are listed on the AX 2012 Developer Resources page. If you have anything you’d like to see a code walkthrough for, don’t hesitate to contact me by email or on Twitter.
Meanwhile, I’ll post a few AX news and tips I’ve picked up in the last few weeks. There’s been the AXUG summit in Las Vegas, the European Tech Conference is going on right now in Nice, France, so lots of information to share, lots of announcements.
Microsoft Dynamics InformationSource (Beta) Microsoft opened their new site called InformationSource, a portal for Dynamics Customers and Partners. Using your PartnerSource or CustomerSource logon (click “Sign In” at the top right of the page), you can access this beta site. The most notable things to me are under the “Services” section.
- Application Analysis Tool (Beta): A tool designed to assist AX developers analyze and understand the X++ code and data model
- Intelligent Data Management Framework (Beta): A tool designed to help system administrators optimize the ax database size and performance by purging and/or archiving data
- Security Upgrade Advisor Tool (Beta): A tool intended to help simplify the process of upgrading security settings from earlier versions of AX to AX 2012
- Code Upgrade Advisor Tool (Beta): A service to help developer upgrade their X++ code to AX 2012
I don’t have a lot of details yet on these, but I downloaded them today so expected more on this later! Besides the services, they have a library with videos, powerpoints and other documentation on 2012. Go check it out if you have a PartnerSource/CustomerSource login.
AX Session Language
A few weeks ago someone in our office needed to get the language id for the current session… (for reporting label purposes) Answer:<pre>new Session().interfaceLanguage()</pre>
Form Datasource in AX 2012
Form datasources in AX 2012 now have an easier way of getting their QueryBuildDatasource… so when you are in the init() method of a form datasource, setting up a query, you can get the objects using <pre>this.QueryBuildDatasource()
//and
this.queryRunQueryBuildDatasource()</pre>Since “this” is the datasource anyway, it makes sense you should be able to access the datasource objects right from it. Courtesy of Vanya Kashperuk.
Parsing a string to a real / .NET objects by reference
Parsing a string to a real value has always been an issue in AX. str2Num() just doesn’t cut it. So we decide to use System.Decimal from .NET. Unfortunately, the Parse() function throws an error if the conversion fails, even if you catch it. The other option is TryParse(), but that requires you to pass a decimal by reference, which you can’t do in X++! OR wait, YES you can in fact pass it (this work sin 2009 and 2012 both):<pre>System.Decimal decimal = new System.Decimal(0);
System.Decimal::TryParse(stringValue, byref decimal);</pre>YAY!
Debugging while using restricted roles
This other post on Kashperuk’s blog is intended to show how to debug code while using a restricted role (non-sysadmin). However, I can see other interesting uses for this for testing security. Basically, there’s a static method sysAdminMode() on the SecurityUtil class which takes a true or false to enable or disable it. Haven’t played with it myself yet, but it sounds interesting for all sorts of things. Check out Vanya Kashperuk’s blog.<pre>SecurityUtil::SysAdminMode(false);</pre>
X++ Compiler Changes in AX 2012 The AX 2012 Developer Resources page has had a link to MSDN for quite a while, but the Issues Concerning X++ blog summed it all up in a blog post.
AX Roadmap On the AXUG Summit 2011 in Las Vegas, Microsoft made some announcements regarding the roadmap of AX. Dynamics World has made a good summary which you can find right here. Bottom line is CU2 will be released before the end of the year, Feature Pack 1 (which includes the retail vertical) will be January 2012, and first quarter of 2013 will see the release of AX 2012 R2, which will include support for SQL 2012 including the exciting new BI capabilities.
Oct 21, 2011 - Get Infolog details from code
Filed under: #daxmusings #bizappsOn the Dynamics AX Community forums, the question was asked how to get detailed information on the type, message and prefixes of messages in the infolog. The original post can be found here. This type of code usually happens in modifications that need to somehow keep a log of sorts, so that the infolog details can be retrieved from somewhere even after a user has closed the infolog screen.
Well, it all revolves around containers. The infolog class has a “copy” and a “cut” method that return the contents of the infolog, in container form. The elements in the container are containers themselves, each one corresponding to a line in the infolog. So you get the container, loop over it, and for each iteration you can grab the sub-container and extract the details like the exception type, action class, helptext, etc.
I guess a code sample says more than a thousand words:
static void InfologParse(Args _args)
{
    container   infologCon, infoline;
    Exception   exception;
    int         i;
    str         message;
    str         helpURL;
    ClassName   actionClassName;
    container   actionClassOptions;
    ;

    // Put test data in infolog
    setPrefix("First Prefix");
    error("test error");
    warning("test warning");

    setPrefix("One more level");
    info("infolog!");

    // Get the infolog data and clear the messages (cut)
    infologCon = infolog.cut();

    for(i=1; i<=conLen(infologCon); i++)
    {
        infoline = conPeek(infologCon, i);

        exception = conPeek(infoline, 1);
        message = conPeek(infoline, 2);
        helpURL = conLen(infoline) > 2 ? conPeek(infoline, 3) : '';
        if(conLen(infoline) > 3 && conPeek(infoline, 4))
        {
            actionClassName    = classId2Name(conPeek(infoline, 4));
            actionClassOptions = conPeek(infoline, 5);
        }

        info(strFmt("Type: %1; Prefix: %2; Message: %3",
            exception,
            // replace the \t by / so we can see all prefixes
            strReplace(message, '\t', '/'),
            // copy the message from the last occurance of the \t to the end
            subStr(message,
                strScan(message, '\t',
                strLen(message),
                -strLen(message)) + 1,
                strLen(message))));
    }
}
</code>
Oct 20, 2011 - Consuming External Webservices in AX 2012
Filed under: #daxmusings #bizappsFor those of you who have read my post on the Windows Azure App, may recall my shortcut for fixing the missing bindings and other app.config settings. I’ve been meaning to dig into this further and come to a solution, but for the Azure post being constrained by my promised “10-minute app” I stuck with the ugly solution. Recently I was talking with the MSDN team about AIF related articles they are wanting to do, and I brought up this issue. They pointed out they had not seen this issue and asked if I had followed the whitepaper on consuming webservices. Now, there’s not necessarily a lot to it, but in looking over the whitepaper I found one tiny little thing, which makes a world of difference and solves my issue: AIFUtil class! This sparked the idea of doing a follow-up on this, and due to a late night conversation on Twitter related to this I figured I really need to get this on my blog. The issue as I’m about to explain is a .NET fact and not an AX 2012 issue per se. In fact, as you’ll see, AX 2012 has a way to fix the issue.
For this code walkthrough, I will use a free online web service for a currency converter. You can find the WSDL at http://www.restfulwebservices.net/wcf/CurrencyService.svc?wsdl. In case you this link is down by the time you read this, or if you just want to try something else, check XMethods for other free available web services online.
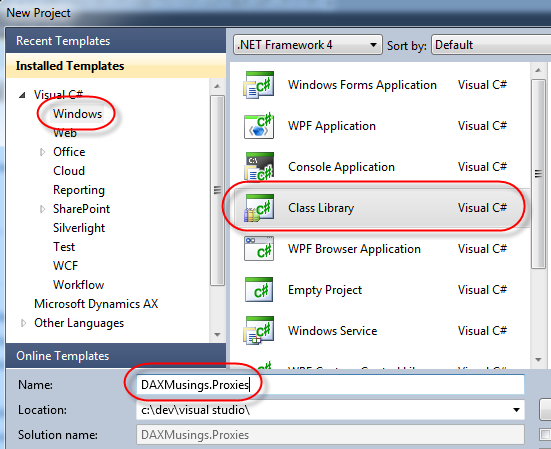
To get started, we’ll create a new Visual Studio 2010 Class Library project, which I will name DAXMusings.Proxies
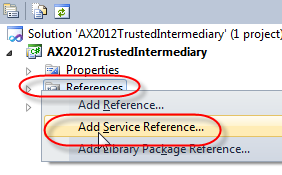
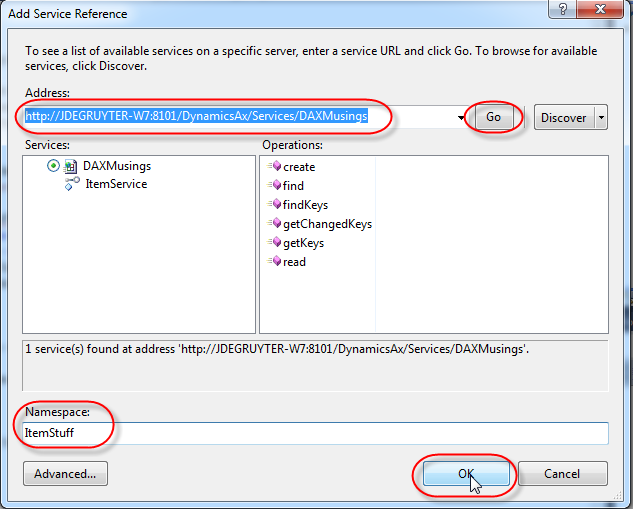
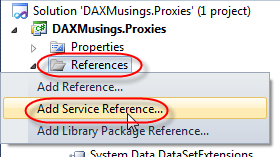
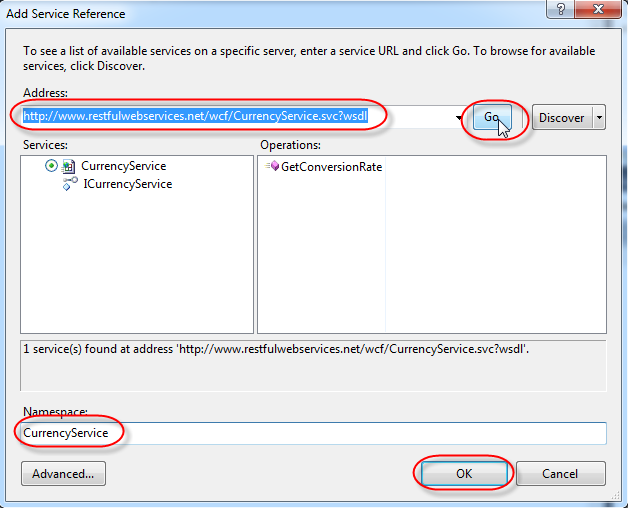
Next, we add a service reference. Right-click on the References node in your solution and select “Add Service Reference”. In the address field, type our service URL http://www.restfulwebservices.net/wcf/CurrencyService.svc?wsdl and click “Go”. In the Namespace field, type “CurrencyService”. Click OK to generate the proxies.
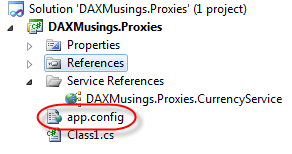
Besides the proxy classes being generated by Visual Studio, it also puts all the web service bindings and information in the app.config file of your project. You can open it by double clicking on the app.config in the Solution Explorer.
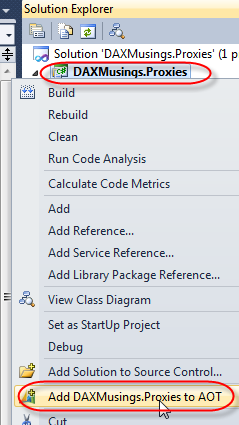
Now, when an application loads a config file, it looks for the application’s executable name and .config at the end. So on the AX client the Ax32.exe.config gets loaded. On the server side, Ax32Serv.exe.config file. Of course, our code is in the app.config, which is not helpful, it will never be loaded. Let’s see what happens. On the project, right-click and select “Add DAXMusings.Proxies to AOT”.
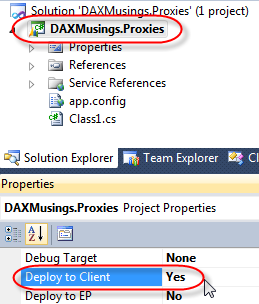
Next, in the properties of the project, set the “Deploy to Client” property to “Yes”.
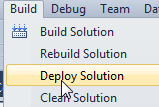
Save the project and click Build / Deploy Solution. This will build and deploy your solution to the AX client.
Next, let’s open the AX client. If you still had the client open, close it first and re-open. To do a quick and dirty test on the client, let’s create a new job. If not open yet, open a developer workspace using CTRL+SHIFT+W. In the AOT, right-click and select New > Job.
In the code, we’ll just create an instance of the service client, and call the service:
static void Job7(Args _args)
{
    DAXMusings.Proxies.CurrencyService.CurrencyServiceClient  service;
    DAXMusings.Proxies.CurrencyService.Currency currency;
    System.Exception ex;

    try
    {
        service = new DAXMusings.Proxies.CurrencyService.CurrencyServiceClient();
        currency = service.GetConversionRate(
            DAXMusings.Proxies.CurrencyService.CurrencyCode::USD,
            DAXMusings.Proxies.CurrencyService.CurrencyCode::EUR);

        info(strFmt('%1', CLRInterop::getAnyTypeForObject(currency.get_Rate())));
    }
    catch(Exception::CLRError)
    {
        ex = CLRInterop::getLastException();
        info(CLRInterop::getAnyTypeForObject(ex.ToString()));
    }
}
Now, if you try to run this service, you get the error “Object ‘CLRObject’ could not be created”. Not very helpful, and trying to catch a CLR Exception won’t work either. If you look in the Windows Event Viewer, all you’ll find is a warning that Dynamics AX is unable to load your assembly’s config file. I’m unsure how to actually get the exception details in AX, so if anyone knows let me know. What I’ve done to get this, is basically create a static method in Visual Studio that I can debug. The error message I got out of that is:
Could not find default endpoint element that references contract 'CurrencyService.ICurrencyService' in the ServiceModel client configuration section. This might be because no configuration file was found for your application, or because no endpoint element matching this contract could be found in the client element.
So yes, the is the actual issue at play. The endpoint is in the app.config (in the output it becomes DAXMusings.Proxies.dll.config, check your user folder under AppData\Local\Microsoft\Dynamics AX\VSAssemblies where assemblies are deployed… check my blog post on Assembly deployment) and not in the config file of the executing host for our class library (AX32.exe.config).
And that is exactly what AIFUtil fixes! Change the code to the following:
static void Job7(Args _args)
{
    DAXMusings.Proxies.CurrencyService.CurrencyServiceClient  service;
    DAXMusings.Proxies.CurrencyService.Currency currency;
    System.Exception ex;
    System.Type type;

    try
    {
        type = CLRInterop::getType('DAXMusings.Proxies.CurrencyService.CurrencyServiceClient');
        service = AifUtil::createServiceClient(type);
        //service = new DAXMusings.Proxies.CurrencyService.CurrencyServiceClient();
        currency = service.GetConversionRate(
            DAXMusings.Proxies.CurrencyService.CurrencyCode::USD,
            DAXMusings.Proxies.CurrencyService.CurrencyCode::EUR);

        info(strFmt('%1', CLRInterop::getAnyTypeForObject(currency.get_Rate())));
    }
    catch(Exception::CLRError)
    {
        ex = CLRInterop::getLastException();
        info(CLRInterop::getAnyTypeForObject(ex.ToString()));
    }
}
And yes, that one works! If you look into the createServiceClient() method, you’ll notice it actually loads the class library’s config file. Nice! Problem solved!!
So, as a final note, on Twitter the question was asked, how do I differentiate between development and production? First I didn’t get the question, but I get it now. If you are calling a custom service you’ve made, you may have a version of the service for development, and a separate version for production. Of course, the class library points to one and only one URL. So how do we make it point to different places in different environments without changing the code between the environments?
Change the config file? This would work, but the class library’s config file is stored in the model store and downloaded by the client/server. It can’t be changed unless it’s changed in the AOT, the Visual Studio project is rebuilt, at which point the client/server will download the new version from the model store. So, you could copy/paste all the app.config settings into the AX32(serv).exe.config file and change it there. Then you won’t need to use the aifUtil::createserviceclient. In any case, this is very impractical, especially for services running on the client side!
We can just go the AX route, and store the URL in a parameter table somewhere. Then, at runtime, we change the end point address with the following code (replace the hardcoded the localhost url with a parameter).
static void Job7(Args _args)
{
    DAXMusings.Proxies.CurrencyService.CurrencyServiceClient  service;
    DAXMusings.Proxies.CurrencyService.Currency currency;
    System.ServiceModel.Description.ServiceEndpoint endPoint;
    System.Exception ex;
    System.Type type;

    try
    {
        type = CLRInterop::getType('DAXMusings.Proxies.CurrencyService.CurrencyServiceClient');
        service = AifUtil::createServiceClient(type);
        //service = new DAXMusings.Proxies.CurrencyService.CurrencyServiceClient();
        endPoint = service.get_Endpoint();
        endPoint.set_Address(new System.ServiceModel.EndpointAddress("http://localhost/HelloWorld"));

        currency = service.GetConversionRate(
            DAXMusings.Proxies.CurrencyService.CurrencyCode::USD,
            DAXMusings.Proxies.CurrencyService.CurrencyCode::EUR);

        info(strFmt('%1', CLRInterop::getAnyTypeForObject(currency.get_Rate())));
    }
    catch(Exception::CLRError)
    {
        ex = CLRInterop::getLastException();
        info(CLRInterop::getAnyTypeForObject(ex.ToString()));
    }
}
That’s all I got. Have fun with your SOA architecture! And as usual, this walkthrough was added to the other ones on the AX 2012 Developer Resources page!
Blog Links
Blog Post Collections
- The LLM Blogs
- Dynamics 365 (AX7) Dev Resources
- Dynamics AX 2012 Dev Resources
- Dynamics AX 2012 ALM/TFS
Recent Posts
-
GPT4-o1 Test Results
Read more... -
Small Language Models
Read more... -
Orchestration and Function Calling
Read more... -
From Text Prediction to Action
Read more... -
The Killer App
Read more...
 Menu
Menu
