Microsoft Dynamics 365 / Power Platform - page 7
Sep 14, 2012 - Windows 8 RTM running SQL2012 and AX2012
Filed under: #daxmusings #bizappsSo, being a Microsoft partner has its advantages, including getting early hands on the RTM version of Windows 8. So, I finally upgraded from Windows 8 Release Preview and installed Windows 8 RTM.
I figured I’d share my experience on getting AX 2012 installed locally (AOS and client). No major issues, just a few tweaks. I’ll try and install AX 2012 on a Windows Server 2012 soon as well, I’m expecting it to be similar to my Windows 8 install experience. I had a few issues that are SQL 2012 specific and not necessarily Windows 8, but I’ll point those out as well.
Prerequisites:
Pretty much all of the prerequisites can be configured or downloaded using links from the prerequisite screen of AX. There are two issues:
1) For SQL 2012 - you still need the Data Management Objects for SQL 2008 R2, even if you have the 2012 versions installed. Just click on the download link the prerequisite installer gives you and install those. I also installed the CU2 update for SQL 2012, I’m not sure if that is a prerequisite of any kind but updating never hurts, I figured.
2) For Windows 8 - the Windows Identity Foundation components are needed for AX. In Windows 8, those are not available for download but are actually a “Windows Feature” you need to turn on. Open your start screen, and type: windows features. In the search pane, click on the “Settings” button to show apps in the settings category. This will bring up the “Turn Windows features on or off” link.
So, getting on to the actual install. For both Windows 8 and SQL 2012, you want to make sure you slipstream CU3 into your installer. Whether you’re using FPK or RTM as a base, either will work with CU3.
Take the UNMODIFIED (ie the ISO from Microsoft or an extracted version that has NEVER been run… the setup will update itself when run, and I’ve seen issues with it having been updated prior to the CU3 being put in). If you have the ISO, extract it to a folder. Download CU3 from Microsoft and extract the “DynamicsAX2012-KB2709934.exe” extractor into the “Updates” folder of your AX installer. The following screenshot shows you what the folder tree should look like, and what contents should be where. Note that I renamed the KB extracted folder to include (CU3) at the end. The name of the folder doesn’t matter at all, so I added this for my sake.
Now you’re ready to run the installed. You may want to take a copy of the install files with the slipstreamed CU3 first, to avoid future issues. Personally I downloaded a free tool called “ISO Recorder” to convert the folder back into an ISO, to have a clean, read-only copy.
The prerequisites configurations should all work just fine, besides the two mentioned above. The installer should work as expected from here on.
Note I had one unrelated issue initially. I have the Windows Azure SDK installed which also includes a tool called “Web Deploy 3.0”. When installing the AOS, it errors out trying to create the Microsoft Dynamics AX Workflow event log, as it clashes names with the Micosoft Web Deploy (apparently the system name for an event log only has 8 significant characters, which means anything that starts with “Microsoft” will clash). I uninstalled the web deploy tool from add/remove programs. I’m guessing this is also an issue on other versions of the Windows OS. The actual error I got was: “Only the first eight characters of a custom log name are significant, and there is already another log on the system using the first eight characters of the name given. Name given: ‘Microsoft Dynamics AX Workflow’, name of existing log: ‘Microsoft Web Deploy’”. I re-installed the Web Deploy 3.0 tools after AX was done installing and that was no issue.
Sep 3, 2012 - New release of AX TFS Build Library Beta (v0.2.0.0)
Filed under: #daxmusings #bizappsI’m glad to (finally) announce a major update to the TFS Build Library on CodePlex. Besides some fixes and additions, the major feature/issue resolution everyone was waiting for is included: Visual Studio Projects import. There are multiple ways to accomplish this, but we found this is the only way (autorun.xml) that seems to work with a variety of different VS projects. I’ve talked about that before in this article.
Note that there is one refactor that will break any workflows you may have in use! Please see the release notes below. If you are using the template that was provided in the previous release, just replace with the new sample template and you’ll be good to go.
Release notes:
There is one refactor of code that will break your existing workflows. The AOS workflow step to stop/start AOS now expects the actual windows service name, not the port number of the AOS. There now is a new step to retrieve server settings, which can get the service identifier based on the port number. The registry has to be read to retrieve these settings, and we didn’t want to keep that code in multiple places. The sample workflow file provided in this release fixes this issue, so if you use the sample you will be ok.
This release addresses several major issues that arose from using the library on daily basis. Among the fixes (not limited to):
- Missing label folder resulted in error
- Labels did not always show up correctly (AOS issue where label files on AOS bin need to be deleted)
- Visual Studio Projects could not be imported
- Split system classes in separate import at the very end to avoid system stability issues
Also some new features:
- Allow overwrite of manifest description (not used in sample 2012 workflow file)
- Allow install of dependent models (not used in sample 2012 workflow file)
Aug 30, 2012 - Explaining Table Indexes from a SQL Point of View
Filed under: #daxmusings #bizappsAs part of the MVP club, we get to network with MVPs in other products in the Microsoft world. So, after some recent discussions within our development group at Sikich, I decided to get an official explanation on a few index properties to get a more technically accurate and concise explanation. (For the record, we did know what these properties mean, but it wouldn’t make for good reading. :-)) So I emailed a fellow MVP, Dan Guzman, who has been a SQL MVP for 10 years!
My first question to Dan is more a lead-in into the next question. I asked Dan: “What is the difference between a clustered and non-clustered index?”
SQL Server implements relational indexes as b-tree structures consisting of multiple index levels. These levels form a hierarchy consisting of a single root node at the top of the hierarchy, zero or more intermediate levels below, and finally the index leaf nodes at the bottom with one entry per row. Each index node points to a node in the next lower level in the hierarchy. SQL Server traverses an index hierarchy during query execution to efficiently locate a row by key rather than scanning the entire table from beginning to end. SQL Server also maintains indexes pages in logical key order using previous/next pointers. This allows SQL Server to use indexes to return data in key sequence without sorting the data. In the case of a non-clustered index, the index leaf nodes contain the index key plus a unique row locator that points to the corresponding data row. With a clustered index, the index leaf node is the actual data row, which is why a table can have only one clustered index. Every table should typically have a clustered index and the best choice for the clustered index for a given table depends on your queries.
Considering that, what is the difference between a primary key and a clustered index?
All ANSI-compliant relational databases support primary keys. A primary key specifies one or more columns that uniquely identify a row. A table can have only one primary key, consisting of one or more not-null columns that uniquely identify a row in the table. SQL Server creates a unique index on the primary key column(s) to enforce uniqueness. Like all indexes, the primary key index can be used by SQL Server to optimize query performance and you have the choice between clustered or non-clustered. SQL Server will create a clustered index for the primary key unless a clustered index already exists on the table or you specifically specify a non-clustered primary key.
My third question is a question I have been asked quite a few times because this is a new feature in our Dynamics AX 2012 environment: What are indexes with included columns?
Included columns are additional non-key columns stored in non-clustered leaf nodes. Included columns are applicable only to non-clustered indexes because clustered index leaf nodes are the actual data pages and therefore already include all non-key columns. A technique sometimes used to improve query performance is a covering index. A covering index is one that contains all columns needed by a query, thus avoiding the need to read the actual data row. Indexes with included non-key columns allow an index to cover a query. Consider the following query with a non-clustered index on DepartmentCode: SELECT DepartmentCode, FirstName, LastName FROM dbo.Employee WHERE DeparmentCode = ‘HR’; SQL Server will use the non-clustered index on DepartmentCode to locate the employees for the HR department and then read the corresponding employee data row for each employee in order to get the FirstName and LastName values needed by the query. By adding FirstName and LastName as included columns to the DepartmentCode index, SQL Server can use the DepartmentCode, FirstName and LastName columns in the index leaf nodes and avoid touching the data row entirely.
Jul 31, 2012 - Checking Country-Specific Feature Settings from Code
Filed under: #daxmusings #bizappsLast week I posted about the country-specific features in AX 2012. We looked at creating fields that are country-specific, and how those relate to either your legal entity, or another party entity specified on another field in the table.
What prompted me to write about this feature was actually the opposite problem. I had some generic code that was looping over tables and fields, but users complained the code was showing tables and fields they had not seen before. Turned out those were country-specific fields and tables. When checking configuration keys, there are easy functions to test those (isConfigurationkeyEnabled). Unfortunately, there is no such functional to test for country-specific features… so, time to code!
The metadata classes DictTable and DictField have been updated to give you the two properties we’ve set in our previous article, namely “CountryRegionCodes” (listing the countries) and “CountryRegionContextField” (optionally listing a field for the region context).
First things first. Remembering the setup we did, the field or table specifies a list of country ISO codes. The country/region of the “context” is considered as a RecId of a DirParty (global address book) entity record. So, we’ll need a function that finds the ISO code of the primary address of a DirParty record…
public static AddressCountryRegionISOCode getEntityRegionISO(DirPartyRecId _recId)
{
    DirParty party;
    LogisticsLocationEntity location;
    AddressCountryRegionId regionId;

    party = DirParty::constructFromPartyRecId(_recId);

    if (party)
        location = party.getPrimaryPostalAddressLocation();

    regionId = location ? location.getPostalAddress().CountryRegionId : '';

    return LogisticsAddressCountryRegion::find(regionId).ISOcode;
}
This will return an empty string if the party, the party’s primary address, or the ISO code cannot be found. You could place this method on the Global class to make it a global function.
Next, we’ll create a method to check if a table is in fact enabled in our current context (this means checking the regular configuration key as well as the country-specific settings, if they are used). Since there is potential for the function needing the actual record (in case of a table specifying a context field), we require an actual table buffer as input to our function. Note that the “getCountryRegionCodes()” method of the DictTable class doesn’t return a comma-separated list as specified in the properties, but parses it out into a container of ISO codes.
public static boolean isTableCountryFeatureEnabled(Common _record)
{
    DictTable dictTable = new DictTable(_record.TableId);
    boolean isEnabled = false;
    DirPartyRecId partyRecId;
    // First make sure we found the table and it's enabled in the configuration
    isEnabled = dictTable != null && isConfigurationkeyEnabled(dictTable.configurationKeyId());

    // Additionally, check if there are country region codes specified
    if (isEnabled && conLen(dictTable.getCountryRegionCodes()) > 0)
    {
        // If a context field is specified
        if (dictTable.getCountryRegionContextField() != 0)
        {
            // Get the Party Rec Id Value from that field
            // TODO: could do some defensive coding and make sure the field id is valid
            partyRecId = _record.(dictTable.getCountryRegionContextField());
        }
        // If no context field is specified
        else
        {
            // Get the Rec Id from the legal entity
            partyRecId = CompanyInfo::find().RecId;
        }

        // Call our getEntityRegionISO function to find the ISO code for the entity
        // and check if it is found in the container of region codes
        isEnabled = conFind(dictTable.getCountryRegionCodes(), getEntityRegionISO(partyRecId)) > 0;
    }

    return isEnabled;
}
The function will return true if the table is enabled in the current context or if the table is not bound to a country/region. Note that this code uses the “getEntityRegionISO” function created earlier. If you are not adding these to the Global class, you will have to reference the class where that method resides (or add it as an inline function inside the method). Finally, we want a similar function that tests an individual field.
public static boolean isFieldCountryFeatureEnabled(Common _record, FieldName _fieldName)
{
    DictField dictField = new DictField(_record.TableId, fieldName2id(_record.TableId, _fieldName));
    boolean isEnabled = false;
    DirPartyRecId partyRecId;

    // First make sure the table is enabled
    isEnabled = isTableCountryFeatureEnabled(_record);
    // If that checks out, make sure we found the field and that is enbled in the configuration
    isEnabled = isEnabled && dictField != null && isConfigurationkeyEnabled(dictField.configurationKeyId());

    // Additionally, check if there are country region codes specified
    if (isEnabled && conLen(dictField.getCountryRegionCodes()) > 0)
    {
        // If a context field is specified
        if (dictField.getCountryRegionContextField() != 0)
        {
            // Get the Party Rec Id Value from that field
            // TODO: could do some defensive coding and make sure the field id is valid
            partyRecId = _record.(dictField.getCountryRegionContextField());
        }
        // If no context field is specified
        else
        {
            // Get the Rec Id from the legal entity
            partyRecId = CompanyInfo::find().RecId;
        }

        // Call our getEntityRegionISO function to find the ISO code for the entity
        // and check if it is found in the container of region codes
        isEnabled = conFind(dictField.getCountryRegionCodes(), getEntityRegionISO(partyRecId)) > 0;
    }

    return isEnabled;
}
The function behaves similarly to the table function, and in fact it calls the table function first. Note that this means the code depends on the “isTableCountryFeatureEnabled” and the “getEntityRegionISO” functions created earlier. If you are not adding these to the Global class, you will have to reference the class where that method resides (or add it as an inline function inside the method).
So now, feel free to test these methods on our previously created fields. Sure hope it works =)
Jul 26, 2012 - Creating Country-Specific Features in AX 2012
Filed under: #daxmusings #bizappsOne of the new features in Dynamics AX 2012 is the country-specific features. In previous releases, country-specific features were available through configuration keys. Configuration keys however are global, meaning when turned on those features appear in all companies in your Dynamics AX environment.
In Dynamics AX 2012 these configuration keys are still there, and you still can disable/enable these configuration keys. However, to avoid confusion in legal entities that are in other countries, a new feature will make the user interface “adapt” to the country your legal entity is in, or, depending on the setup, the country of the data you are working with.
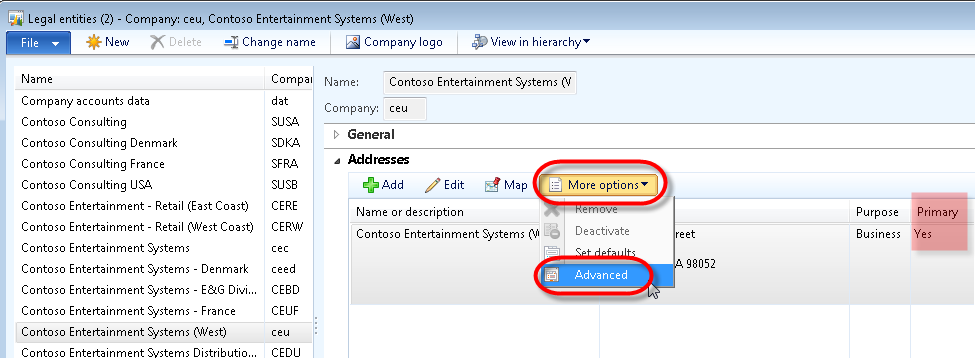
Let’s create some code to illustrate this functionality and how it works. First, my setup here is using the Contoso Demo Data. I’m the “CEU” legal entity. Since the country features will look at that entity’s primary address country by default, let’s make sure we know what it is. Go to Organization Administration > Setup > Organization > Legal Entities. In the Addresses FastTab, select the primary address and click More Options > Advanced.
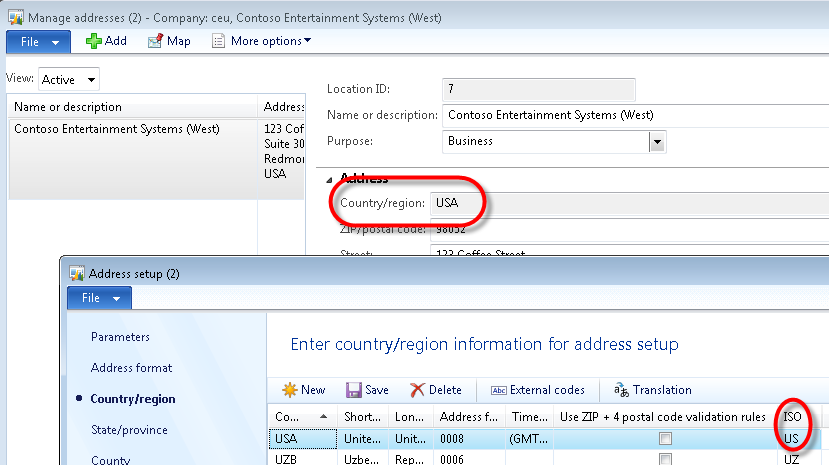
On the Country/region field, right-click and select “View Details”. The reason we go through all of this is that the country-specific features use the country ISO codes, so you want to make sure you capture the correct ISO code for the address. In my case here, the address uses “USA” as the country, but the ISO code is “US”.
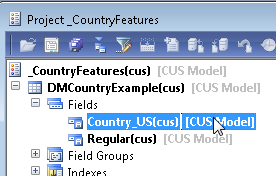
Let’s dive into the code. We’re going to create a table with 2 string-type fields. One regular field, one field that is tied to the country features. To shorten the exercise I won’t bother with data types or labels, but of course you should always use those in your code! :-)
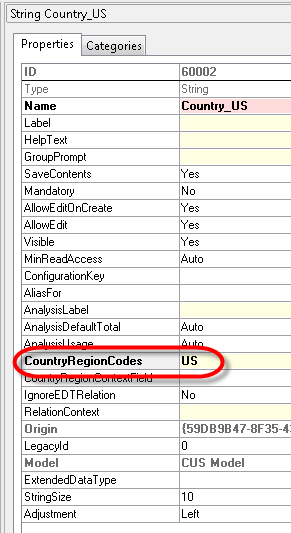
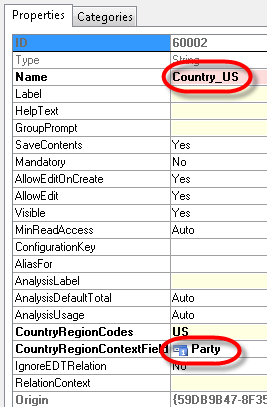
Right-click the Country_US field and select “Properties”. On the properties window enter US in the CountryRegionCodes property. Note that you can specify a comma-separated list of ISO country codes in case you need the field in multiple regions.
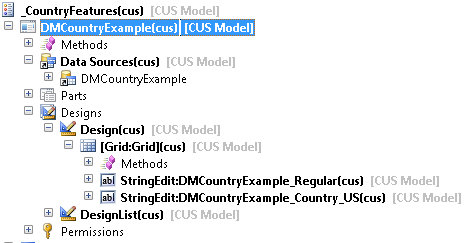
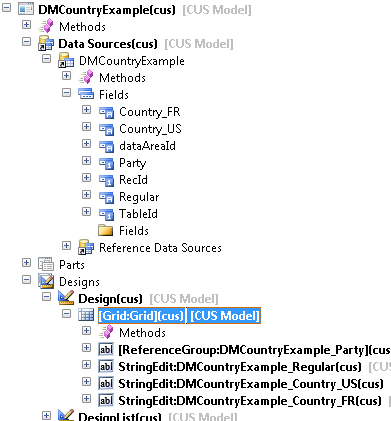
Next, we’ll create a form for this table. I just added a grid and put the two fields on it. I dragged my table onto the “data sources” node, and from there dragged the two fields onto the grid. You gotta love MorphX drag and drop.
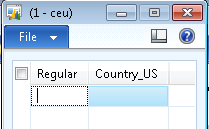
Now when I open the screen in my US company, as expected, here’s what it looks like:
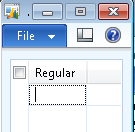
However, when we open this screen in for example CEUF, which is a French demo company, here’s what the screen looks like:
In this case, the field we added uses the legal entity’s country ISO code to determine visibility of the field. However, we can make this a bit more dynamic by explicitly specifying what is called a “Context Field”. By default, the context is the legal entity (and it’s primary address’ country) the form is running under, however, we can create a field on the table that will indicate the context on a record-by-record basis. To demonstrate this, let’s add a field indicating a “party” (yes, global address book!) the record is for, and a second country-specific field, this time for France.
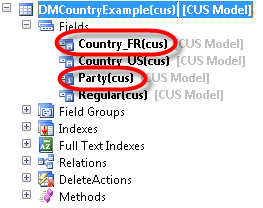
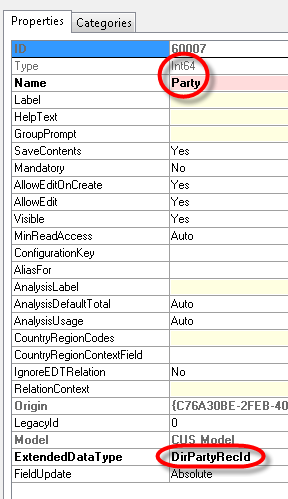
First, add an Int64 (recid) field to indicate the “entity” (aka party) and a new field that will be France-specific.
On the Party field, select the extended data type “DirPartyRecId” (make sure your field is Int64 type). This will also prompt you to add the relation to your table. Say yes, as this will enable the alternate key lookup.
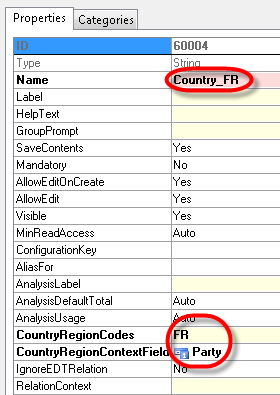
For the new Country_FR field, make sure to set the “CountryRegionCodes” property to “FR” and select our new Party field as the “CountryRegionContextField”.
Next, change our original Country_US field to use the new CountryRegion field as the context, by setting the “CountryRegionContextField” property on that field to “Party”.
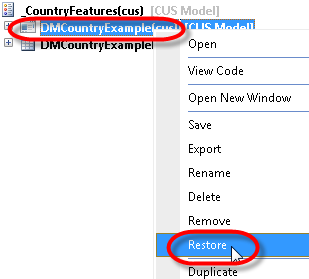
Finally, we’ll need to add both fields on our form. First, you need to refresh the form to pick up the newly added fields on the table. In case you don’t know, the quickest and easiest way to accomplish that is to right-click the form and select “restore”. This will also reload the table and make the new fields available. Open the Data Sources node and expand the DMCountryExample table… drag the new fields onto the grid in the design. By dragging the Party field, you will automatically get the ReferenceGroup added. If you are manually adding controls to the grid, make sure to add the reference group for the Party so you get the alternate key lookup correctly.
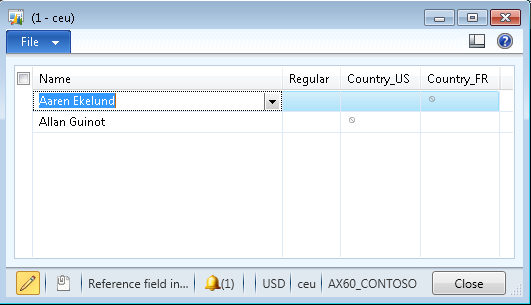
So now for the grand finale… Let’s open the form and add two records, one with a US party, one with an FR party. You may have to go through your parties and find USA and FRA records, or perhaps add a primary address to one of the parties and set them so you know they work.
This is what that looks like in a US company:
If you would blank out the Name for one, both fields will show the n/a symbol.
And of course, in the French company, this screen looks exactly the same, as the fields are now tied to the party and no longer to the default of legal entity!
Jun 26, 2012 - Builds: Importing Visual Studio Projects into AX
Filed under: #daxmusings #bizappsI have received some really great feedback on the beta release of the AX TFS build library, and obviously also some reports of issues.
Since we heavily rely on TFS and builds here at Sikich, we are obviously facing these issues on a daily basis, and are trying to come up with different approaches to overcome these issues. The biggest issue we’ve faced so far is the importing of Visual Studio project into AX, which is what I’d like to talk about in this post.
When using source control, Visual Studio projects - as opposed to other objects in the AOT - are not stored in the source control tree as XPO files, but rather as their actually Visual Studio files (.cs files etc). This has some great advantages, however it becomes an issue when these projects need to be imported back into AX, based on the source control tree (in our case, during a build). Now, AX does support the exporting of VS projects from the AOT as XPOs. So, first thing we tried was creating XPOs from VS project files. This involves some minor “wrapping” of the files with XPO “tags”, and for binary files the hex-text encoding of those binaries into a text-based XPO. We were successful in doing this, and the XPOs import just fine into AX, however there are certain types of VS projects that create sub-folders (eg for service references and their datasources). And although these “XPO-encoded” VS projects import fine from the UI, they somehow fail to import from the command-line import that we use for builds. We’ve actually tried to command-line import an XPO that AX generated, and even that did not work… (the project does not show up in the AOT, and the import log shows an error “Unable to find appropriate folder in the AOT for this element” and “unknown application object type”). There are other methods to import code though. For example, using autorun.xml files. However, when we tried this it resulted in the exact same behavior. Since there is different behavior between UI and command-line import, I will report this issue to Microsoft.
If you think about it, the “synchronize with source control” feature in AX somehow is able to get the VS project files out of source control and import them back into AX, so there has to be a way… And indeed, there is: \Classes\SysTreeNodeVSProject::importProject() This static method is able to import a VS project and all its files directly, without the need to convert to XPO! And static methods can be called from an autorun.xml file, so we have a solution!
Once that was done, we were facing the next challenge… The way we are importing the combined XPO using command-line, AX is instructed not to do a compile when done. The reason for this is that AX actually does a full AOT compile, and doesn’t just compile the elements being imported. But, it also skips compiling the imported objects, and so the import of the VS project works, but the VS project cannot be built if it relies on proxies for classes that were imported (but not compiled). When you then run a full compile, the X++ classes will not compile because of the missing assemblies (assuming you are using your VS project in X++ somewhere of course). So this seems like a vicious circle; even if your code is not circular in reference, the compiles will fail (perhaps multiple compiles in row will eventually work, but how much total time will that take?). Bottom line, it would help tremendously if the X++ artifacts being imported would compile during import… The only way we seem to be able to do that, without a full compile, is using autorun.xml again!
So basically, we now have a need to use autorun.xml to instruct commands to AX, rather than a straight-up command line call to ax32.exe. In itself this is not an issue, but of course we were not using autorun in the build scripts at all, up to this point.
End result is a change in workflow (and change in philosophy a little bit perhaps) to use autorun XML files.
Coming soon to a CodePlex update near you.
May 10, 2012 - Announcing: AX TFS Build Library
Filed under: #daxmusings #bizappsAs you know I started a project on CodePlex last year, sharing our internally built scripts to automate builds for AX 2009. Obviously with the release of AX 2012 and new ways to release AX code (models!), we had to change our build scripts.
And with change comes the opportunity for improvement. We have taken the build process a step further and created workflow code activities for use with the TFS 2010 build server. If you want to dive into it, check out the beta release on CodePlex. Note this is a beta release, and particularly the AX 2009 code is not tested thoroughly.
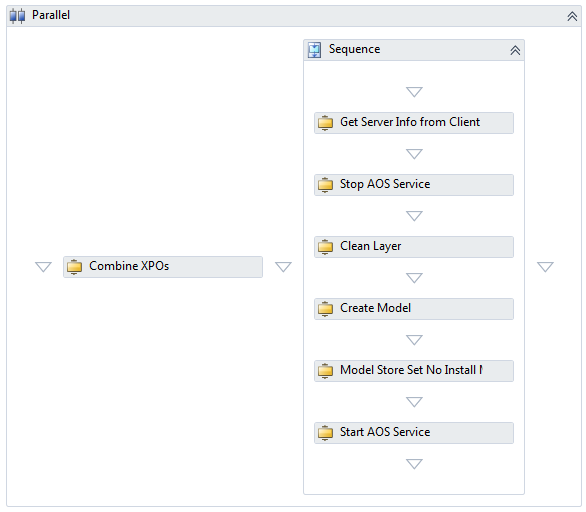
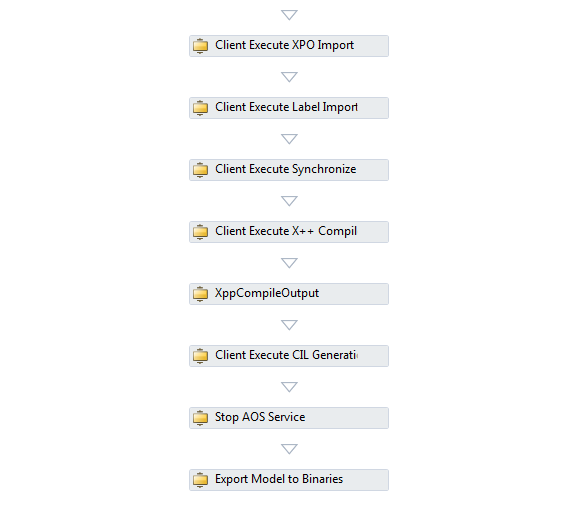
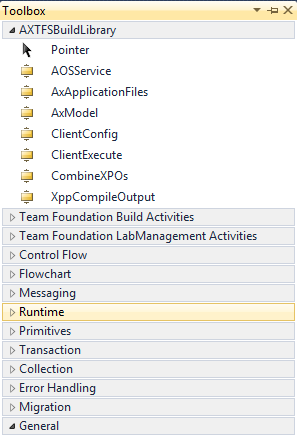
What does this mean, code activities? Once loaded (see below), you can drag-and-drop Dynamics AX build activities in your workflow, and compose your own build template. Below screenshots from the AX 2012 build script included in the beta release.
This release includes the following code activities you can include in your build scripts:
There is a lot to talk about on this topic, including more documentation on how to use these activities. For now, feel free to download and try out the sample build template included! To be able to use these activities, you need to add the assembly DLL file to your source control on TFS somewhere, and point your TFS build controller to that server path, as explained in this blog post under “Deploying the Activity”.
Stay tuned for more documentation, information, tips and walkthroughs on automating your AX builds!
May 4, 2012 - AxUtilLib.dll Issue with .NET 4
Filed under: #daxmusings #bizappsI ran into the following issue, which is now reported and recognized as an official bug by Microsoft.
When you use the AxUtilLib.dll assembly from a .NET 4 project, you can manage models from code. However, the DLL file is built against .NET 2.0 runtime. This poses no problem as those assemblies can be run in the .NET 4.0 runtime. However, when you export a model using this library in a 4.0 runtime, the exported model will be a.NET 4.0 assembly instead of a 2.0 assembly. When you then try to import this model using the powershell cmdlets or the axutil command line utility, you receive the following error message:
ERROR: The model file [filename] has an invalid format.
When you try to view the manifest of the model file, you get the following error message:
ERROR: Exception has been thrown by the target of an invocation.
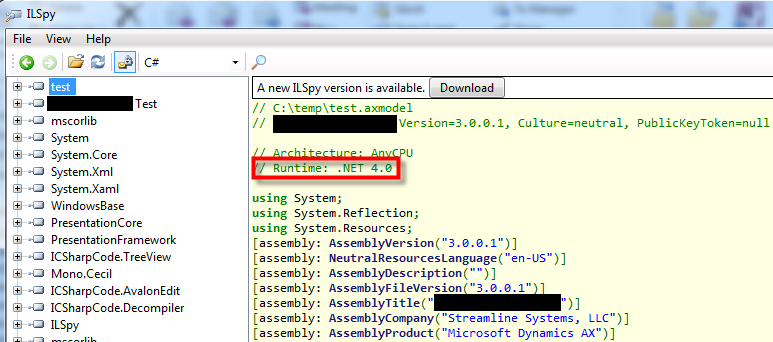
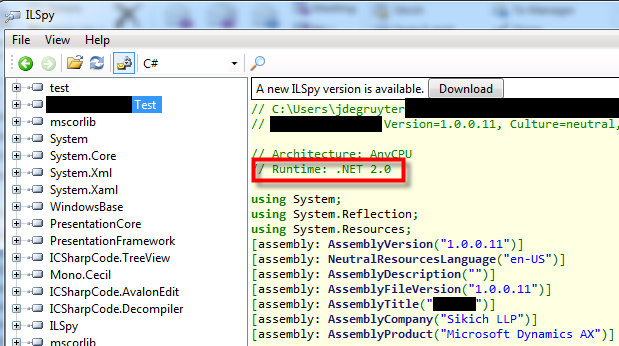
When you open the axmodel file using ILSpy (remember the axmodel files are actual assemblies), you will notice that the model is a .NET 4.0 assembly, whereas a “good” model is .NET 2.0:
You will see the same behavior if you use the 2012 PowerShell cmdlets from PowerShell 3.0 (currently in beta). There is currently no fix for this, the only workaround is to use the command line utilities. Note that all other features work perfectly, including importing the model.
Apr 30, 2012 - Changing a Model Name When Using TFS on AX 2012
Filed under: #daxmusings #bizappsOne of the challenges we recently faced was renaming a model on an AX 2012 system that is hooked up to TFS. As it turns out, it’s not a big deal, really.
- Make sure everyone is off the system, shutting down the AOS may be a good idea too.
I’m not certain how much trouble you would be in changing the model while the AOS is running or someone is on the system, but at the very least you want to avoid issues with the TFS paths.
- Rename the model folder in TFS (optional).
Open up Visual Studio, browse to the model folder in source control and rename the model folder. Now, keep in mind that technically the name of the folder in TFS does not have to match the name of the model (although I find it much more intuitive of course).
- Edit the model.xml file in TFS to reflect the new name.
I’m not entirely certain what AX uses the model manifest for after it’s been created, but we use it in our build scripts, and it’s probably just good bookkeeping to changing the name everywhere.
- Edit the vcsdef.xml.
the vcsdef.xml file resides in the Definition folder of your source control tree, and maps model names to folders in your source control. This comes back to the point that the folder name does not necessarily have to match the name of the model. The vcsdef.xml file has a
- Use AxUtil or the powershell cmdlets to change the name property of your model.
Using AXUTIL: axutil edit /model:MYMODEL /manifest:Name=MyModelNewName
Using PowerShell: Edit-AXModelManifest -Model MYMODEL -Property “Name = MyModelNewName”
Optionally you can also used the updated model manifest file to update the model store to the new name.
- Make sure you pull all the updated TFS stuff into your local AX workspace.
Depending on where you launched Visual Studio to make the changes, and depending what workspace you were using there, the vcsdef.xml file (and new folder name, model.xml, etc) may not be updated in the repository that your AX client is using. Make sure you pull the latest changes down!
- Restart AOS and AX 2012 won’t realize anything happened at all.
Log into AX and you shouldn’t have any problems with your renamed model.
Mar 16, 2012 - Blog Update and Convergence
Filed under: #daxmusings #bizappsI realize it’s been longer than usual for another update to appear on this blog. Don’t fear, there is more to come! We are experiencing the surge in demand due to the AX 2012 release, and our offices are buzzing like never before. To make things even more busy, I’ve become a first time father on March 1st, so there is even less time to write articles. Don’t worry, the content will start coming in again soon!
And of course… next week is Convergence! For those not attending, make sure you watch the keynote on the Convergence website to see where things are at, and where they’re going. For those who are attending, make sure to check out the computer labs for walkthroughs, demos and some good hands-on with the product. Several MCTs, including myself, will be supervising the labs to make sure you are getting started ok, and answering questions where possible. Make sure to come check us out. We will be together with the Microsoft AX support and product groups, so you have everything in one place…
See you in Houston! If you’re going to be there, let me know.
Blog Links
Blog Post Collections
- The LLM Blogs
- Dynamics 365 (AX7) Dev Resources
- Dynamics AX 2012 Dev Resources
- Dynamics AX 2012 ALM/TFS
Recent Posts
-
GPT4-o1 Test Results
Read more... -
Small Language Models
Read more... -
Orchestration and Function Calling
Read more... -
From Text Prediction to Action
Read more... -
The Killer App
Read more...
 Menu
Menu
