All Blog Posts - page 14
Jul 20, 2011 - AX 2012 Models & Events Part3: The Power Combo!
Filed under: #daxmusings #bizappsIn the conclusion of this 3-part blog article, I will finally get to my point. We will walk through the event code and models and create an example where we have two models that both touch the same table, the same form AND the same method (by means of handlers). In the end, we will import both those and they will install themselves, without any merging necessary. They can be used independently, or together. Hopefully you will understand the needed change in thinking and designing code to make this possible.
Part 1: Model Architecture Part 2: Events Part 3: The Power Combo
So, let’s get down to business. We will create two models (separately, one at a time), each will add a new field to the CustTable table, each will add that field to the customer details screen, and each will add code to the validatefield method on the custtable. We will create one model, do the customization, remove the model, create the other model, do the customization, then import the old model back in. If the promise of models and events holds, and if we create our customizations the right way, we can add and remove these models in whatever sequence we want, as many times as we want, and there will be no merging necessary at all. Just a plain old install, as if you would install an app on your phone.
If you are attempting this walkthrough on the public beta, there are potential issues. Remember that is a pre-release which is 5~6 months older than the version I have created this exercise on. If there are issues with the beta, please let me know in the comments. And be patient and try again when RTM is released (we’re getting close!).
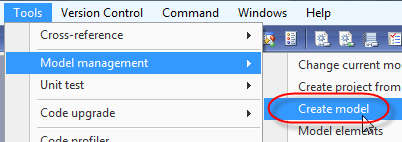
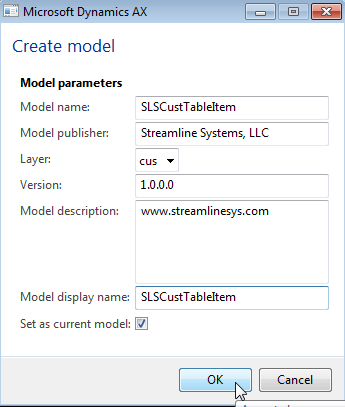
Each layer in AX 2012 has a default model. For VAR, this would be the “VAR Model”, CUS is the “CUS Model”, etc. So first thing we need to do, regardless of what layer you are test this in, is create a new model so we can separate our code. Open AX in the developer workspace (add “-development” in your client configuration or use shortcut CTRL+SHIFT+W in the regular mode to open the developer workspace). From the Tools menu, select Model Management / Create Model.
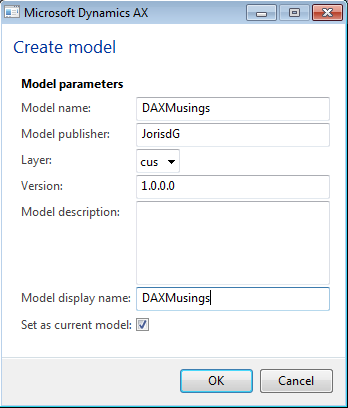
Enter the information of the model. You don’t have to copy my settings exactly, just make it unique enough, our next model will need a different name (and remember what is what). I decided to name this first model DAXMusings after my blog, and the publisher is myself. Make sure to give it a display name as well, and set it as your current model. As opposed to layers, you can change “active” models on the fly (only within the layer you’re logged into, though).
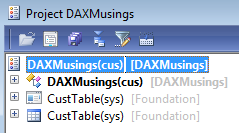
You will get a nice infolog message indicating your model was created successfully. Other ways to create a model is from the command line using the AXUTIL command-line tool. If the tool is not in your path, it’s located on your server, in the 64-bit program files under “management utilities”. Remember though this is a separate item in the AX 2012 installer. Next up, we’ll create a new project and drag the CustTable table and CustTable form into it. We will also create a new class, which, to keep it easy, I will also call DAXMusings.
Ok, so here’s the story. We will add a field on the custtable to contain a project number (string extended data type “ProjId”). We will validate that field to make sure the project status is “In Process” (granted, this is a silly, useless example, but for the sake of the exercise, let’s pretend it’s business critical!). Traditionally, we would add code to the validateField method on the CustTable. This would be a one-liner calling a method somewhere else, or we would just add all the code in there, doesn’t matter. However, in AX 2012, we can segregate our customization easily by using a pre/post handler. In that case, come the next hotfix rollup or AX release, we need not be concerned about “upgrading” our over-layered method, because it won’t be over-layered at all. And, as we will see here, when we install another model that also needs to hook into the validateField, we can just install it without investigating both code sets and merging. So, let’s get down to it. First, we add our field. To avoid more conflict, we will prefix our customization objects with DM (for DAX Musings). Add the field DMProjId, and set the extended data type to “ProjId”.
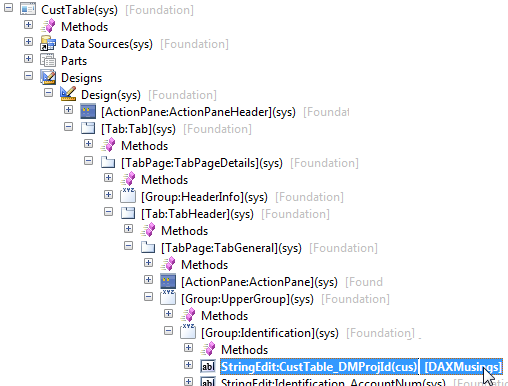
We will add this field on the CustTable form, on the general tab. It doesn’t really matter where you put it, the point is we’re customizing the screen by adding it.
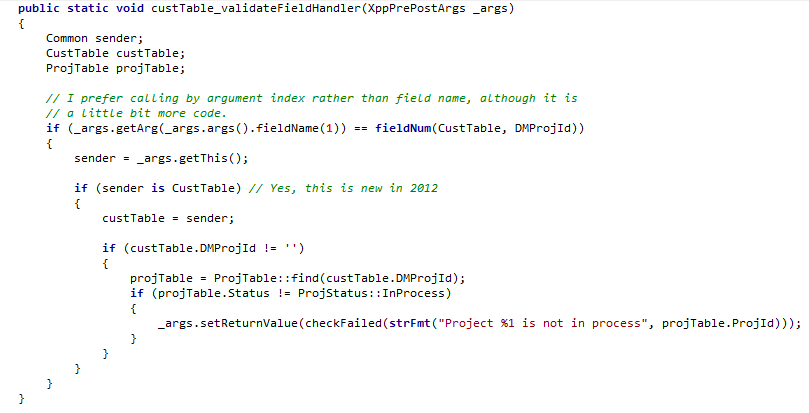
Next, we will add a pre/post handler method to attach to the CustTable.validateField method. We will use the standard pre/post handler, since that allows us to change the return value. In case of the validateField, changing the return value makes sense. By default, it will return true, and if one of the validations fail it will set the return value to false. So, if we (and consequent other handlers) don’t touch the return value unless we want to set it to false, it doesn’t matter what order handlers subscribe (let that sink in - I’m making sense, really). I will spare you the details on the code I’m writing. You can just either set the return to false or true to speed this up, I’m still trying to maintain the illusion of a useful mod here.
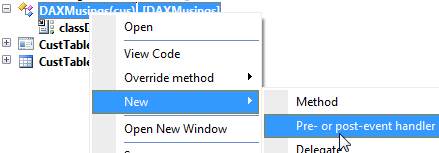
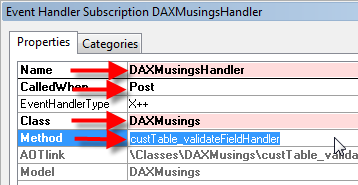
To hook up this method, drag&drop the method onto the validateField method of the CustTable, or right-click the validateField method and select “New Event Handler Subscription”. Make SURE to rename the subscription to a unique name, and set the “CalledWhen” property to “Post” (if you select pre, the return value will be reset to the default TRUE of the original validatefield method!).
Feel free to open the CustTable form and test the validation. Trust me, it works! :-) Great, so now we have our DAXMusings model. Let’s export this to an AxModel file, and remove it from our system. To do this, open up a command prompt or powershell (I prefer the latter after discovering the joys of powershell). We will use AXUTIL to export, and then remove the model.
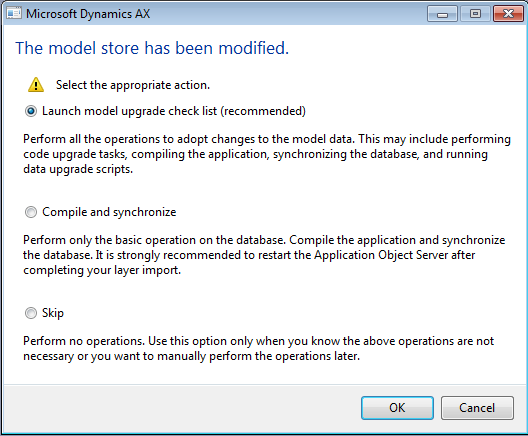
The tool will ask you to restart the AOS (think: indexing of objects/layers). After you restart the AOS and fire up your AX client again, you will get a prompt asking you to synchronize and compile. Obviously, you should. In our case, the table needs to drop a field, and the validateField method of the CustTable table needs to be recompiled (remember the pre/post handler is compiled as if it were part of the original method, so a recompile is definitely needed here - weird and bad things happen otherwise).
So, now that we’re back to a virgin AX with foundation, let’s repeat the steps. This time, we’ll sneak in some clandestine advertising for Streamline Systems in our model name and description. As a field, we’ll add an item number (string extended data type “ItemId”) and validate that it does not have an alternate item number (field AltItemId should be blank on the InventTable). Otherwise, we’re pretty much repeating steps here (fast forward the screenshots!).
Add a field Set the Extended Data Type to “ItemId” Create pre/post handler method on the new class Subscribe the new method to the validateField on CustTable Add the new field to the CustTable form
Alright. Now that that’s over, think about what we are about to do. We have an installed model customizing the CustTable, adding a field to a form, and performing a validation in code by adding code, but by using pre/post handlers rather than actually modifying the base code. So, let’s put this new architecture to the test and install our old DAXMusings model back into this same environment.
Now, restart the service, and let’s fire up AX. Again, it will prompt about model changes. Synchronize and compile people (seriously, compiling is an absolute must here)! So now, before you test the mod, what do you think will happen?
YES! Success! (admittedly, I was sweating a little bit… all this typing, imagine if this hadn’t worked).
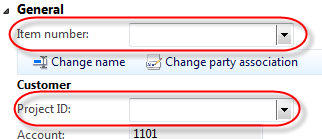
Open the CustTable form… Both the fields are there!
Try to pick an item with an alternative item (3004 in demo data). Try to put in a project not in process. (if you are getting unexpected results… did you compile?)
Enjoy the power of this new architecture. If you have doubts, feel free to import/export these models in other environments that haven’t been customized at all. You can also try to ACTUALLY customize the validateField method, you will notice it is independent of the handlers attached to it (proving the upgrade point, if standard AX modifies lower level code).
Hope you enjoyed the series. Please leave me a comment, or send me some feedback using the contact form!
Jul 19, 2011 - AX 2012 Models & Events Part2: Events
Filed under: #daxmusings #bizappsIn this 3-part series I will let you in on the power of the 2012 model architecture in combination with events. There is a paradigm shift in regards to customizations and even ISV code that will make life so much easier, provided everyone uses this new model. To that end, I will talk a bit about models, events, and then put it all together and SHOW you the advantage. The originally article kept getting bigger and bigger, so I decided to split it up in three parts, I will publish one every day.
Part 1: Model Architecture Part 2: Events Part 3: Full Walkthrough (with code and screenshots)
AX 2012 introduces the concept of events (whitepaper is available on Microsoft’s Download Center - for a list of all available 2012 documentation see my June Documentation round-up post). For those of you familiar with C# you will realize that delegates are a great concept, but they require the base functionality to have these delegates (for those unfamiliar, delegates are event “hooks” the application exposes). I counted the number of delegates in the RTM release of AX 2012, and there are about 100 (which is not a lot yet, considering the application has around 5 million lines of code). Chances are your customizations will want to subscribe to places, or make modifications to, code that doesn’t provide any delegates. Peter Villadsen and his team thought about this, and introduced a concept of pre and post-handlers. This basically allows you to “subscribe” your code to any method in the application, without having to modify the standard application code to make that call. For the sake of customizations, I will talk about these pre/post handlers, and not delegates. The principles are similar enough. I will have another article on delegates altogether, since there are some interesting details to them. In any case, pre-post handlers come in two flavors: the “lightweight” handlers, and the other handlers that don’t have an official name (yet?). Let’s call them original handlers (one could argue they should use some opposite term of lightweight, but let’s not go there). Let’s start with the original handlers. They are always static methods (since pre-post handlers can only be attached in the AOT, as opposed to delegate handlers that can be subscribed at runtime), obviously public (remember, new methods in AX 2012 will be explicitly declared “private” by default), and no return type (=void), and accept an object of type XppPrePostArgs.
The XppPrePostArgs object is the juice of the meat. This gives you access to the arguments passed into the method you’re subscribing to (using getArg() or args()), the return value being returned from the method you’re subscribing to (getReturnValue()), and it has a method getThis() which returns the instance of the object that fired the event. Of course, you can modify the arguments being passed in, and modify the return value of the original method. But here’s the thing! Technically, it is not guaranteed in what order the event subscribers will be called. This is because it depends on the order in which code is imported, models are installed, etc. So changing the return value (in post-handlers) or arguments (in pre-handlers) is possible, but since you are not guaranteed to be the last person to touch these values, it is not guaranteed that nobody will overwrite your values. Since changing the return value cannot be guaranteed, it becomes a little less useful. On top of that, accessing arguments through the args() or getArg() methods is not the safest thing. You either access the arguments through index or through name (ugh), which you won’t know works until runtime. Because of these limitations and potential issues, lightweight handlers were invented. They are lightweight in the sense that they do not provide a means to change the arguments (but you can read them - and remember certain types are passed by reference so technically you can change them), no means to change the return value, and no means to retrieve the object instance the event was thrown from. Unfortunately, the latter makes the lightweight handlers handicapped to a certain extent. All in all, depending on your situation, you will find that either one will support you in your endeavors. It’s a powerful feature. To finish the quick introduction (without spoiling the next article), to hook up the subscriber, you either drag your subscriber method and drop it on the method you wish to subscribe to. Or you right-click the method you wish to subscribe to and select “New Event Handler Subscription”.
Note that the “subscription” itself (the node in the AOT) carries a name property. Make sure to give this a unique name. Also in the properties, you can denote the subscription to be pre or post, and in case you wish to write the code in managed code, you can, by setting the EventHandlerType property to “Managed”. In that case, make sure, for the class name, to include the full assembly name as well (eg: MyCompany.MyProject.MyClass).
There are two major things you need to know to appreciate this pre/post handler feature even more: 1) The “subscription” (the link between the original method and your subscriber method) has an AOT node, and is stored in the layer/model separate from the original code (so giving it a unique name is of the essence!) 2) The compilation of the original method will “append” the call to your handler to itself - this means no “lookup” overhead at runtime (if you think about this, it will answer any questions you may have around database transactions, exceptions, etc… consider the pre/post handler as if they were calls to your method at the very beginning, or very end, of the method you’re subscribing to).
The key here is number 1 though, the fact that the subscription is stored separate from the original method. This is in fact the number one reason for the power of the events and models combo!
Next: Part 3: Full Walkthrough (with code and screenshots)
Jul 18, 2011 - AX 2012 Models & Events Part1: Model Architecture
Filed under: #daxmusings #bizappsIn this 3-part series I will let you in on the power of the 2012 model architecture in combination with events. There is a paradigm shift in regards to customizations and even ISV code that will make life so much easier, provided everyone uses this new model. To that end, I will talk a bit about models, events, and then put it all together and SHOW you the advantage. The originally article kept getting bigger and bigger, so I decided to split it up in three parts, I will publish one every day.
Part 1: Model Architecture Part 2: Events Part 3: Full Walkthrough (with code and screenshots)
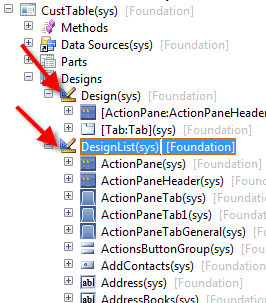
In this first article, we need to learn some basics about models. The standard layering system as we’ve known it for years still exists. This means, when you modify an existing object, it gets copied into the layer you are working on, and your changes will be saved there. This means the existing object is still intact in its original lower layer, but AX uses its index to execute the object in the highest layer it can be found in. There are however some interesting changes in AX 2012 even on that front. Certain objects such as reports (which only exist in AX 2012 for backwards compatibility) and forms, used to get copied into your working layer, in their entirety. This meant, even if you just added a method or control to a form, or move a control to a different tab, the whole form was over-layered. This opposed to classes, where adding or changing a method only puts THAT particular method in the higher layer, not the whole class with all of its methods. This has been changed in AX 2012. Forms are now over-layered on a control and method level. This is achieved by giving each control a property that indicates what parent it is attached to. This means AX can now keep track of each control. If you move it, the control still exists, it just changed its parent property. So when you add a new control, it is the new control that gets put in the higher layer. For customizations, this is already a blessing, making it much easier to merge customizations, merge a customization with a hotfix rollup, etc. This also means in the AOT you can now see your traditional tree-view design, or you can look at the flat list of controls. This may be necessary in situations where controls get “orphaned” (the parent control is removed). There are some strategies when importing to deal with these situations.
So, back to the models. They are basically compartments within each layer. An object exists in one or more layers, and in EXACTLY one model per layer. Let that sink in. The immediate question then becomes: what good does it do if an object can only exist in one model per layer? Well, there’s a few things. For one, since we no longer have AOD layer files to move, we can export models from a layer to a binary format, and move (export/import) those between environments. This has the added benefit we don’t have to move the whole layer, but logically segregated pieces of code, such as one custom module at a time, or certain third-party apps that are installed in the same layer. Models have an extension of .axmodel, and can be signed (like assemblies) to ensure integrity and authenticity when distributing. The “import” (aka installation) of a model can be done using powershell or regular command line, or you can create a custom installer package to install the model. Of course models can be “uninstalled” in the same fashion. All that is required is a restart of the AOS (think rebuilding the index in previous versions). When you then open AX, it will prompt you with a warning and some choices related to compiling, synchronizing, etc.
I can see you wonder (yes, this blog enables your webcam so I can see you wondering) how this is going to work. Sure, you say, forms are now granular to a control-level, but still… when it comes to code, multiple mods may be touching the same piece of code. This will require merging on install, and it will mean the object/method is one model or the other, which makes model moves useless, since I’ll have to move them all, or resume my old-school XPO practices and merge on import.
AHA! You hit it now. Thank you for leading me to the point of this article series. Events provide the missing piece to the puzzle.
Next: Part 2: Events
Jul 6, 2011 - Generic Unit Tests for Dynamics AX in Visual Studio
Filed under: #daxmusings #bizappsA little while ago, I blogged about unit testing and integrating this with TFS builds. We have this running currently, but with some drawbacks. We basically wrap each X++ unit test method in a test method in C#, which reads the AX unit test XML results file and either throws an error or passes the test. As Dave Froslie pointed out to me, there is such a thing as “generic tests” in Visual Studio. This is basically a means to invoke an external process, which can then generate a summary results file in .TRX (xml) format. That of course would be a much more efficient way of doing this. Seeing that AX has “listener” classes, which can subscribe to the unit test framework’s output, all we need to do is create one that writes the TRX format that Visual Studio is expecting…
I have created the listener and it’s up for download on the AX Build project on CodePlex. In this post I will describe how to set up the generic test in Visual Studio 2010. This process works for both AX 2009 and AX 2012. The code is the same, but make sure you download the right XPO from CodePlex (AX 2009 doesn’t like the AX 2012 XPO format).
For a quick overview on how to create unit tests in AX, please check out the following pages on MSDN for AX2009 and AX2012.
For the purpose of this walkthrough, we’ll assume you have an X++ test project containing your tests (aka “test suite”). Let’s also assume this project is called “TFSGenericTestProject”. Replace with the name of your actual unit test project in AX.
First, download the SysTestListenerTRX class for AX2009 or AX2012 from the AX Build CodePlex project. Import the class into AX. This implements the TRX format for a unit test “listener”. A listener is a class AX unit tests use to output their results. TRX is the result file format which generic unit tests in Visual Studio can read. Feel free to open these, they’re basically XML files. To make the generic unit tests work, all you need is the class. The enum you’ll need if you want to run the TRX listener when running unit tests inside AX, but is not necessary for the TRX listener to work.
AX unit tests can be run from a command line. You can start the AX client as usual (either using the default config in the registry, or by passing a config file as the first command line argument. Furthermore, you can pass “RunTestProject” as a startup command, followed by an underscore, followed by the name of the AX unit test project. The syntax for this is a little strange perhaps:
-StartupCmd=RunTestProject_TFSGenericTestProject
Where “TFSGenericTestProject” is the name of your test project in AX. Now, the parsing of these arguments get even more interesting. The class that runs the unit test project supports two more arguments; one that supplies the name of the listener, and any subsequent arguments will be passed into the NEW method of your listener (the TRX listener’s NEW method accepts an optional filename). The listeners are all called SysTestListener_NAME, and it’s that “name” you need to pass as an argument. So, putting this all together, to start AX using a configfile.axc, run our TFSGenericTestProject with the TRX listener, and output the file to c:\unittest.trx, you would use the following command line:
Ax32.exe "configfile.axc" -StartupCmd=RunTestProject_TFSGenericTestProject@TRX@C:\unittest.trx
Now, if your filename/path contains spaces, you will need to wrap the whole thing in quotes. Since the -StartupCmd and the consequent class names etc are considered 1 argument, you would have to wrap it from start to end, as such:
Ax32.exe "configfile.axc" "-StartupCmd=RunTestProject_TFSGenericTestProject@TRX@C:\my folder with spaces\unittest.trx"
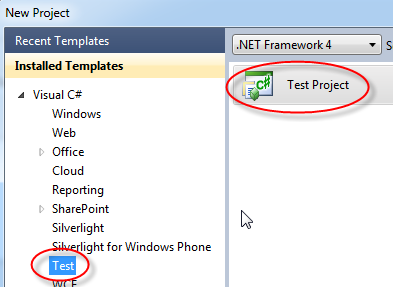
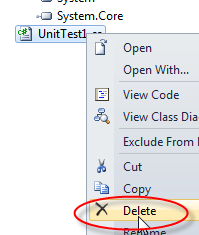
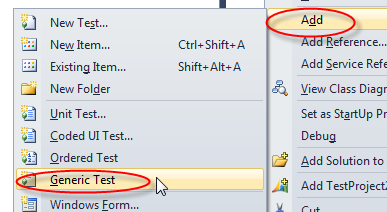
Ok, so now we’re ready to create our Visual Studio generic test project. If you already have a solution (.sln) for your TFS project (which you will if you’re using builds), you will add a new project to the existing solution, don’t start a new solution. For the new project, select the Test template / Test Project. This will actually create a new test class for you, but we do not want to use this, so go ahead and delete that UnitTest1.cs file. Right-click your project again, and select Add / Generic Test.
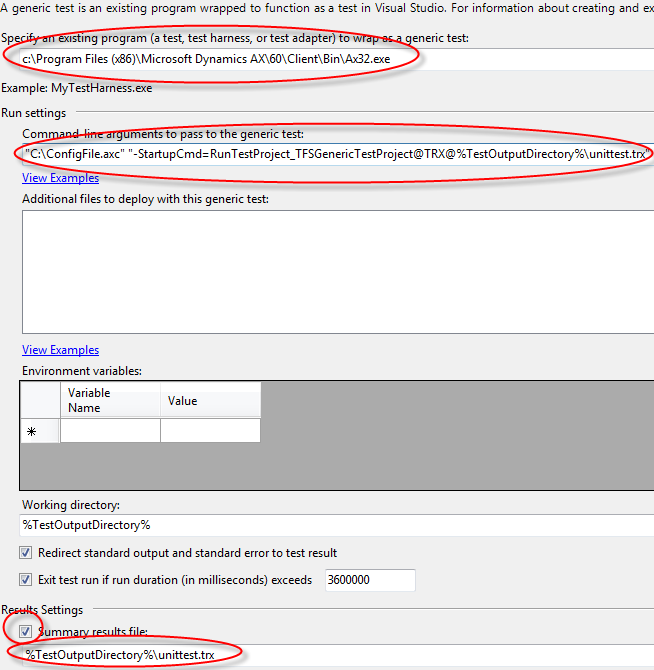
As the existing program we wish to wrap, enter the path to your AX client (Ax32.exe). The command-line arguments are the arguments we talked about earlier, except one difference. The generic test supplies a variable for the test output directory, which we can leverage for our summary results TRX file. The only thing we want to change is the result settings, where we can specify the filename/path of the TRX file. Also note there is a time-out feature (this can be useful in case your ax client can’t connect to the AOS).
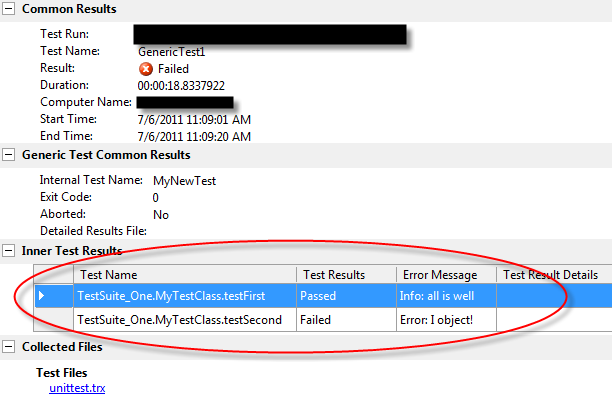
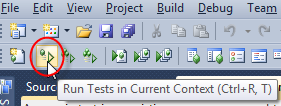
Once you have this setup, you’re DONE! Assuming you actually have an AX unit test project called “TFSGenericTestProject”, you can now run this test, and you will see it open AX, run the tests, close AX, and Visual Studio will show you the results of your tests. Double-click on the test results at the bottom to see a break-down of your methods, with their results and the messages associated with them.
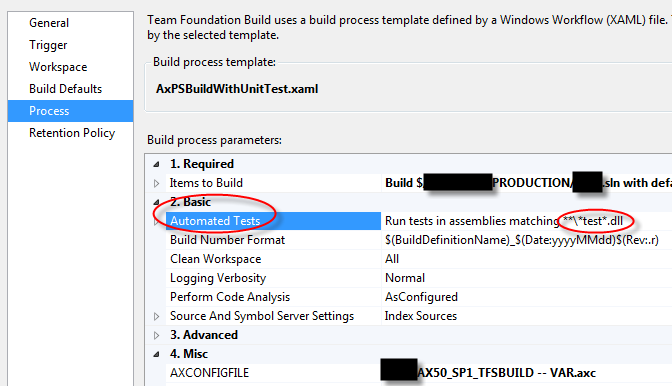
The test project should be automatically included in your TFS builds if you’re using that, assuming you added the test project to the build solution, and it contains “test” in its name. In your build definition under “Process” you will find a section under Basic that runs the tests based on names containing test.
Jun 30, 2011 - AX 2012 Documentation Round-up (June 2011)
Filed under: #daxmusings #bizappsWith the launch date of AX 2012 coming closer and closer, your organization should be preparing for this major release. There are lots of resources being made available almost on a daily basis. It’s hard to keep up with documentation being released every day, but here’s the list I have so far. Feel free to leave any additional links you may know of in the comments.
Major Sources for AX 2012 documentation: Microsoft’s Download Center (search for “AX 2012”) MSDN AX 2012 Beta Page PartnerSource US Launch Page (requires MBS Partner access) PartnerSource Global Launch Page (requires MBS Partner access) PartnerSource Getting Ready for Microsoft Dynamics AX 2012
This "Getting Ready" page on PartnerSource is extremely valuable. It contains the "What's New" training material (including functional), it contains the Convergence Hands-on labs, the Technical Conference 2011 session videos, etc!
The list below contains all the publicly available documentation (all outside of PartnerSource).
Documentation: Upgrade Guide Installation Guide Deploying Customizations Across Environments AX 2012 System Requirements New, Changed and Deprecated Features in AX 2012 What’s new in AX 2012 for Developers AX 2012 Implementation Planning Guide Selecting the Best Development Technology for your Development Scenario (White Paper) Updating the Uses of the Ledger Posting Framework (White Paper) Services (White Paper) Lean Manufacturing - Production Flows and Activities (White Paper) Microsoft Project Server 2010 Integration (White Paper) How to Write Data Upgrade Scripts for AX 2012 Code Upgrade (Multiple White Papers)
This contains the following White Papers: Code_Upgrade_Overview_AX2012.pdf Developing_with_Table_Inheritance.pdf Eventing_AX2012.pdf Implementing_and_extending_the_organization_model_in_Microsoft_Dynamics_AX_2012.pdf Implementing_and_Updating_the_Human_Resources_Framework_AX2012.pdf Implementing_Budgeting_for_Microsoft_Dynamics_AX_2012_Applications_AX 2012.pdf Implementing_InventTrans_refactoring_for_Microsoft_Dynamics_AX_Applications_AX2012.pdf Implementing_Item-Product_data_management_framework_for_Microsoft_Dynamics_AX_2012_Applications_AX2012.pdf Implementing_the_Account_and_Financial_Dimensions_Framework_AX2012.pdf Implementing_the_Address_Book_Framework_for_Microsoft_Dynamics_AX_Applications_AX2012.pdf Implementing_the_Budget_Control_Framework_for_Microsoft_Dynamics_AX_2012_Applications_AX_2012.pdf Implementing_the_Operations_Resource_Model_AX2012.pdf Mapping_the_LedgerTrans_table_to_General_Journal_tables_AX2012.pdf Migrating_EDT_Relations_in_Microsoft_Dynamics_AX2012.pdf Shared_Currencies_and_Exchange_Rates_AX2012.pdf Using_the_Enhanced_Number_Sequence_Framework_in_Microsoft_Dynamics_AX_2012.pdf Using_the_Policy_Framework_in_Microsoft_Dynamics_AX_2012.pdf Using_the_refactored_Formletter_framework_AX2012.pdf
Upgrade Script Reference Reference: Tables and Table Groups Developing Extensible Data Security Policies (White Paper) Implementing the Tax Framework (White Paper)
Jun 29, 2011 - AX & TFS FAQ
Filed under: #daxmusings #bizappsThis is my first post containing an FAQ on the AX and TFS integration. I get a lot of the same questions, and below are the most commonly asked ones. This is a lengthy post so I apologize to the RSS subscribers.
Feel free to leave your questions in the comments, and I will keep this FAQ updated.
AX & TFS FAQ
Q: How to move one X++ project at a time, and what if it contains objects that have been modified for other X++ project as well?
A: This is where TFS' intelligent branching/merging process comes into play. The prerequisite is that you check in code for one X++ project at a time. That way, TFS knows which changes are "bundled" together. Obviously you can multiple changes over multiple days, but it is imperative that you never check in changes you made for different projects. When you merge a change set to another branch, which contains objects also modified by other projects that you are not moving, TFS will raise a flag. It will allow you to make a decision (on the XPO text) whether you wish to move the whole thing anyway, whether you want to move just the change associated with the change set you're moving, or whether you wish to manually modify the change to make it work. This works well for code in general but I always manually check to make sure anyway.
Q: How to build one project or one object or one changeset?
A: Although I understand the question in certain situations, I feel like there is never a good enough reason not to build the whole thing (except time perhaps). In any case, this basically boils down to creating a custom build workflow. When building just one object or one changeset, I'm fairly certain that can be done with the workflow. To build just one project, that is more tricky since TFS is not "aware" of projects, for what it's concerned, all it has is a text file (xpo) dubbed the "project definition". That being said, consider what we're doing with builds today: we are taking all XPOs and combining them into one giant XPO to import. What can be done of course it instead of combining all XPOs, first read a project definition, then combine only the objects described in that. Then follow the normal process for the build.
Q: How can we build a patch/hotfix layer?
A: This relates to the previous question. If you have a project containing the objects touched for your patch, you can use the combine-xpo approach I described above. If you want to build certain changesets only, either build a custom workflow, or consider perhaps a different branch, which can then be completely built in a patch layer…
Q: How can we have multiple developers work on the same AOS using TFS?
A: Due to the way the standard AX integration is designed, this is not possible. Of course in reality, this is a VERY common scenario, and Microsoft has asked a lot of questions and asked for lots of feedback from me and other in the community to try and solve this issue in AX2012. The solution unfortunately, has not worked it's way into the product. Instead, we will get more access to the integration code with TFS (the .NET "proxy" assembly is now a visual studio project in the AOT) so we can make any changes we need to ourselves.
A: That being said, in our AX2009 environments we do have multiple developers on one AOS. This is done through some customizations to AX, and some NTFS (windows filesystem) tricks. Bottom line: - We modify the AX integration to append the AX username to the local repository folder, this satisfies TFS that all users are using a different repository "working folder" - We add NTFS "junctions" so that although each user has its own folder, they are physically all the same folder (think sym links in unix/linux). This satisfies some issues with AX (namely if you have outdated XPOs there's a danger of updating the AOT with old code when you undo a chance for example).
Q: Can AX2009 support branching in the source tree? IE can I point AX 2009 to use a SUB-folder in my source tree rather than the root?
A: Standard AX 2009 will always put all the files starting at the root. Please note that this has been fixed in AX 2012 and you can specify a branch folder there.
A: For AX 2009, we have branching working at our offices at Streamline Systems. The only thing you really need to do is, after AX sets up your workspace, is changing that workspace (using visual studio) so that the working folder on the server points to your sub-folder. Of course, it only takes one user to not do this properly to mess up your source tree. To that end, we have automated this "fix" on the workspace by adding some .NET code in AX that gets executed when you log into AX, and changes your server working folder.
Q: In ISV scenarios, how can we maintain multiple components, and create unique builds for clients containing a unique combination of our components?
A: To be honest, I do not have a good answer to this. For big components, it makes sense to develop them in separate AX environments. For small ones, that sounds like overkill. In any case you can hook them up to the same ID server to avoid object ID collisions.
A: As far as branching is concerned, this would require a branch for each unique combination where you merge in the components you need. That is technically not unrealistic, but may be too much work for your scenario. Especially if you then need to branch for each release off of that…
A: I believe the AX developer community needs to start thinking more in lines of general software development practices, which in the past has never been the case. There are issues due to features and architectural challenges that are unique to AX, but most of the time those can be overcome. In this case, think of each component as a DLL or software product you would sell to a client. The uniqueness in AX is that they will all go in the same layer. But honestly, that's an installation detail, and it should not prevent you from considering each component as a unique product in your development cycle.
A: With the coming of AX 2012, the introduction of models, AxModel deployments and installations, I believe it will become easier to do these sorts of things.
Q: In client scenarios, clients may be doing their own development in a higher layer, how does that work?
A: When clients do development of their own, it should go in a higher layer than your delivered solution. This makes sense from a maintenance/support and liability point of view. We usually deliver our builds in a VAR layer and recommend customers use the CUS layer for their customizations.
A: In situations where you do off-site development and move layers into client environments (are current setup at Streamline Systems), it is true clients may be over-layering your objects so that any changes you make are not reflected in the final code layer "combination". To that end, you have a build log from TFS that can tell you what objects have been modified since the last release, and you have a layer compare in AX to detect layer conflicts. This sounds like a lot of work, but it isn't really. The point of source control is that you know exactly what has changed, so unless you have a ton of changes every release, the layer merge effort should be minimal.
A: In situations where there is development in multiple layers at the same time (such as traditional client projects where all development is done on-site), there are unique challenges. Even though for example fields on a table can be in different layers (ie not the whole table is in a layer at the time, like reports or forms in AX 2009), from a source control point of view the whole objects is moved into the higher layer. This prevents you from making ANY changes to the object in a lower layer as soon as it's over-layered. I have had numerous discussions with Microsoft on this subject, but there is no good way of resolving this.
Q: Why do we want to move layers and not XPOs as we’ve always done?
A: My favorite topic. Moving XPOs is literally moving source code (the XPO is a plain text file containing the source code). There are several issues with that approach: 1) the person importing the XPO can make mistakes (merge issues, object IDs, "delete tables and class members", etc). An XPO also implies someone took an export somewhere, which is the same issue, mistakes could have been made in the exporting. 2) from an auditing perspective this "should" be unacceptable: whomever imports this into production can modify the code, which is a segregation of duties issue, and a liability since after import the code cannot be guaranteed to be exactly the same as the test environment (export/import could introduce changes, merge issues, etc)
A: Usual complaints are one needs to take down the AOS to move in a new layer. My response to that is taking down the AOS, moving in the layer and starting it up again is a matter of minutes. Proper procedure when moving XPOs would be that all users are out of the system anyway, and that you do a full compile afterwards to make sure there are no issues. The difference is minimal, and not an excuse to keep doing XPO exports.
A: Moving compiled, binary code is the approach anyone should take. You do not receive hotfixes for Windows from Microsoft in source code form, you receive binary updates (new DLLs, EXEs, etc). This is also where Microsoft is going in AX 2012. There are models, and model exports (.AxModel). XPOs in AX 2012 are not the recommended way of moving code.
A: By moving code in layers, they can be versioned easily as "releases", which makes it easy to keep track of what version of the code is deployed where. XPO moves (unless extremely strictly controlled) have the potential of having different versions of different objects. Layers are the only guaranteed way of having two environments use the same code.
Jun 28, 2011 - Unit Tests - Revisited
Filed under: #daxmusings #bizappsAs I have posted on this blog previously, we at Streamline Systems have done some minor testing and created a small framework to be able to run unit tests during our TFS builds. The reason I have not put this up on the CodePlex AX build project yet is that the solution is not entirely elegant… it requires a C# unit test project be created, and a wrapper method for each test method in AX. However, after talking with Dave Froslie at Microsoft and some investigation (my Visual Studio skills are still a work-in-progress), there exists such a thing as a “generic” unit test in Visual Studio. Basically, this is a one-time unit test project, which wraps a command line process and takes an output file from that (.trx file). I’ve not created an actual test on this, but the .trx file is basically an XML file, so the only thing required would be an XSL transformation. And as far as that goes, one could extend the standard AX unit test XML output class and transform the output before writing to file.
Since we’ll be working on converting our build processes to AX2012 soon, I’m expecting us to implement this for AX2012 (which I think last beta build I looked at, it was still the same code for XML output of unit tests).
Jun 16, 2011 - AX2012 .NET Proxies for Kernel Objects
Filed under: #daxmusings #bizappsFor those who’ve played around with Visual Studio and AX2012, the proxies are a great way to most of your logic on the .NET side, without too much hassle. One thing is apparent after a while though: how do we create proxies for kernel classes and tables? For some classes, there is a Sys* version (eg SysQueryRun, SysDictTable, etc), but first of all, you don’t get the static methods of the original kernel class, and as for queries, there is no Sys* equivalent of QueryBuildRange and so on.
So how do we get the proxy? Turns out, this is all handled by the .axproxy file extension. Just create a new file (mind the case! remember .NET is case-sensitive!) in the format ObjectType.ObjectName.axproxy. For example, to get QueryRun, create a file:
Class.QueryRun.axproxy
The standard Visual Studio AX tools just put a plain text message in this file:
This is a Microsoft Dynamics AX proxy file that generates classes for the element that it represents in the project to which it is added.
With the file created, you can drag and drop the .axproxy file onto your Visual Studio project, and the build will generate the proxy for you. (again, watch the case… for example the class QueryBuildDataSource has a capital S in datasource!)
Obviously this is not the recommended way to create proxies, but I have yet to hear a more official way to do this from Microsoft. As for built-in X++ functions in AX, the official word is there is no way to get those, except creating a wrapper class in X++ and generating a proxy for that.
Jun 1, 2011 - TFS Build Workflow
Filed under: #daxmusings #bizappsThis will be a rather lengthy post. I’ve received several emails asking how to implement the TFS build scripts. Well, it’s pretty easy actually.
First things first. The build scripts need to be available to your build agent, of course. To that end, you can either put them in a fixed location and call them from that fixed path. However, at Streamline Systems we actually sometimes switch between building on a dedicated build VM (per client - to support different versions of AX) to building on an AOS server where consultants can remote in to test. To support our multiple scenarios, we actually put the build scripts IN the source tree, so that the build script workflow can run it, regardless of what server or where the scripts are located. They’re always in the source’s root. The added benefit is you’re versioning your build scripts, in case you need something crazy for a particular project/branch.
Anyway, the following is a TFS project based on the CMMI template. I’m unsure if the Agile template has a different build template. I’m assuming it’s slightly different, except for these essentials steps, regardless of your project management style.
First, locate the spot in the XAML (have fun scrolling) where it actually does the compiling. I’ve noticed there’s more than one MSBuild statement in there, so locate this exact spot.
Now, we want to get rid of the MSBuild task (delete!) and add the calls to our build scripts instead. To get the console output, errors and warnings to show up in the logs, we need to capture the output. So, to that end, add a step (where the MSBuild used to be) and add the “InvokeProcess” workflow step. In fact, add two while you’re at it. Now, as you may have noticed, the build scripts have some optional parameters. The cool thing with TFS is, you can create “arguments”. That way, even if you don’t use the optional parameters NOW, you can still use them later. Also, we’ll use arguments to make the AX configuration file a parameter to the build script. As for the standard and error output, you can have it write to the actual output, and then use them to write as build output / build errors. Completed, it should look something like this.
<img style=”float:left; margin:0 10px 10px 0;cursor:pointer; cursor:hand;width: 200px; height: 170px;” src=”http://2.bp.blogspot.com/-CfQ1UVgrBS8/TeWnTo8wFdI/AAAAAAAAA1Y/lI_YYPGe2j8/s200/TFS-WF-02.png” border=”0” alt=”“id=”BLOGGER_PHOTO_ID_5613076466438772178” /><img style=”float:left; margin:0 10px 10px 0;cursor:pointer; cursor:hand;width: 200px; height: 93px;” src=”http://4.bp.blogspot.com/-JpxN_sp8gHw/TeWoCPs8e8I/AAAAAAAAA1g/DageYLFlExE/s200/TFS-WF-03.png” border=”0” alt=”“id=”BLOGGER_PHOTO_ID_5613077267115441090” />
As you can tell, the process you invoke, should be “powershell.exe”. We use the SourcesDirectory as the working directory, since that is where our build scripts will be located (TFS will pull them from the source tree, along with the XPOs). As for the arguments, we pass in the main build script name along with the properties.
You can see we added an “argument” for the config file which you can then use in the parameters to the build script. As for the second InvokeProcess step you’ve added, that is used to get the compiler errors and warnings. Same setup for the workflow step, except this time, write the standard output to the writebuildwarning, and error output you write to writebuilderror.
Now you setup the build definition; you will need a blank solution file… you don’t need anything in it. I’m sure you can find it in the workflow where it looks for it (and remove that step), but we never bothered.
I hope this will get you started with the scripts. Let me know how it works out for you!
May 31, 2011 - Build scripts update
Filed under: #daxmusings #bizappsI have updated the Dynamics AX 2009 build scripts on CodePlex.
This update features a fix for the clean layer list, there was a powershell variable issue (the variable was declared as string, so couldn’t be re-used as an array). There’s also an additional “feature” that contains a tweakable time-out for the calls to AX32, to avoid issues where the build process gets stuck due to a client dialog (can’t connect to AOS etc). A third addition/fix is to remove the read-only flag from the label file after copying it to the application folder.
I’ve associated a new release with all the scripts in one zip file.
Blog Links
Blog Post Collections
- The LLM Blogs
- Dynamics 365 (AX7) Dev Resources
- Dynamics AX 2012 Dev Resources
- Dynamics AX 2012 ALM/TFS
Recent Posts
-
GPT4-o1 Test Results
Read more... -
Small Language Models
Read more... -
Orchestration and Function Calling
Read more... -
From Text Prediction to Action
Read more... -
The Killer App
Read more...
 Menu
Menu
