Microsoft Dynamics 365 / Power Platform - page 11
Sep 16, 2011 - Windows 8
Filed under: #daxmusings #bizappsAs you may or may not have heard, this week at the build conference, the Windows 8 Developer Preview was released. You can go over to the build website, watch the keynotes (good overviews), and download the ISO files for the Windows 8 build. We’ve installed it here on a laptop, and it’s nice to see the work in progress. Stressing the work in progress. We’ve already had to reinstall it, after switching the laptop between docking station and running stand-alone, the new start screen got very confused on what monitor to be on, and decided to just disappear altogether. In any case, it’s cool to play around, it also has IE10 on it and Visual Studio Express 11, which I haven’t had time to check out yet. Make sure to watch some of the videos on the build website, they show off some good tech stuff, developing against the WinRT API using Javascript, etc.
A good friend of mine, Kevin Dockx, who is a frequent speaker on SilverLight at Microsoft events (and has written books on the subject), has put together a quick overview and his take on the whole new API, JavaScript development, etc. Check it out here. It’s a good overview for developers in case you don’t want to watch all the Build conference material.
I agree with him that the new Metro-style and start screen are great for touchscreens, but are pretty clumsy on mouse and keyboard. We have to keep in mind though that this is an early preview, so we’ll see how this ends up in the final product. For those who were involved in the AX 2012 beta program, you know how for example the sales order screen was initially redesigned (short story: it was pretty bad). Microsoft did take the beta participants’ feedback and reworked that to something way more user friendly. So let’s not scream too hard just yet, there’s a ways to go with Windows 8 development. What I like a lot is the new multi-monitor support. It’s gotten better over the years, especially with Windows 7, but I feel like the new features (taskbar per monitor, options for showing all or only windows on that monitor, etc) finally equal what other OSes and third-party plugins have offered for years now.
I’ve tried to install the AX2012 client on Windows8, but it threw an exception while checking prerequisites. I’ll try again later but at least it won’t work right out of the box (yet).
Sep 8, 2011 - AX 2012 Virtual Launch
Filed under: #daxmusings #bizappsIf you haven’t heard, this morning is the AX 2012 Virtual Launch event. Keynote from Steve Ballmer and Kirill Tatarinov followed by Gartner analyst Nigel Montgomery. Make sure to head on over to http://www.microsoft.com/dynamics/ax2012launch/ which will also allow you to replay the keynote in case you missed it!
Obviously, Microsoft is making a big deal out of this release. And rightfully so. There have been more changes in this new release than the last three releases combined! If you’ve been following my blog, you’ve noticed all the new technical features which I’ve been explaining. And I’m far from done. Of course, I only blog about technical topics, but there is just as much excitement on the functional side.
Back in the old days, before Microsoft acquired this product called ‘Axapta’, we used to not even bother “deploying” the AX client to customer’s computers. We just copied the executable and some DLLs from the install CD onto a shared folder on the network, and just gave all users a shortcut to the executable. It’s tough to put it all in words, but it’s pretty incredible how far Microsoft has brought this product. To me as a developer, who happened to land a job coding in this small but promising Danish product, it is great to see the progress, and with this 2012 release the type of investment Microsoft has made to push an already leading edge platform and take it to the next level. I’m happy to see my job is safe for quite a few years to come. I worked for VARs that also did other ERPs, and it was sad to see some great functional products getting lost in today’s technology, being bought and sold, with no roadmap or hope for an overdue technology facelift (you know who you are!).
AX has always been at the forefront of technology in the ERP world. And it’s obvious Microsoft is all-in to make sure it stays that way. I was in Fargo this week (one of the major Microsoft campuses for Dynamics) and it is clear there is a vision and a goal. Looking at the changes, both architecturally and technically, it is clear where things are going. Technologies are converging. Using C# with AX (and making X++ a managed language). Sharepoint. SQL Reporting. Office add-ins. WCF. WPF. Workflow.
These are exciting times, and I’m glad to be a part of it. Next stop - the cloud.
Sep 7, 2011 - 10-Minute AX 2012 App: Windows Azure (Cloud)
Filed under: #daxmusings #bizappsPowerfully simple put to the test. If you missed the first article, I showed you how to create a quick WPF app that reads data from AX 2012 queries and displays the results in a grid. In this article, I will continue showing you how easy it is to make use of AX 2012 technology in conjunction with other hot Microsoft technologies. Today, we will create a Windows Azure hosted web service (WCF), to which we’ll have AX 2012 publish product (item) data. Again, this will take 10 minutes of coding or less. Granted, it was a struggle to strip this one down to the basics to keep it a 10-minute project.
Windows Azure is Microsoft’s cloud services platform. We’ll be creating a web role here, hosting a WCF service. The idea I’m presenting here is an easy push of data out of AX to an Azure service. There, one could build a cloud website or web service, for example to serve mobile apps (Microsoft has an SDK to build iOS, Android and Windows Phone 7 apps based on Azure services). We’ll spend most time setting up the Azure WCF service (and a quick webpage to show what’s in the table storage), and finally we’ll create a quick AX 2012 VS project to send the data, and hook that into AX using an event handler! So, we’ll build an Azure WCF service using Table storage (as opposed to BLOB storage or SQL Azure storage). Make sure to evaluate SQL Azure if you want to take this to the next level. So, our ingredients for today will require you to install something you may not have already…
Ingredients:
- Visual Studio 2010
- Windows Azure SDK (download here)
- Access to an AX 2012 AOS
Now, the Azure SDK has some requirements of its own. I have it using my local SQL server (I did not install SQL Express) and my local IIS (I did not install IIS express).
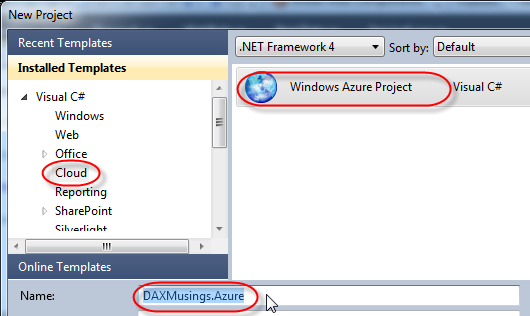
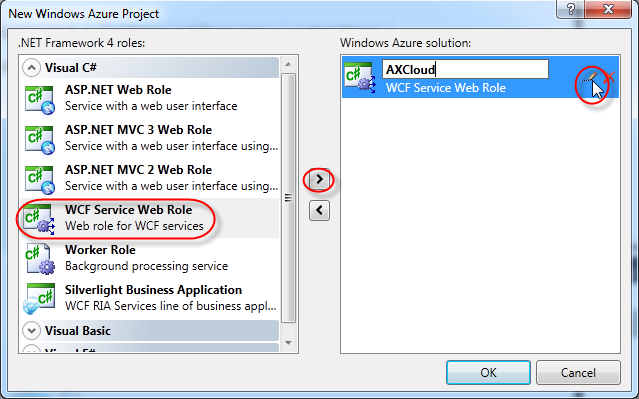
Ok, everything installed and ready? Start the timer! You need to start Visual Studio 2010 as administrator. So right-click Visual Studio in your start menu and select “Run as Administrator”. This is needed to be able to run the Windows Azure storage emulators. We’ll start a new project and select Cloud > Windows Azure Project. I’ve named this project “DAXMusings.Azure”. Once you click OK, Visual Studio will ask you for the azure role and type of project. I’ve select “WCF Service Web Role”. Click the little button to add the role to your solution. Also, click the edit icon (which won’t appear until your mouse hovers over it) to change the name to “AXCloud”.
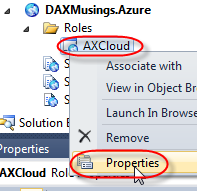
Ok, first things first, setup the data connection for the table storage. Right-click on the “AXCloud” under “Roles” and select properties.
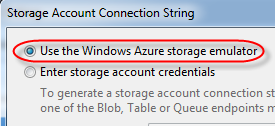
Under settings, click the “Add Setting” button, name it “DataConnectionString”, set the drop down to… “Connection String”, and click the ellipsis. On that dialog screen, just select the “Use the Windows Azure storage emulator” and click OK.
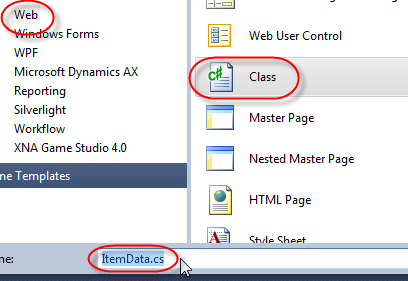
Hit the save button and close the properties screen. So, what we will be storing, and communicating over the webservice, is item data. So, let’s add a new class and call it ItemData. To do this, we right-click on the AXCloud project, and select Add > New Item. On the dialog, select Class and call it “ItemData”.
So, here’s the deal. For WCF to be able to use this, we need to declare this class as a data contract. For Azure table storage to be able to use it, we need three properties: RowKey (string), Timestamp (DateTime) and PartitionKey (string). For item data, we will get an ITEMID from AX, but we’ll store it in the RowKey property since that is the unique key. We’ll just add a Name property as well, to have something more meaningful to look at. To support the data contract attribute, you’ll need to add the namespace “System.Runtime.Serialization” and for the DataServiceKey you need to add the namespace “System.Data.Services.Common”. The PartitionKey we’ll set to a fixed value of “AX” (this property has to do with scalability and where the data lives in the cloud; also, the RowKey+PartitionKey technically make up the primary key of the data…). We’ll also initialize the Timestamp to the current DateTime, and provide a constructor accepting the row and partition key.
Click here for screenshot or copy the code below:

namespace AXCloud
{
    [DataContract]
    [DataServiceKey(new[] { "PartitionKey", "RowKey" })]
    public class ItemData
    {
        [DataMember]
        public string RowKey { get; set; }

        [DataMember]
        public String Name { get; set; }

        [DataMember]
        public string PartitionKey { get; set; }

        [DataMember]
        public DateTime Timestamp { get; set; }

        public ItemData()
        {
            PartitionKey = "AX";
            Timestamp = DateTime.Now;
        }

        public ItemData(string partitionKey, string rowKey)
        {
            PartitionKey = partitionKey;
            RowKey = rowKey;
        }
    }
}
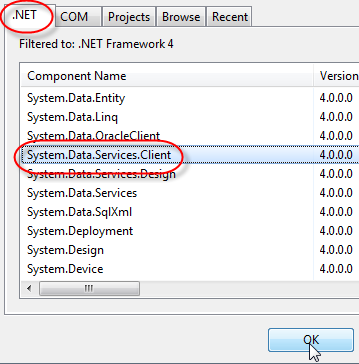
Next, we’ll need a TableServiceContext class. We’ll need to add a reference to “System.Data.Services.Client” in our project. Just right-click on the “References” node of the AXCloud project and select “Add Reference”. On the .NET tab, find the “System.Data.Services.Client” assembly and click OK.
For easy coding, let’s add another using statement at the top as well, for the Azure storage assemblies.
And we’ll add the Context class. This will provide a property that’s Queryable, and an easy way to add an item through an AddItem() method.
Click here for screenshot or copy the code below:

    public class ItemDataServiceContext : TableServiceContext
    {
        public ItemDataServiceContext(string baseAddress, StorageCredentials credentials)
            : base(baseAddress, credentials)
        {
        }

        public IQueryable Items
        {
            get
            {
                return this.CreateQuery("Items");
            }
        }

        public void AddItem(string itemId, string name)
        {
            ItemData item = new ItemData();
            item.RowKey = itemId;
            item.Name = name;

            this.AddObject("Items", item);
            this.SaveChanges();
        }
    }
</code>
</pre>
So, first time we use this app (or any time you restart your storage emulator), the table needs to be created before we can use it. In a normal scenario this would not be part of your application code, but we'll just add it in here for easy measure. Open the "WebRole.cs" file in your project, which contains a method called "OnStart()". At the top, add the using statements for the Windows Azure assemblies. Inside the onstart() method, we'll add code that creates the table on the storage account if it doesn't exist.


Click here for a full screenshot or copy the below code to add before the return statement:

CloudStorageAccount.SetConfigurationSettingPublisher((configName, configSettingPublisher) =>
{
	var connectionString = Microsoft.WindowsAzure.ServiceRuntime.RoleEnvironment.GetConfigurationSettingValue(configName);
	configSettingPublisher(connectionString);
}
);

CloudStorageAccount storageAccount = CloudStorageAccount.FromConfigurationSetting("DataConnectionString");

storageAccount.CreateCloudTableClient().CreateTableIfNotExist("Items");


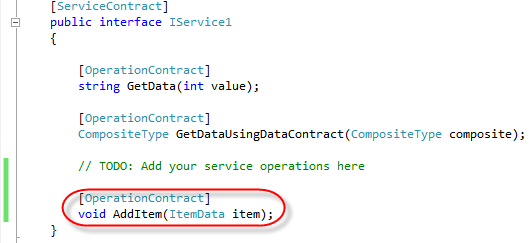
Next, we'll create a new operation on the WCF service to actually add an item. Since we already have all the ingredients, we just need to add a method to the interface and its implementation. First, in the IService.cs file, we'll add a method where the TODO is located. You probably want to remove all the standard stuff there, but to keep down the time needed and to make it easier for you to see where I'm adding code, I've left it in these screenshots.


Now, into the Service1.svc.cs we'll add the implementation of the method, for which we'll need to add the Windows Azure using statements again:


Click here for a full screenshot or copy the code below:

public void AddItem(ItemData item)
{
    CloudStorageAccount.SetConfigurationSettingPublisher((configName, configSettingPublisher) =>
    {
        var connectionString = Microsoft.WindowsAzure.ServiceRuntime.RoleEnvironment.GetConfigurationSettingValue(configName);
        configSettingPublisher(connectionString);
    });

    CloudStorageAccount storageAccount = CloudStorageAccount.FromConfigurationSetting("DataConnectionString");

    new ItemDataServiceContext(storageAccount.TableEndpoint.ToString(), storageAccount.Credentials).AddItem(item.RowKey, item.Name);
}


So now the last thing to do is create a class the consumes this service, which we can use as a post event handler for the insert() method on the InventTable table in AX... I am skipping through some of the steps here, but basically, we create a new class library project in Visual Studio (open a second instance of Visual Studio, since we'll need to keep the Azure service running!), and "Add it to AOT". For a walkthrough on how to do this, check this blog article. We're calling this class libary "DAXMusings.ItemSubscriber".
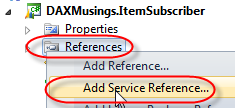
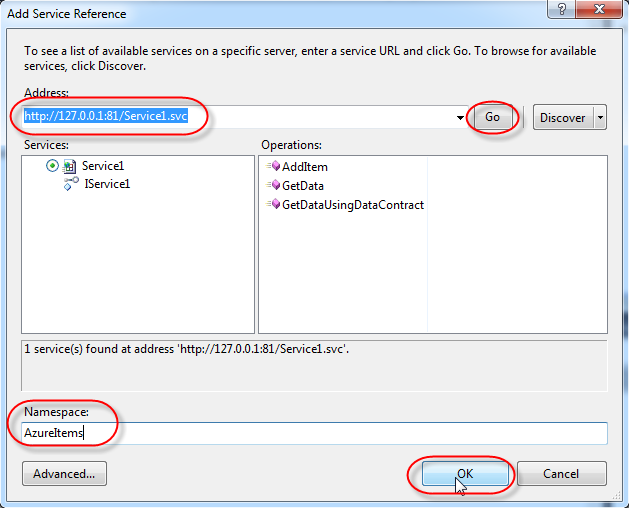
Alright, when you have the new project created and added to the AOT, we need to add a service reference to the Azure WCF service. Since we're running all of this locally, you'll need to make sure the Azure service is started (F5 on the Azure project). This will open internet explorer to your service page (on mine it's http://127.0.0.1:81/Service1.svc). If Azure opens your web site but not the .svc file (you probably will get a 403 forbidden error then), just add "Service1.svc" behind the URL it did open. If you renamed the WCF service in the project, you'll have to use whatever name you gave it.
So, we'll add that URL as a service reference to our subscriber project, and I'm giving it namespace "AzureItems":


Now that we have the reference, we will make a static method to use as an event handler in AX. First, we need to add references to XppPrePostArgs and InventTable by opening the Application Explorer, navigating to Classes\XppPrePostArgs and Data Dictionary\Tables\InventTable respectively. For each one, right-click on the object and select "Add to project" (for more information on the why and how, check this blog post on managed handlers).
Next, there's one ugly part I will have you add. Since the reference to the service is in a class library, which will then be used in an application (AX), the service reference configuration (bindings.. the endpoint etc) which gets stored in the App.config for your class library, will not be available to the AX executables. Technically, we should copy/paste these values into the Ax32Serv.exe.config (or the client one, depending where your code will run). However, this would require a restart of the AOS server, etc. So (.NET gurus will kill me here, but just remember: this is supposed to be up and running in 10 minutes!) for the sake of moving along, we will just hardcode a quick endpoint into the code...

Click here for full screenshot of the class.

public static void InventTableInsertHandler(XppPrePostArgs args)
{
    InventTable inventTable = new InventTable((Microsoft.Dynamics.AX.ManagedInterop.Record)args.getThis());
    AzureItems.ItemData itemData = new AzureItems.ItemData();
    itemData.RowKey = inventTable.ItemId;
    itemData.Name = inventTable.NameAlias;

    System.ServiceModel.BasicHttpBinding binding = new System.ServiceModel.BasicHttpBinding();
    binding.Name = "BasicHttpBinding_IService1";
    System.ServiceModel.EndpointAddress address = new System.ServiceModel.EndpointAddress("http://127.0.0.1:83/Service1.svc");
    AzureItems.Service1Client client = new AzureItems.Service1Client(binding, address);

    client.AddItem(itemData);
}


Notice how the URL is hardcoded in here (this is stuff that should go into that config file). One thing I've noticed, with the Azure project running emulated on my local machine, that it seems to change ports every now and then (I started and stopped it a few times). So you may need to tweak this while you're testing this stuff out.

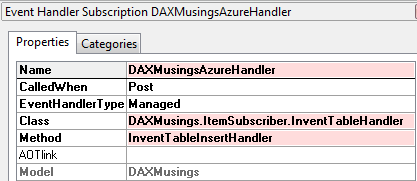
So last thing to do is add this as a Post-Handler on the InventTable insert() method... (for more information and walkthrough on adding managed post-handlers on X++ objects, check this blog post)


Time to add an item and test! If you wish to debug this to see what's going on, remember the insert method will be running on the AX server tier so you need to attach the debugger to the AOS service.


How do you now know your item was actually added in the Azure table storage? Well, I will post some extra code tomorrow (a quick and dirty ASP page that lists all items in the table).

I am expecting you will run into quite a few issues trying to get through this exercise. I know I have, some of them were minor things but took me hours to figure out what I was missing. Feel free to contact me or leave a comment, and I'll try to look into each issue.
Sep 6, 2011 - New Design and New Articles
Filed under: #daxmusings #bizappsIf you haven’t noticed yet, Dynamics AX Musings has a new design. This is something I’ve been wanting to do for a while, so nothing better than a long weekend to do it. On top of that, I’ve gone through old posts and fixed all the large screenshots that were running into the right-hand menu. Going forward, rather than just a screenshot, the new design will allow me to post some code that you can copy/paste. Hopefully this will improve the usability of the articles in the future. I realize this will not show up properly in the syndication of this blog, including the syndication on community.dynamics.com but I will make sure to provide a link to the actual blog article every time. I will also still continue to provide a link to a screenshot for those who prefer that.
A link to the screenshot will go here.

public void Example()
{
    info("this is an example of what it will look like");
}
On top of that, I will soon be providing downloads for all the code belonging to the big articles, including all the managed code ones, the WPF code, etc… and will continue doing that for all the future articles to come.
For those who are waiting on the continuation of the 10-minute apps for AX 2012, I will post the next one tomorrow (it’s actually finished except for the new inline code).
So thanks for being patient, and hopefully you will find that the new inline code and project downloads were worth the wait!
Sep 1, 2011 - AX 2012 Licensing
Filed under: #daxmusings #bizappsThere’s a lot of questions surrounding licensing and AX 2012, especially around user licensing. Just wanted to do a quick post and bring your attention to two blogs tackling some of these questions:
1) Becky Newell from Microsoft posted a blog article explaining the licensing and how to obtain them 2) Matrin Dráb on his Goshoom.NET DEV blog posted some more details on the licensing and useful links to partnersource and other resources
Aug 31, 2011 - 10-Minute AX 2012 App: WPF
Filed under: #daxmusings #bizappsPowerfully simple put to the test. In this first article, we will create a WPF (Windows Presentation Foundation) application, which will query AX by consuming the system services. The system services are services that provide access to the AX metadata, queries, etc. We will achieve this in 10 minutes (or less… post your time in the comments!).
Ingredients:
- Visual Studio 2010
- Access to an AX 2012 AOS
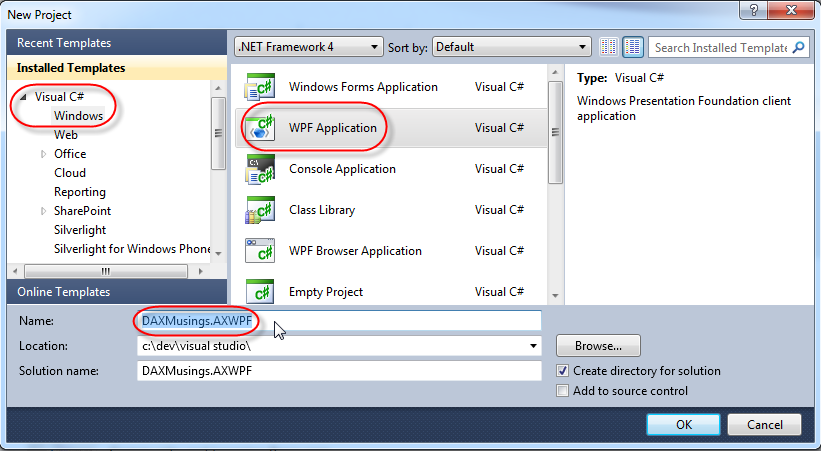
To get started, open Visual Studio 2010 and create a new project. Under C# / Windows select the “WPF Application” project type. I named this project “DAXMusings.AXWPF”.
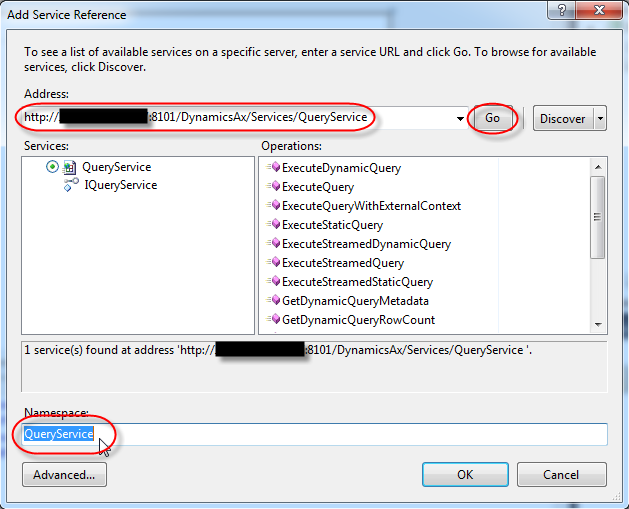
So, next up, we want to add a service reference to our AX WCF system query service. To do this, you will need to find out what address/port your AOS uses for the WSDL. On a default install, the WSDL address will be http://AOSSERVERNAME:8101/DynamicsAx/Services/QueryService . You can test this by just typing in that URL into a browser and see if you get the XML schema definition of the service (WSDL stands for Web Service Definition Language). If you don’t, you can find out what the actual port number is by opening the AX 2012 Server Configuration Utility. The first tab (“Application Object Server”) will show the WSDL port. Alternatively, you can open the AX client and navigate to System Administration > Setup > Services and Application Integration Framework > Inbound Ports. You won’t find the QueryService in there, but if you look at one of the other services such as AxClient, it will tell you what the WSDL URL is. Just replace the “AxClient” with “QueryService”.
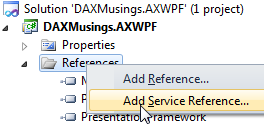
Once you figured out your WSDL URL, go back to Visual Studio and right-click on the “References” node in your project, and select “Add Service Reference”.
Enter your URL, and hit “GO”. This will fetch the WSDL and show you what it has in store. Just enter a namespace (I’m using “QueryService” here, we’ll use this in code so you may want to follow me on this name) and click OK.
Next, we’ll add a DataGrid to the screen. In the XAML file, add one line to add the control. We’ll name it “MyDataGrid” (which is pretty irrelevant for this code), and we set its ItemsSource to “{Binding}”.
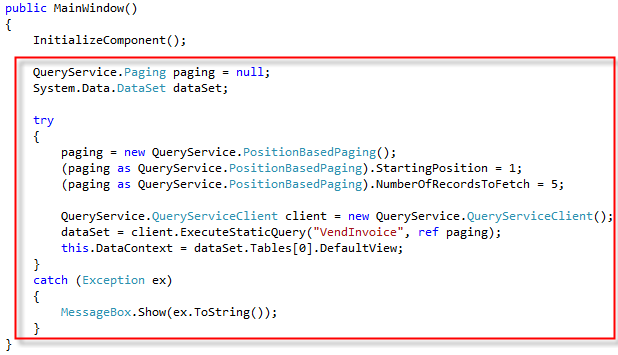
Lastly, we’ll add some code in the MainWindow.xaml.cs which should have opened by default when you created the project. We’ll add some code in the MainWindow() method.
Before I explain all that’s going, and before I’ve passed the 10 minute mark blabbing about the details, give it a spin. If you followed to the letter and your URL is correct, you should see a data grid with all the query’s fields, and whatever rows of data you have in your AX environment.
Click. What’s your time? :-)
So, the AX QueryService returns a standard System.Data.DataSet .NET object. The DataGrid control has the magic. First, we set it to Binding. Notice that we didn’t tell it WHAT to bind to. This is WPF feature where certain properties get passed down from parent controls to child controls (looking at the XAML file, the Window is the root, Grid is the first child, DataGrid is the child of Grid). So, from our code, we set “this.DataContext”, where “this” is the window. So the Window passes down the DataContext to all its children (see this MSDN article for more information on that). DataGrid also has a property called “AutoGenerateColumns”, which is set to true by default (so we don’t explicitly set it in the XAML). The feature will auto generate columns for each column contained in the dataset. Also note the “Paging” object. We use positionbased paging, which requires an explicit sort on the query. So if you try to use a different query, you may see the following error: “Paging is not supported for queries that do not have an ordering property”. You can pass in a NULL reference instead of creating an instance, however, some queries return so much data it will hit the maximum buffer size of your WCF service consumer. You can change these buffer sizes in your app.config file which is contained in your project.
There’s more you can do here of course. For one, you can hook up the paging object to some controls so you can actually page through the results. You could explore some of the other system services, for example to get a list of queries in the system, and then allow the user to select one and get the results.
No was that powerfully simple or what?!
Aug 30, 2011 - Three 10-minute Powerfully Simple Apps
Filed under: #daxmusings #bizappsAX 2012: Powerfully simple, you’ve probably heard that by now. We’ve looked at events, managed code, and all sorts of other interesting and powerful new things in AX 2012. Now, I’d like to show you just how powerful (and simple) some of these new things really can be. In the next few days, I will show you three apps using other hot Microsoft technologies. On top of that, these apps will only take about 10 minutes to develop from scratch (or less if you’re as good as our team…). That should fit into your 5-minute lunch break, right? You bring lunch, I’ll bring the code (-walkthrough).
Aug 23, 2011 - AX2012 Developer Resources
Filed under: #daxmusings #bizappsFor those of you who don’t visit my Dynamics AX Musings blog directly, here’s what you’ve been missing out! I have been posting quite a few lengthy articles on the subject of AX 2012, highlighting new features and actually walking through full code examples (Business Operation Framework, X++ in CLR, Events, Managed Code, Models, etc). Blogs are great, but they are horrible to navigate and don’t lend themselves well as references, since they are inherently tough to navigate. To that end, I have setup two “pages”, providing a listing of resources available, both articles on my blog as well as external resources such as MSDN articles and Whitepaper downloads. I keep these pages up-to-date any time I post a new article, so check back regularly if you’ve been missing a few posts!
The two pages available:
ALM/TFS with Dynamics AX AX 2012 Developer Resources
Aug 22, 2011 - X++ in the .NET CLR : Life in the Fast Lane
Filed under: #daxmusings #bizappsYou’ve heard it by now. In Dynamics AX 2012, X++ can actually run in the .NET CLR. What I’ve often heard is “X++ running on the server runs in IL”. Well, that is somewhat true. But it doesn’t mean setting your classes or menu items to “RunOn Server” makes them run in IL.
So what runs in the CLR “automatically”? Well, any execution path that starts on the server definitely does. First of all that means, batch jobs… the server runs and executes batch jobs, so they all run as IL. All services run as IL, since they start on the server tier as well. Any “Business Operation” (the RunBase replacement called “Business Operation Framework” - more on that here) also runs as CLR (since it uses the service framework as a back end) So does that mean code started from the AX client never runs as IL, even when it’s set to run on the server tier? Well, not automagically. But, we can do some manual magic!
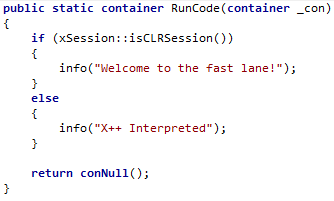
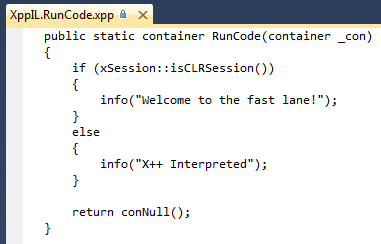
Consider the following method (created on a class I called “XppIL”), it checks whether it is running in the CLR or as interpreted X++ script and outputs an infolog to show you the result. Note it accepts and returns a container. Anyone who has worked with the runAs() method in AX 2009 will recognize this pattern.
Notice the method does not require the “server” modifier (although adding won’t harm anything of course). It is just public static, taking basically the default “called from”. You can make this “server”, but as said earlier, that won’t make it run as IL necessarily.
Ok, so how do we now run this as IL? Calling this now from any method (server or client) will just return the “X++ interpreted” message… Well, let’s create a Main method on our “XppIL” class and call the static method. But not the old fashioned way, we use the new function “runClassMethodIL”. We don’t care about passing in or getting out containers, so we’ll just pass in a conNull() since we need to pass in something.
To call the runClassMethodIL function, we need to assert the XppILExecutePermission. Also as a good practice we don’t use strings for the method and class name, but use the classStr() and staticMethodStr() precompiler functions. For good measure, we’ll also call the method directly, from our Main method that we make run on server, just to make the point “server” doesn’t mean IL necessarily.
The last thing we need to do is make sure we generate the CIL so our X++ can run in the CLR. No need to compile the whole thing again, you can do an “incremental” compile to just compile any changes you made since the last CIL generation.
We can run our class now. And, as expected, our output looks as follows.
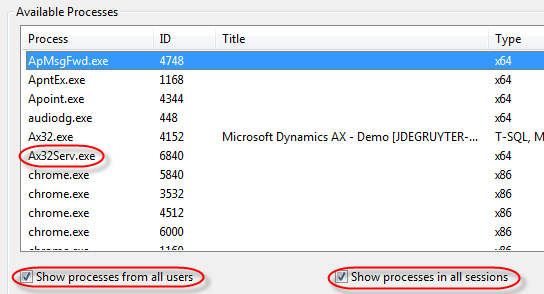
Great! That worked. But, how do we now debug this? Well, in Visual Studio of course! Few things on that. First, remember the IL runs on the server, so you need to debug the server process. Secondly, to debug the server service, your Visual Studio should run as administrator (elevated permissions). If it’s not running as such, Visual Studio will ask you. Let me show you. Open Visual Studio. On the debug menu, select “Attach To Process”.
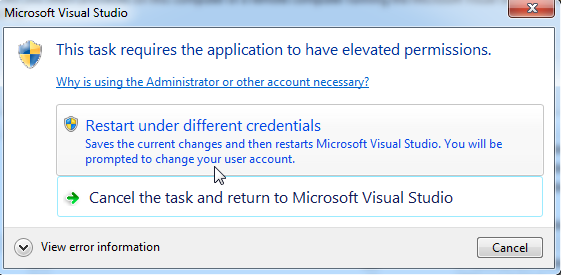
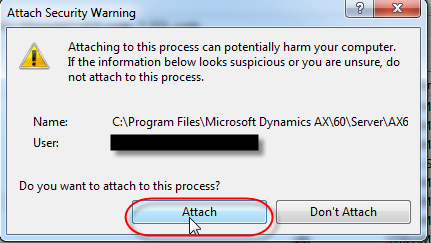
From the list, select the Ax32Serv.exe. If it’s not on the list, make sure you have the “Show processes from all users” and “Show processes in all sessions” checked. Click the “Attach” button. If your Visual Studio is not running as administrator, you will get the prompt as shown below. Once you say “restart under different credentials”, and then click “yes” to allow it, Visual Studio will restart in administrator mode. You will have to repeat the above steps to attach the debugger to the Ax32Serv.exe.
Next, open the application explorer (View / Application Explorer). Navigate to Classes and find the XppIL class. Expand the class and double-click on the “RunCode” method. This will open the X++ code in Visual Studio (not editable, and unfortunately no code highlighting either).
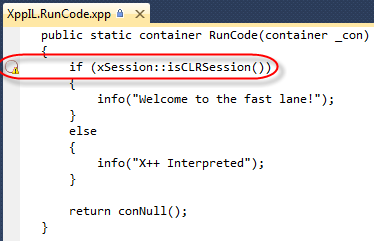
Let’s put a breakpoint in this code. Put your cursor on the line with “if (xSession” and press F9 to put a breakpoint on that line. This will put either a red dot or a red circle in front of the line. If you get a red circle (shown below), you will notice it has a little warning icon in there as well. If you hover your mouse over it, you will notice the tooltip says “The breakpoint will not currently be hit. No symbols have been loaded for this document”. Basically this happens because AX will not load all assemblies at startup, but rather load them on first use. So, as soon as we start our class, you will see Visual Studio’s output window (if you have that open) show assembly loading, including the IL compiled X++. So, get back into AX and run the class again…
Windows should switch you to Visual Studio and you will see the breakpoint hit there. Notice you have full capability here, including stack trace, variable watches, etc. One MAJOR point to remember here is that Visual Studio supports conditional breakpoints. That’s right. The feature you’ve been waiting for.
As far as debugging in Visual Studio goes, the shortcuts are the same as in AX. F5 is continue, F10 is Step Over, F11, is Step Into, etc.
Have fun in the fast lane!
Aug 19, 2011 - From RunBase to SysOperation : Business Operation Framework (Cont'd)
Filed under: #daxmusings #bizappsSo, yesterday I started writing about the Business Operation Framework (BOF) - aka the SysOperation framework. We walked through a full example of taking a basic RunBase class and turning into a Business Operation Framework MVC pattern. The example turned out fairly straightforward once you get the concepts down. The two things we were missing though, was the ability to add a query to the Operation, as well as manipulating the auto-generated dialog of the BOF, which is based on the Data Contract and its data member data types. This article builds further on that code, so if you haven’t read it yet, please check the previous article first.
Let’s start with the query. Since all inputs that are being passed down to your operation are on the data contract, we can safely assume the query will need to go onto the data contract as well. Now, the data contract has accessor methods for every member you wish to expose, and those members are base AX types (string, int, real, etc). So how will we pass a query? Well, traditionally queries are “packed” (aka serialized) into a container. Containers however are not part of the CLR and so we need a more basic type to serialized our query to. So, BOF basically serializes (encodes) the query to a string. Let’s look at the easy way to do first, which is basically all automatic.
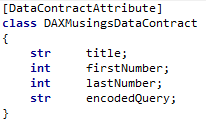
Assuming we have a query in the AOT called “CustBaseData” (this query is available in standard AX for your convenience). All we need to do add that query to our Data Contract is add a variable in the classDeclaration for the encoded query string, and create a data member on the data contract class of type string, and add a special attribute for the query (on top of the datamember attribute we have to add anyway):
The AifQueryTypeAttribute specifies the name of the argument variable that the encoded query will go into, and you specify what query in the AOT it is based on (CustBaseData in this case). This is already enough to make the query show up on your dialog, as it would with RunBase (a dialog with select button, etc). Now of course the question is, how do we retrieve (decode) this encoded query string in our operation “CoolOperation”? Well, basically we’re not encoding the query itself necessarily, we’re encoding and decoding a container (=packed query). For this, AX has two methods available:
SysOperationHelper::base64Encode() SysOperationHelper::base64Decode()
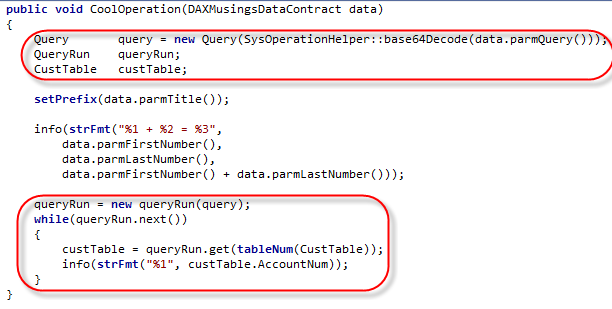
So, to retrieve the packed query, we just need to decode the parmQuery() string of the data contract to a container, then unpack that container to a query… So, let’s add some code to our previous CoolOperation method:
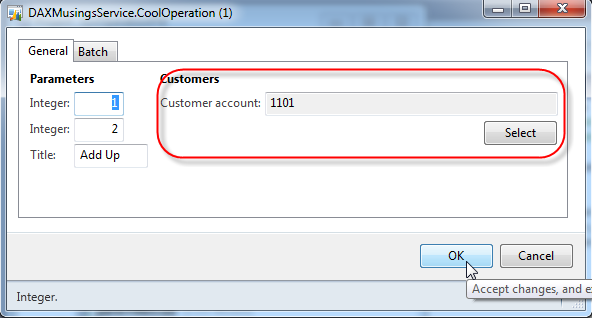
Here we decode the parmQuery() string to container and immediately pass that to the new Query() method to unpack that there. Further down, we create a new QueryRun object base on that query and just iterate the result set and output the customer account number. Before we can run this, we need to run the Incremental CIL Generation! Then, go ahead and try it! To limit the amount of output, I basically clicked the “Select” button and selected the first customer account as a filter.
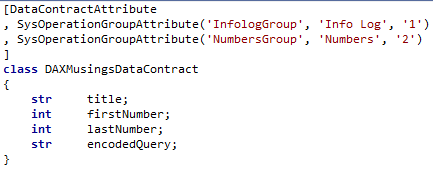
Ok, so that worked beautifully! Now you know how to add a query to your Business Operation. So how about customizing the dialog? In a RunBase class, we can add groups to the dialog, and order dialog controls by changing the order of adding of fields to the dialog. This can also be achieved with BOF, by adding some attributes to the data contract. So, the original dialog showed the two integers and then the title. Let’s add a group for the numbers, and a group for the title. And let’s sort it so the title group is comes before the numbers. All this information is added as metadata on the contract. First, you “declare” the group in the classDeclaration of the data contract:
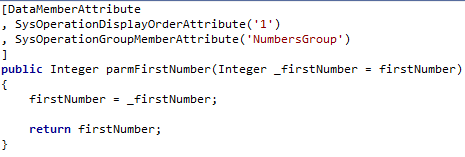
The attribute takes a name for the group (control), a label (I used a hard coded string here, but you should use a label such as @SYS9999), and a third parameter specifying the order. Now, for each data member, we can say what group it belongs to, and give it a sorting number within the group:
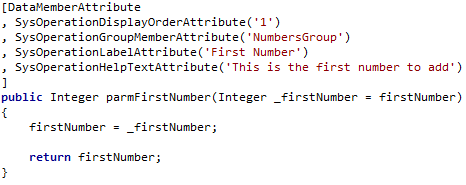
The order in which you add the attributes doesn’t matter. The query doesn’t take a group since it’s on the side with the filter fields and the select button (ok, I had to try this to see what would happen… nothing. Adding a group attribute on the query doesn’t do anything. You read it here first!). Anyway, now we have groups, but our two integer fields are still called “Integer” and “Integer”. So how do we set label and helptext like we used to do on RunBase dialog fields? Well, more attributes! (Again, please use labels in real life code!)
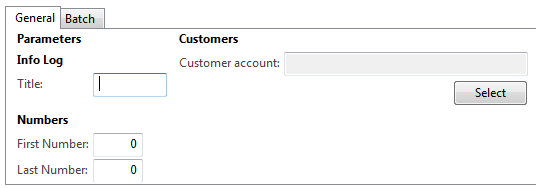
Here’s what the dialog now looks like:
Admittedly, I haven’t figured out how to get rid of the “Parameters” top-level group. I’ll be debugging this some time to figure out if there’s an easy way to get rid of it. So anyway, this is all great. But is there ANY way to build a dialog from scratch, like, the old-fashioned way using dialog.addField() or something? Well yes ladies and gentlemen, there is. You can create your own “UIBuilder” class by extending the SysOperationUIBuilder class. By default, the SysOperationServiceController class uses the SysOperationAutomaticUIBuilder class, which examines your data contract(s), the attributes used (for groups etc), and builds the dialog from that automatically. But, you can create your own builder. To make the BOF use your UI builder, you guessed it, we can attach the builder to your data contract using… an attribute:
SysOperationContractProcessingAttribute(classStr(YOURUIBuilderClassName))
Unfortunately, again, the post is running a little long, so I’ll owe you an example of this some time. Feel free to test out the UI builder class, if you search the AOT for the SysOperationContractProcessingAttribute string in the classes, you will find some examples of this in standard AX. Happy coding!
Blog Links
Blog Post Collections
- The LLM Blogs
- Dynamics 365 (AX7) Dev Resources
- Dynamics AX 2012 Dev Resources
- Dynamics AX 2012 ALM/TFS
Recent Posts
-
GPT4-o1 Test Results
Read more... -
Small Language Models
Read more... -
Orchestration and Function Calling
Read more... -
From Text Prediction to Action
Read more... -
The Killer App
Read more...
 Menu
Menu
