All Blog Posts - page 13
Aug 22, 2011 - X++ in the .NET CLR : Life in the Fast Lane
Filed under: #daxmusings #bizappsYou’ve heard it by now. In Dynamics AX 2012, X++ can actually run in the .NET CLR. What I’ve often heard is “X++ running on the server runs in IL”. Well, that is somewhat true. But it doesn’t mean setting your classes or menu items to “RunOn Server” makes them run in IL.
So what runs in the CLR “automatically”? Well, any execution path that starts on the server definitely does. First of all that means, batch jobs… the server runs and executes batch jobs, so they all run as IL. All services run as IL, since they start on the server tier as well. Any “Business Operation” (the RunBase replacement called “Business Operation Framework” - more on that here) also runs as CLR (since it uses the service framework as a back end) So does that mean code started from the AX client never runs as IL, even when it’s set to run on the server tier? Well, not automagically. But, we can do some manual magic!
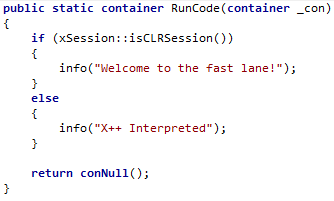
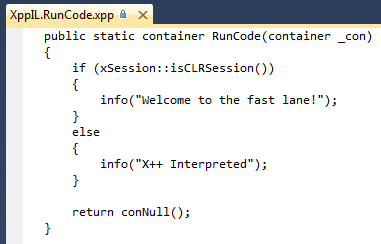
Consider the following method (created on a class I called “XppIL”), it checks whether it is running in the CLR or as interpreted X++ script and outputs an infolog to show you the result. Note it accepts and returns a container. Anyone who has worked with the runAs() method in AX 2009 will recognize this pattern.
Notice the method does not require the “server” modifier (although adding won’t harm anything of course). It is just public static, taking basically the default “called from”. You can make this “server”, but as said earlier, that won’t make it run as IL necessarily.
Ok, so how do we now run this as IL? Calling this now from any method (server or client) will just return the “X++ interpreted” message… Well, let’s create a Main method on our “XppIL” class and call the static method. But not the old fashioned way, we use the new function “runClassMethodIL”. We don’t care about passing in or getting out containers, so we’ll just pass in a conNull() since we need to pass in something.
To call the runClassMethodIL function, we need to assert the XppILExecutePermission. Also as a good practice we don’t use strings for the method and class name, but use the classStr() and staticMethodStr() precompiler functions. For good measure, we’ll also call the method directly, from our Main method that we make run on server, just to make the point “server” doesn’t mean IL necessarily.
The last thing we need to do is make sure we generate the CIL so our X++ can run in the CLR. No need to compile the whole thing again, you can do an “incremental” compile to just compile any changes you made since the last CIL generation.
We can run our class now. And, as expected, our output looks as follows.
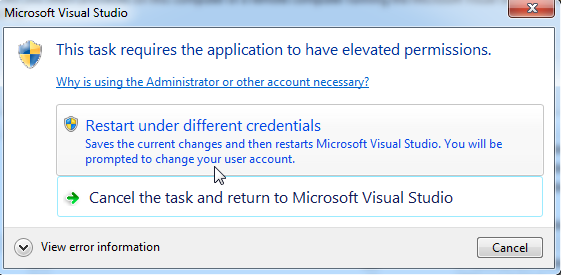
Great! That worked. But, how do we now debug this? Well, in Visual Studio of course! Few things on that. First, remember the IL runs on the server, so you need to debug the server process. Secondly, to debug the server service, your Visual Studio should run as administrator (elevated permissions). If it’s not running as such, Visual Studio will ask you. Let me show you. Open Visual Studio. On the debug menu, select “Attach To Process”.
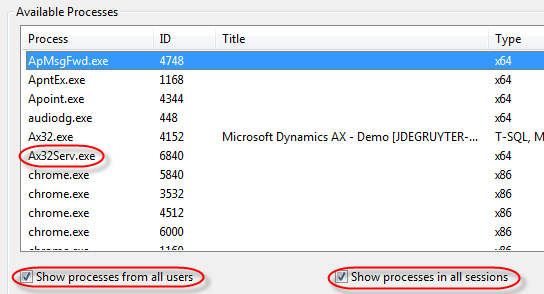
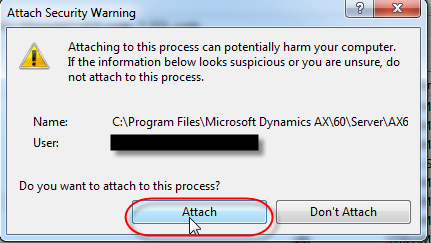
From the list, select the Ax32Serv.exe. If it’s not on the list, make sure you have the “Show processes from all users” and “Show processes in all sessions” checked. Click the “Attach” button. If your Visual Studio is not running as administrator, you will get the prompt as shown below. Once you say “restart under different credentials”, and then click “yes” to allow it, Visual Studio will restart in administrator mode. You will have to repeat the above steps to attach the debugger to the Ax32Serv.exe.
Next, open the application explorer (View / Application Explorer). Navigate to Classes and find the XppIL class. Expand the class and double-click on the “RunCode” method. This will open the X++ code in Visual Studio (not editable, and unfortunately no code highlighting either).
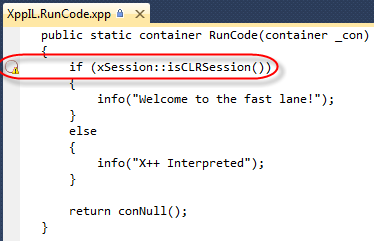
Let’s put a breakpoint in this code. Put your cursor on the line with “if (xSession” and press F9 to put a breakpoint on that line. This will put either a red dot or a red circle in front of the line. If you get a red circle (shown below), you will notice it has a little warning icon in there as well. If you hover your mouse over it, you will notice the tooltip says “The breakpoint will not currently be hit. No symbols have been loaded for this document”. Basically this happens because AX will not load all assemblies at startup, but rather load them on first use. So, as soon as we start our class, you will see Visual Studio’s output window (if you have that open) show assembly loading, including the IL compiled X++. So, get back into AX and run the class again…
Windows should switch you to Visual Studio and you will see the breakpoint hit there. Notice you have full capability here, including stack trace, variable watches, etc. One MAJOR point to remember here is that Visual Studio supports conditional breakpoints. That’s right. The feature you’ve been waiting for.
As far as debugging in Visual Studio goes, the shortcuts are the same as in AX. F5 is continue, F10 is Step Over, F11, is Step Into, etc.
Have fun in the fast lane!
Aug 19, 2011 - From RunBase to SysOperation : Business Operation Framework (Cont'd)
Filed under: #daxmusings #bizappsSo, yesterday I started writing about the Business Operation Framework (BOF) - aka the SysOperation framework. We walked through a full example of taking a basic RunBase class and turning into a Business Operation Framework MVC pattern. The example turned out fairly straightforward once you get the concepts down. The two things we were missing though, was the ability to add a query to the Operation, as well as manipulating the auto-generated dialog of the BOF, which is based on the Data Contract and its data member data types. This article builds further on that code, so if you haven’t read it yet, please check the previous article first.
Let’s start with the query. Since all inputs that are being passed down to your operation are on the data contract, we can safely assume the query will need to go onto the data contract as well. Now, the data contract has accessor methods for every member you wish to expose, and those members are base AX types (string, int, real, etc). So how will we pass a query? Well, traditionally queries are “packed” (aka serialized) into a container. Containers however are not part of the CLR and so we need a more basic type to serialized our query to. So, BOF basically serializes (encodes) the query to a string. Let’s look at the easy way to do first, which is basically all automatic.
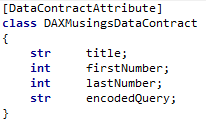
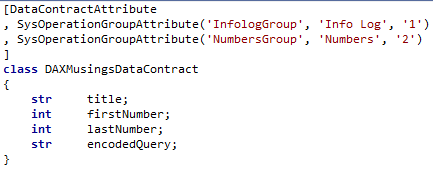
Assuming we have a query in the AOT called “CustBaseData” (this query is available in standard AX for your convenience). All we need to do add that query to our Data Contract is add a variable in the classDeclaration for the encoded query string, and create a data member on the data contract class of type string, and add a special attribute for the query (on top of the datamember attribute we have to add anyway):
The AifQueryTypeAttribute specifies the name of the argument variable that the encoded query will go into, and you specify what query in the AOT it is based on (CustBaseData in this case). This is already enough to make the query show up on your dialog, as it would with RunBase (a dialog with select button, etc). Now of course the question is, how do we retrieve (decode) this encoded query string in our operation “CoolOperation”? Well, basically we’re not encoding the query itself necessarily, we’re encoding and decoding a container (=packed query). For this, AX has two methods available:
SysOperationHelper::base64Encode() SysOperationHelper::base64Decode()
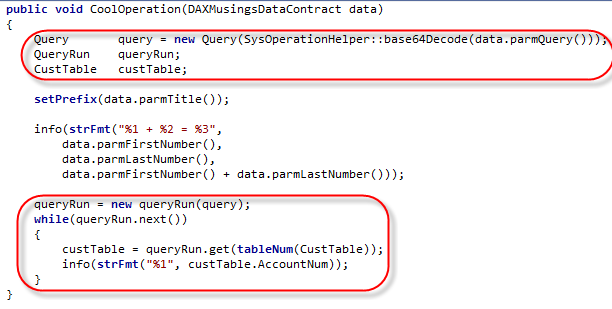
So, to retrieve the packed query, we just need to decode the parmQuery() string of the data contract to a container, then unpack that container to a query… So, let’s add some code to our previous CoolOperation method:
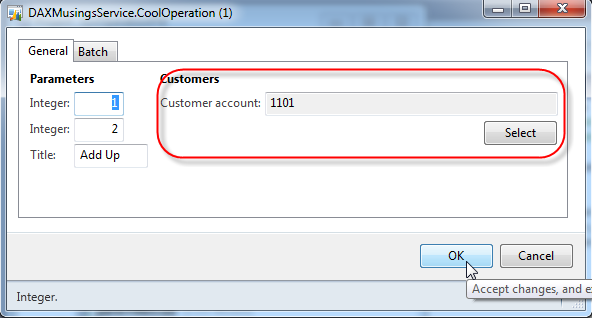
Here we decode the parmQuery() string to container and immediately pass that to the new Query() method to unpack that there. Further down, we create a new QueryRun object base on that query and just iterate the result set and output the customer account number. Before we can run this, we need to run the Incremental CIL Generation! Then, go ahead and try it! To limit the amount of output, I basically clicked the “Select” button and selected the first customer account as a filter.
Ok, so that worked beautifully! Now you know how to add a query to your Business Operation. So how about customizing the dialog? In a RunBase class, we can add groups to the dialog, and order dialog controls by changing the order of adding of fields to the dialog. This can also be achieved with BOF, by adding some attributes to the data contract. So, the original dialog showed the two integers and then the title. Let’s add a group for the numbers, and a group for the title. And let’s sort it so the title group is comes before the numbers. All this information is added as metadata on the contract. First, you “declare” the group in the classDeclaration of the data contract:
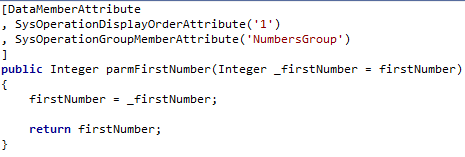
The attribute takes a name for the group (control), a label (I used a hard coded string here, but you should use a label such as @SYS9999), and a third parameter specifying the order. Now, for each data member, we can say what group it belongs to, and give it a sorting number within the group:
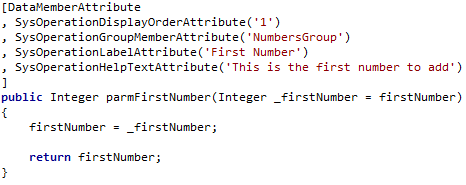
The order in which you add the attributes doesn’t matter. The query doesn’t take a group since it’s on the side with the filter fields and the select button (ok, I had to try this to see what would happen… nothing. Adding a group attribute on the query doesn’t do anything. You read it here first!). Anyway, now we have groups, but our two integer fields are still called “Integer” and “Integer”. So how do we set label and helptext like we used to do on RunBase dialog fields? Well, more attributes! (Again, please use labels in real life code!)
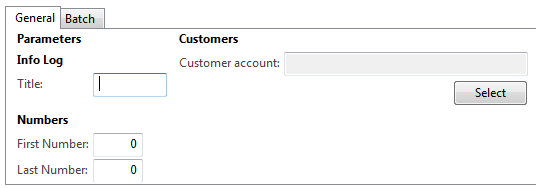
Here’s what the dialog now looks like:
Admittedly, I haven’t figured out how to get rid of the “Parameters” top-level group. I’ll be debugging this some time to figure out if there’s an easy way to get rid of it. So anyway, this is all great. But is there ANY way to build a dialog from scratch, like, the old-fashioned way using dialog.addField() or something? Well yes ladies and gentlemen, there is. You can create your own “UIBuilder” class by extending the SysOperationUIBuilder class. By default, the SysOperationServiceController class uses the SysOperationAutomaticUIBuilder class, which examines your data contract(s), the attributes used (for groups etc), and builds the dialog from that automatically. But, you can create your own builder. To make the BOF use your UI builder, you guessed it, we can attach the builder to your data contract using… an attribute:
SysOperationContractProcessingAttribute(classStr(YOURUIBuilderClassName))
Unfortunately, again, the post is running a little long, so I’ll owe you an example of this some time. Feel free to test out the UI builder class, if you search the AOT for the SysOperationContractProcessingAttribute string in the classes, you will find some examples of this in standard AX. Happy coding!
Aug 17, 2011 - AX 2012 Manuals and Training
Filed under: #daxmusings #bizappsBefore continuing on the Business Operation Framework post, I wanted to share that you can now find some official AX 2012 manuals on PartnerSource, if your organization has access to the learning content on PartnerSource.
Aug 17, 2011 - From RunBase to SysOperation : Business Operation Framework
Filed under: #daxmusings #bizappsThere’s been a lot of talk about the Business Operation Framework (or SysOperation), how it is the next iteration and future replacement of the RunBase and RunBaseBatch framework. I say “future replacement” since there is plenty of RunBase to go around in the standard application. But we’d all be fools not to take advantage of this new framework in AX. There is a bit of information to be found about this new framework online already. Rather than just a straightforward walkthrough, I will make the comparison between RunBase and SysOperation and you will see making the transition is not that difficult.
The SysOperation framework is basically an implementation of the MVC pattern. The isolation of the parameters (model), the dialog (view) and the code that runs (controller) is the essence of the pattern. If you think about RunBase and these three elements, you will realize how they are intertwined within the RunBase framework:
Model: • Member variables • Pack/unpack (aka serialization)
View: • Dialog() • GetFromDialog() • PutToDialog()
Controller: • Prompt() • Run()
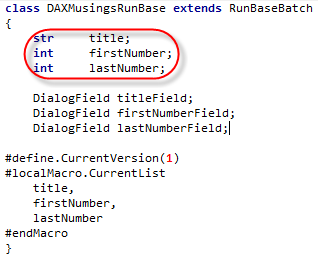
The framework leverages the services framework for this. A service in AX has a data contract. This is basically an AX class with special attributes. The class specifies accessor methods (“parm” methods in AX-speak), again decorated with attributes, which let you set and get member variables. This specifies the data that can go into your process (aka “operation”), and can also specify a return value for it. The operation itself is just a method that takes a data contract, and returns a data contract. This basically classifies it as a custom service. And indeed, if you use this framework, your operation can in fact be used as a service over AIF. You can see the SOA emerge, a hint of where AX is going. Anyway, distractions aside, we now have a model, we have a process, now we need a controller and a view… Easily enough, the view is automatically created based on your data contract (although you can create your own). The controller is simply an inherited class that doesn’t even need to do much. So, what I decided to do is show you a RunBaseBatch class, and then help you convert the class into a SysOperation class. This class lets you input a title and two integer numbers. The run() method will use the title as an infolog prefix, then output the numbers, and the sum of the two numbers. Exciting stuff indeed. So let’s dissect this class.
The inputs of this class are the title and the two numbers. My ClassDeclaration of this class looks as follows:
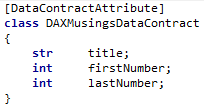
Also note the DialogFields in here (the “View”), and the macros #CurrentList and #CurrentVersion which are used in the pack() and unpack() methods, basically the “serialization” of the input data. To convert this into a BOF pattern, we will create a Data Contract with our three arguments.
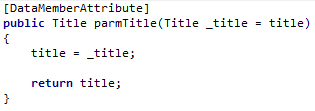
For each member variable (since in AX they are always private), we will create an accessor method. Again here we need to decorate with attributes.
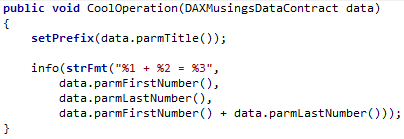
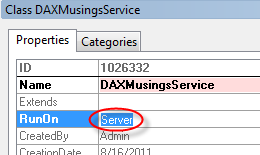
So, we have now created our input Data Contract. Next, we want to create the operation, which is basically the run() method of the RunBase. Compared to RunBase, the operation will not have the member variables for our inputs, but rather it will take the data contract as an argument. Below shows the original run() method, and the new operation method. We’ll also make the operation class RunOn = Server. Other than that, it’s a regular class with a method, no special inheritance, interface implementation, or anything.
Ok, so we now have the input Data Contract, we have the operation that takes the data contract and runs the functionality. How about the dialog? Well, that will get auto-created by the controller. So, how about that controller? Another class!
Ok, here’s where it gets interesting. Technically, we wouldn’t even need our own controller class. The base controller class which we’re extending here (SysOperationServiceController) has some extra logic in its base method, that reads parameters from the Args argument. This will allow you to just create your own menu item (see MSDN article on BOF usage), point it to the class. The parameters field needs to be set to your class and method name. In our case it would be DAXMusingsService.CoolOperation (notice the period in between the class and method), the enumtype to SysOperationExecutionMode and then pick your enum value, default is Synchronous (more about this later) - see an example here. So why am I telling you all this when we were creating our own class? Well, the SysOperationServiceController’s constructor (the “New” method in AX) takes the service class name, operation method name and the SysOperationExecutionMode enum as arguments. Since we specifically created our controller class to run the specific operation, we can “hardcode” the class and method name (using best practices of course: pre-compiler methods classStr and methodStr). To accomplish this, let’s just create a static construct method. We’ll still leave the option of passing in an execution mode so you can do some testing on your own later.
Ok, so we created a handy static construct method. Are we there yet? Yup, pretty much, all we need is a static Main method to execute our controller class.
One more thing left to do. Since services, including BOF services, run X++ in the CLR, we need to generate CIL. Rather than doing a full compile (which you should have done when you installed AX!), we can just generate incremental CIL.
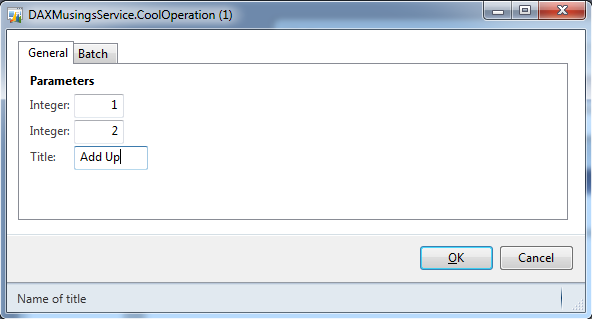
Alright, ready to rock and roll. Run the class!
Cool, that worked! So, no thanks to the length of this article so far, that wasn’t bad at all, was it?
Of course, the AX-dialog aficionado in you is already complaining about the auto-generated dialog . For one, in this example the two integers with the same data type have the same label. Secondly, RunBase(Batch) classes need to deal with queries, so how does that work?
Well, since this article has turned out longer than expected, I will have to politely ask you to tune in again tomorrow for the next article. (If you can’t wait here’s a tip: more attributes).
Aug 10, 2011 - AX2012 Managed Code - Part 3: Unfortunate Limitations
Filed under: #daxmusings #bizappsPart 1: Get Set Up Part 2: Interop Bliss Part 3: Unfortunate Limitations
After all the glory in the last article, I’ll have to end by showing you one unfortunate feature that does not work. In the previous article, we have created some managed code to which we were able to pass AX objects. Those objects translated perfectly into the proxies we were using in managed code. All this worked seamlessly. We also used a managed handler, accepting the XppPrePostArgs class, also a proxy. The event fired and the XppPrePostArgs instance was passed into our managed handler perfectly.
As you have probably read or at least heard mentioned before, there are pre/post events, and there are delegates (aka “coded events”). The pre/post can be handled in two ways. First, as in the previous example, by creating a handler that accepts the XppPrePostArgs class. The second way to handle pre/post events is by using a “lightweight handler”. The lightweight event handler just needs to match the argument signature of the method it subscribes to, and return void. These handlers are called “lightweight”, because they effectively give you no access to the event sender object, no access to the return value, and depending on the type of arguments (certain arguments are by default passed in as references) no means of changing the arguments to the method in case of a pre-handler. The advantage however, is that you don’t have to access the arguments by means of index or name of variable, but rather get compile-time checking of your matching method arguments. The other type of event, called a delegate, is also named a coded event because it is the original coder’s intent to tell the outside world that something has happened, and allow it to react to that event. A regular convention in the .NET world, which is also recommended by the AX compiler team, is to have two arguments to the delegate: the sender object and an arguments class. The reason you want to pass an arguments class is simple. It allows the original developer of the delegate to extend the arguments being presented to event subscribers, without changing the signature of the delegate. This way existing subscribers don’t break, and newer subscribers can use the extensions on the arguments class. For this purpose, AX now has a class named “XppEventArgs”, which you are encouraged to inherit from to create your own event arguments.
So back to the code. Recall that in Part 1 of this series, you created a delegate on an X++ class that looked like this:
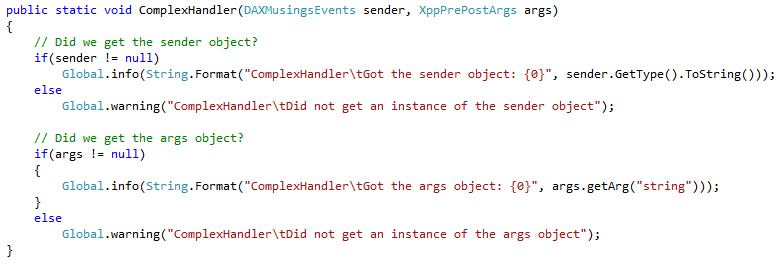
Also recall, that in part 2, you created the following managed event handler in Visual Studio:
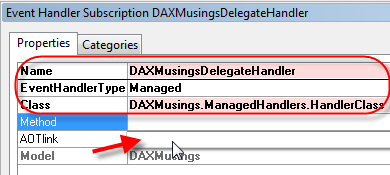
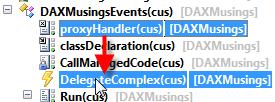
coincidentally, they have the same signature. So, as per the definition of a delegate handler, you expect you can hook up this handler to the delegate. Well, unfortunately this is NOT supported. If we try to set this up (right-click the X++ delegate, select “New Event Handler Subscription”) as a managed handler, the method dropdown is empty (it doesn’t find a matching handler in our HandlerClass):
If we try to actually type in the method name of our handler manually (“ComplexHandler”… remember, ANYTHING related to managed code is case sensitive, class names, namespaces, method names, etc), you will get a compile error:
The error message actually reads “The method ComplexHandler in class -snip- has parameters of X++ complex types. It cannot be used as an event handler”. I find this an interesting message, since it seems to imply that it’s the handler’s fault for having the wrong types, whereas it’s really the X++ delegate’s complex type arguments that make it incompatible with any managed handler. When I asked Microsoft about this, the simple answer was “it’s not supported”. Although I love the managed code interop, and I love the eventing story, apparently the two cannot be fully reconciled…
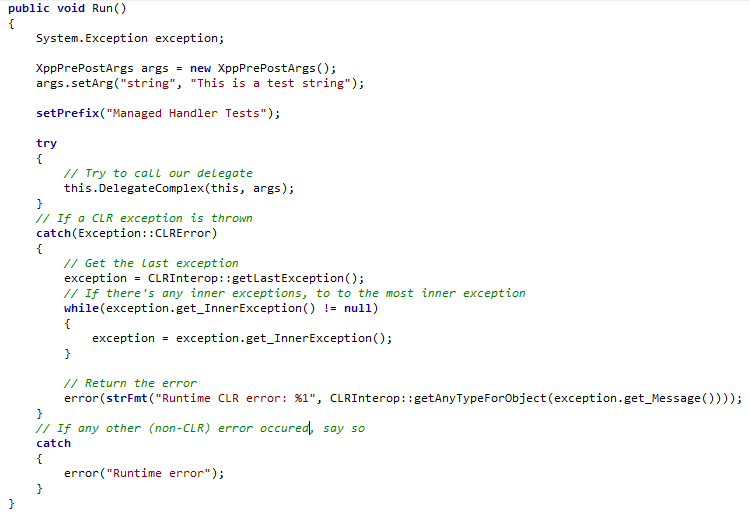
But WAIT! Did we not see in the previous article that we were able to call this ComplexHandler method from X++ code? Well yes, we did see that. And don’t delegates work with X++ code in any shape or form? Well yes, they do. So what if… we create an X++ handler, that calls the managed code method ComplexHandler and just “forwards” the arguments? Let’s add a new static method to our DAXMusings class which we can use for this, let’s call it “proxyHandler”, and let’s call the managed code within it… should work?
If you try to save this… you will get a compile error “Syntax error”. Ok, I did this on purpose of course. This is a minor “glitch” I would say. The semi-colon you no longer need in AX 2012 code? Well, you still need it if your first statement is managed code (basically all of the “rules” of when it was needed in AX 2009 X++, still apply for the managed code statements in AX 2012). So, let’s add the semi-colon and save the method, which will compile at this time.
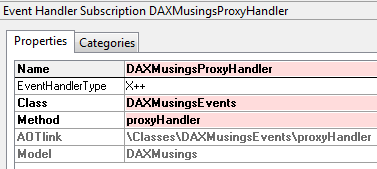
Next, add the handler to the delegate. You can simply drag&drop the “proxyHandler” method onto your delegate in the AOT. All the properties will be setup correctly that way. DO NOT FORGET to rename the handler. If you want to know why this is important, check out previous articles here and here.
Ok, so this saves and compiles! What if we execute it?
Yup, our managed handler now also gets called from the delegate! So, this is quite interesting. Hooking up the managed handler directly does not work, but using this X++ “proxy” handler, yup, that works… As I stated at the beginning of this series, the AX compiler team are real smart people, so I’m sure there are good reasons for this limitation. However, we have to admit that we are missing this one feature to really call .NET a first class citizen in AX 2012. As for us, are we going to be using managed code in our implementation solutions? Absolutely.
I’m still absolutely thrilled about the managed code interop! Perhaps we can’t call .NET a first class citizen, but we can sure call it a first class green card holder.
Aug 9, 2011 - AX2012 Managed Code - Part 2: Interop Bliss
Filed under: #daxmusings #bizappsPart 1: Get Set Up Part 2: Interop Bliss Part 3: Unfortunate Limitations
In part 1 of this series, we setup some base code in AX, and set up Visual Studio with a project containing some AX proxy classes, ready to deploy and run code from Visual Studio. This article (part 2) builds on top of that code.
Ready for some action? I thought so! First, we’ll create a pre/post event handler and hook it up to our Run() method as a managed pre handler. So, with the code from the previous article in place, let’s add some code in Visual Studio. If you didn’t save a solution you can re-open, you can open the Visual Studio project form the AOT. Open AX, and in the AOT go to Visual Studio Projects > C Sharp Projects and find the DAXMusings project. Right-click the project and select “edit”. This will open the project in Visual Studio for you. So, in the HandlerClass.cs file, we will add a new method to the HandlerClass. Handler methods (whether they are X++ or managed) that you will add in the AOT, have to be static and public of course, so they can be called from the event sender. We will use a “standard” pre/post handler, not a lightweight handler, so the only argument we are expecting is XppPrePostArgs. For more information on XppPrePostArgs and how to use it, also see my models and events series (specifically the second part). Just to see our code working I retrieve the calling object (getThis()) from the XppPrePostArgs class and output the type to the infolog using our Global class proxy. The interesting piece here is that getThis() returns an “object”. We need to get this into our proxy. Remember the proxy is a “wrapper” around the AX object, and that means we can’t CAST the getThis() returned object to our DAXMusingsEvents class, but we need to create a new proxy class and pass it the AX object. It’s important you understand why and how this works, because it can lead to some confusion if you’re not careful.
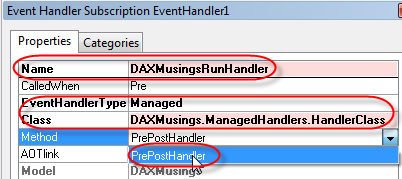
Let’s build and deploy this to our client so we can add it as a handler in the AOT. Just press F5 in Visual Studio. In AX, open the AOT and find our DAXMusingsEvents class. Right-click on the Run() method and select “New Event Handler Subscription”. Open the properties for the handler. Give it a proper name (this is important, check this post so see why, also check the models and events series), and set the “EventHandlerType” property to “Managed”. For the class name, we need to include the full namespace handle to the class. So the class property will be set to “DAXMusings.ManagedHandlers.HandlerClass”. As soon as you do that, the dropdown for the “Method” property will show you the “compatible” methods on the class. Just select the “PrePostHandler” method and save and compile the class.
If you now run your class, you should see the follow infolog:
If you started AX using F5 in Visual Studio, you can put a breakpoint in your C# method and run the class in AX again, to see how the debugging works. So, this works perfectly. You could re-implement the code from the models and events articles to use a managed handler for the validateField instead of the X++ handler.
Let’s try some regular interop. How about we make a C# method which we will call from X++ code? We’ll create one method here which we can later re-use for other purposes. Close the AX client and go back into Visual Studio. In the HandlerClass, we will add the following method:
Hit F5 to build, deploy and start AX. Find your DAXMusingsEvents class in the AOT, and right-click > New > Method. We’ll call the method “CallManagedCode”. Inside, we will create an instance of an XppPrePostArgs class, set an argument “string”, and call the static C# method we created previously.
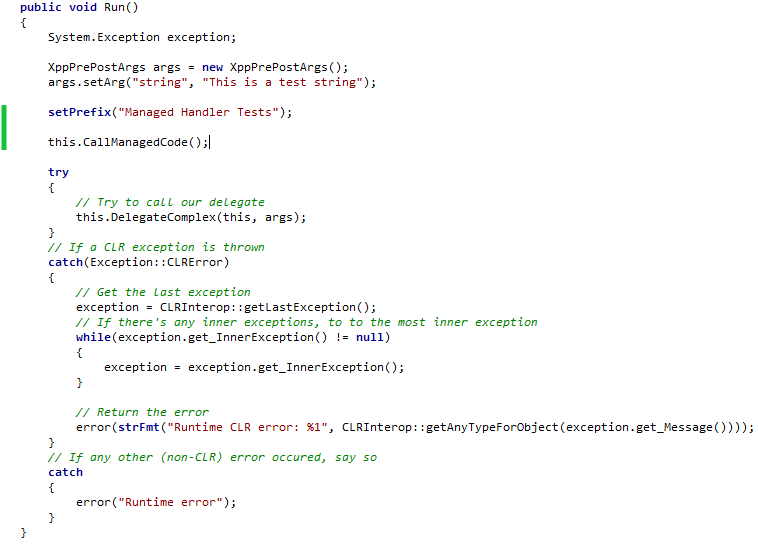
Next, we’ll call this method from the existing Run() method. Open up Run() and add the call to “CallManagedCode”. When you now run the class, you should see the PrePost handler fire, but also our call to our method.
Let’s review what this means. The “CallManagedCode” method, passes “this” (DAXMusingsEvents instance) and an instance of the XppPrePostArgs. Our C# managed method, accepts our PROXY classes for DAXMusingsEvents, and our proxy for XppPrePostArgs. As you can see from the output in the infolog, this works perfectly! You get the proxies in your C# code as expected. I encourage you to play around with this. Debug, try to create a new instance of an AX class in C# and return it from a method, etc. Interop is great. These were basically the missing features in previous versions of AX. Instances of CLR objects and/or AX objects crossing the boundaries back and forth.
As cool as this is, we’ll have to end on a sad note in our part 3 of the series, showing you the unfortunate limitations of these new features.
Aug 8, 2011 - AX2012 Managed Code - Part 1: Get Set Up
Filed under: #daxmusings #bizappsPart 1 : Get Set Up Part 2 : Interop Bliss Part 3 : Unfortunate Limitations
One of the new features Microsoft is praising, is .NET languages being a “first class citizen” in the AX development eco system. That sure is a big deal, and compared to previous releases of AX the major barriers for effectively using .NET code in AX have been overcome. I won’t be doing Peter Villadsen’s work justice if I tried to give you an overview of the underlying changes that had to happen to make the interop between X++ and .NET work the way it does today. But suffice it to say, Peter’s team has done a great job, and there is plenty to talk about. However, there is one sore point (in my opinion) in this model: managed code handlers for X++ events do not support complex types!
What? Yes, you heard me right. If events (be it pre/post events or delegate (“coded”) events) have complex argument types to their methods (anything that’s not a base type), they will not allow managed handlers. I’m sure there are good reasons, knowing how savvy the compiler team is. I have not been able to get any explanation for this, but I did get official word that it is indeed not supported. Interestingly, when calling .NET code from X++, you can pass complex types back and forth just fine. On top of that, the Pre/Post handler type using the XppPrePostArgs class as an argument (a complex type…!) does work with managed handlers. But when subscribing a lightweight handler, or subscribing to a delegate, the managed code handlers CANNOT take complex types. If you put two and two together, does that mean if you would create an X++ handler, which on its turn calls the .NET handler “manually”, that does work? Yes, that does work. Strange goings-on, but again, I’m sure there’s some reason.
So, without further delay, I will show you exactly how to create these managed code artifacts, and show you what is and what isn’t supported, and how to “get around it”.
First, let’s create a new class in Dynamics AX 2012 called “DAXMusingsEvents”. We will have a Run method that calls a delegate, we’ll need to create that delegate, and a main method to run the class. To create the delegate, right-click your new class and select New > Delegate, or you can just create a new blank method and type in the method manually as shown below.
I use the default event convention as used in C#. You do not necessarily have to follow this convention, however, there is good reason to do it this way. I have not seen the latest best practice guide for AX 2012 and whether it mentions delegate best practices, but I do know the Microsoft AX compiler team at least recommends using this convention. There is an abstract “XppEventArgs” class which you can inherit from. I’m using the XppPrePostArgs class (which extends XppEventArgs) to avoid creating a new class for this article. Anyway, next we create a run method which calls the delegate
Finally, we need a Main method to run our class, which will instantiate the class and call Run().
This is enough setup in AX. Next, we’ll go into Visual Studio 2010. Create a new project and select the “Class Library” project type. I called my project “DAXMusings.ManagedHandlers”.
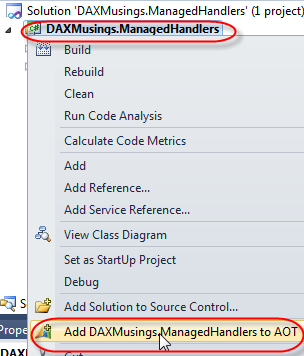
When the project is created, in your solution explorer window, right-click the project and select “Add DAXMusings.ManagedHandlers to AOT”.
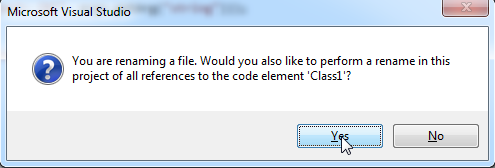
Next, rename the “Class1.cs” file in your project to “HandlerClass.cs”. Visual Studio will ask you if you want to rename the class itself and any references to it. Click YES.
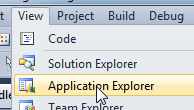
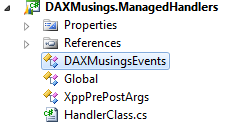
We will also need access to some AX classes, including the DAXMusingsEvents class we created, the XppPrePostArgs class we are using, and also the “Global” class since that contains the info, error, warning functions we can use to put messages in the infolog. To do this, open the “View” menu and open the “Application Explorer”. This will open an AOT-type view in Visual Studio. Browse to Classes, and find the DAXMusingsEvents, the XppPrePostArgs and the Global class. For each one, either right-click on the class and select “Add To Project”, or drag the class onto your project node. When you have all three, your project should look like the project below.
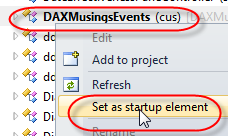
Almost through the setup. In the application explorer, right-click on the DAXMusingsEvents class and select “Set as startup element”.
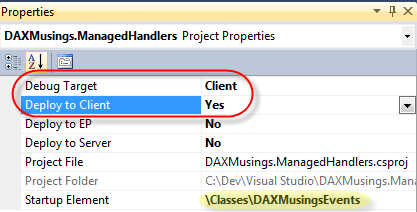
On your project in the solution explorer, right-click and select properties. In the properties, set the “Debug Target” to “Client”, and set “Deploy to Client” to “Yes”. Also notice that the property called “Startup Element” is set to your DAXMusingsEvents class due to our previous action.
The “deploy to client” flags that this assembly we’re building will run on clients, and consequently needs to be deployed to clients. If your code needs to run on server, or both server and client, make sure to set these flags correctly. Also remember event subscribers need to run on the same tier as the event itself. The “debug target” will allow you to hit “F5” (or menu Debug / Start Debugging”), which will build the code, deploy it, and run the AX Client and attach Visual Studio to the client you’ve started, allowing you to debug the C# code in Visual Studio when it gets run from AX. You can also just close your client, run build and deploy in Visual Studio, then run AX client manually. If you want to debug then, you can click Debug / Attach to Process from Visual Studio and attach to the AX client, which would give you the same result. The “startup element” will make AX run that element (in this case: our class - note that we didn’t need a menu item) as soon as it started up. This allows for a full build-deploy-run client-run code scenario with the F5 command.
At this point, the code is not doing anything. Feel free to run F5 and test things out. Next article, we will start testing!
Aug 3, 2011 - Follow-up on the Models/Events Articles
Filed under: #daxmusings #bizappsI’d like to do a little follow-up on the models&events article series I’ve posted. It’s nice to get the feedback from you, these long posts take some work but from the feedback I’ve received it seems people found the series very useful so that is awesome to hear. There was also some other feedback, and the main one I’d like to touch on comes from MFP, which I thought I needed to share with you.
Obviously what I’ve dubbed the “Power Combo” is a very powerful concept and I hope people will embrace the new thinking to make the most of this concept. MFP agrees wholeheartedly, but wanted to make sure I mention the following three other concepts that make this powerful combo possible.
-
Fine grained metadata: I actually explain this one in the first post on models, but it’s important to know the power combo would not work without forms, parts and other AOT artifacts(such as VS projects) storing their components more granular than in previous versions of AX. I did get an email from a reader called Thomas who asked how I could state that an object can only exist in 1 model within a layer, but yet I imported my “customization” to the custTable table and form twice in two different models. Well, the granular metadata is exactly the answer to that!
-
Installation specific IDs: Object IDs have always been an issue in AX. In a strict development environment, with code ONLY moving from DEV to TEST to UAT to PROD, object IDs “should” never be an issue. The issue with object IDs is very easy to illustrate. Assume I create a class in DEV, which gets ID #50000. Someone else meanwhile, is actually creating a new class in TEST as well, which of course will also get ID #50000. Other scenario could be we create two classes in DEV, 50000 and 50001. Now we want to move the second one to TEST, but not the first one (let’s say it’s not done yet). If we move the class into TEST without IDs, it will generate a new ID on the fly (which will be 50000). Again, object IDs are out-of-sync. For classes, although it requires manual intervention, this can be resolved. However, for Table IDs, field IDs and anything that has security tied to it, changing IDs means dropping data from the database, security losing connections, etc. There were different attempts in the past to solve this problem. When source control was introduced in AX 4.0, the recommended setup was every developer having his own AOS and AX instance to work in. To remedy the issue there, a “team server” (poor naming, this has nothing to do with Team Foundation Server) was introduced, to keep track of IDs of objects across environments. In AX 2009, the export and import for XPO code was changed so that “export with IDs” was enabled by default. Which actually caused more issues for some clients who were not paying attention. In any case, as MFP explains on his blog, object IDs are no longer a concern in AX. I suggest reading that blog to get more background information. Short of it is, the IDs are still used by the compiler and the runtime, but they are assigned when a model is installed. To uniquely identify objects across environments, they are assigned GUIDs in the background, when and where you create the object. I’m butchering the details here, so I suggest you read the full explanation here. There are some things to keep in mind, for example, storing element IDs in data is a definite no-no, since they are most likely different between environments (making data export/import impossible). Also, Microsoft had to fix BLOB types (containers) to use element names instead of IDs for that very same reason.
-
SQL-based model store: I’m sure you’ve heard by now, the AOD layer files are gone, and all code and metadata is stored in SQL. There may not be much in your daily life as a developer that will make this change apparent, but it has enabled a lot of the goodies we get in AX 2012.
That was it. I have another big blog post coming up, so stay tuned. Please use the “contact me” link and keep sending me your comments and questions!
Aug 1, 2011 - General Availability of AX 2012: It's here!
Filed under: #daxmusings #bizappsTwitter is buzzing like crazy. AX 2012 has been released. I’ve not been able to find partner and customer licenses yet, so I guess they’re still setting up VOICE with the licensing, but partners can already download the product installer image here.
Make sure to check out the public launch page, and the PartnerSource launch page with all sorts of links to documentation, training, etc.
Check out my June blog post with a Documentation roundup and links to what’s available. There are a few new things released since then, which you can find if you search the Microsoft Download Center.
Jul 22, 2011 - AX 2012 RecIds and UnitOfWork Foreign-Key Magic
Filed under: #daxmusings #bizappsAX 2012 features the new UnitOfWork class. One of the reasons this class exists, is to handle new issues that have come up because of one major shift in thinking in AX.
We now should try to link records together based on RecIds.
I can hear you scream WHAT all the way to Denver. Yes, you heard me right, it’s now considered GOOD practice to link records together based on RecIds. Most developers I know that have any kind of experience with AX hate tables that link on RecId (although in some cases you have to), and usually consider it bad practice.
Well, get with the program! :-) It is now considered a good practice. Key reasons are performance and avoiding data duplication. Lots of tables in AX use(d) long strings as primary keys, and in some cases you need to start linking on more than one field to keep linking unique, etc. Well, since RecId is always unique within a table, and it’s “just” a number, the duplication of multiple field values, and the performance on long string primary keys is now “solved”. Yes, I agree, this will not be pretty when doing data migrations and company copies (which for all intents and purposes are near impossible in 2012 - more on that later). But I’m sure somehow we will all get over our preconceptions and embrace this new paradigm (I’m using it, but I’m not a big fan just yet).
In any case, it is what it is. There are some new things around this RecId linking, to facilitate both developer as well as end-user (can you imagine a user having to pick a RecId from a dropdown instead of a Customer number? Before you freak out - customers still have account numbers and that’s still the primary key).
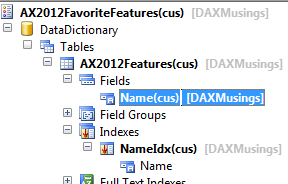
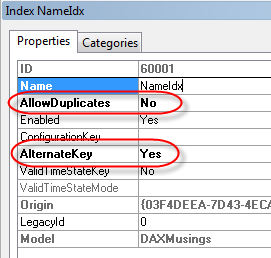
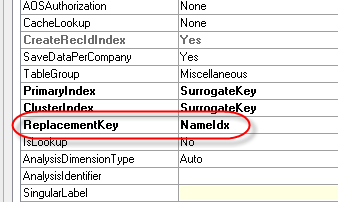
Let’s create a new table called AX2012Features, which uses RecId as its primary key, and a Name field. This name field will be contained in a unique index as well, and be designated as the “Alternate Key” (more on this later). On the table’s properties, set this key as the “ReplacementKey”.
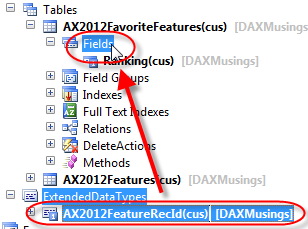
Next, we create a new extended data type for our RecId (yes!). So this data type we’ll call AX2012FeatureRecId, and it has to be an Int64. As it so happens, this data type has a new property called “ReferenceTable”, where we fill in our AX2012Features table.
I’m skipping the creation of a form for this table. Well just add some records using the table browser, we’re amongst developers here, right? So, on to the next table. We’ll add an AX2012FavoriteFeatures table, where we can add an integer field “Ranking” for our favorites features from the other table. Also, we will drag and drop our new AX2012FeatureRecId extended data type on the “Fields” node of the table, which will then release some magic. I will rename this field to “FeatureRecId”.
When you now open this table’s table browser, nothing appears out of the ordinary (besides the fact the table browser in 2012 is now finally no longer an MDI child). There is an integer ranking field, and a FeatureRecId field with a dropdown with recids. Let’s create a form for this, shall we? Now, for the fields, either drag them from the datasource onto the design, OR, when you add a control for the FeatureRecId, select the “ReferenceGroup” control instead and set the referencefield property to “FeatureRecId”. If you drag & drop, it will take referencegroup automatically.
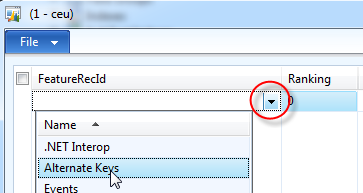
A picture says more than a thousand words, so open up the form, which now has the FeatureRecId field (an Int64) in a ReferenceGroup control.
Yes indeed. The dropdown features your alternate key with your name. If you select a value, the supposed RecId field actually shows the Name, not the RecId. Please try this out with more than one field in the AlternateKey, instead of just one like we did here. Ok, so this is pretty cool actually. We only store one RecId field, but the user sees and picks from a list of values from the alternatekey (however many fields there may be in that key). This begs the question, what do we do in code? Traditionally, I know going in, what my name will be, and so I can add that name when I insert a record in the favorites. Now with this, I cannot get my inserts going, until I have added the favorites, then I need to get that recid and put it in the favorite.
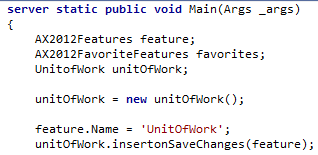
Blast! Just when you started getting used to using RecordInsertList, you need to stop using it because you need the auto-generated value to insert another record. Well, have no fear, the UnitOfWork class is here. And even better, if you have complex structures, it will figure out the sequencing of inserts for you! How you say? Let’s create a class, sporting our two tables and a UnitOfWork class. We create an instance of the UnitOfWork class, and we set the name of our empty feature to “UnitOfWork”. Instead of calling insert, we call unitOfWork’s “InsertOnSaveChanges”, to indicate we want to insert this record when we call “savechanges” on unitofwork. We use a class to test this, and not a job, because UnitOfWork always needs to run on server. So, when you create a main method to run the class, make sure to declare it SERVER!
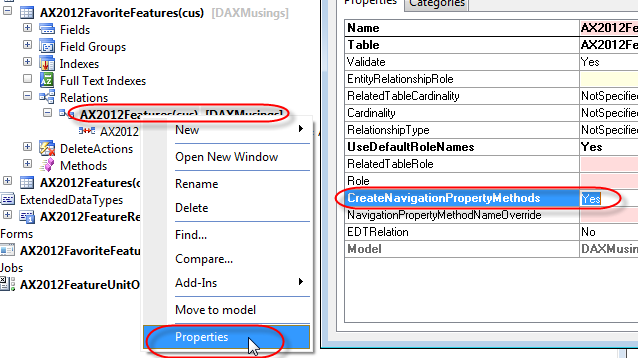
Next, the magic happens. Go back to your FavoriteFeatures table, and check the relations. The RecId data type prompted you to auto-create the relation. If you open the relation, you’ll see the FeatureRecId field linked to the RecId of the Features table. Open the properties of the relation and set the “CreateNavigationPropertyMethods” to YES.
In the code, we’ll say our number one feature (at least for this blog post)is the one we’re trying to insert. Because of the ForeignKey relationship, and setting the navigation property methods to YES, AX 2012 has added a method to the favorites table, carrying the name of your relationship, in the case of this example, AX2012Features. We pass in the (not yet created!) record buffer of feature. Next, we add the favorites buffer to the unitOfWork as well.
Alright. So now, the unit of work class knows we want to insert both records, and it also knows which one depends on which other one, so it will figure out in what sequence the inserts need to happen (granted, in this example there’s not much to it… but feel free to experiment with more records, or changing up the order of calling “insertonsavechanges”).
Since UnitOfWork also takes care of transactions, we don’t really need to do anything more than call the SaveChanges method (because of this transaction model, if you want to use savechanges to make updates, make sure to select your records for optimistic concurrency!).
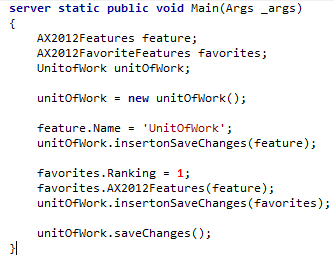
So, your full code should now look like this:
So… ready to run it? GO! And yes, if you open the favorites form, you’ll see your unitofwork ranking number 1 in there, properly linked on RecId (but of course sporting the alternatekey “Name” field on the form instead!).
Blog Links
Blog Post Collections
- The LLM Blogs
- Dynamics 365 (AX7) Dev Resources
- Dynamics AX 2012 Dev Resources
- Dynamics AX 2012 ALM/TFS
Recent Posts
-
GPT4-o1 Test Results
Read more... -
Small Language Models
Read more... -
Orchestration and Function Calling
Read more... -
From Text Prediction to Action
Read more... -
The Killer App
Read more...
 Menu
Menu
