Auto-Deploying DLLs and Other Resources - Intermission
Filed under: #daxmusings #bizapps
I posted part 1 of the auto-deploying DLLs and other resources article last month. Although I will finish the part 2 article as promised, an interesting comment and subsequent email discussion / testing has prompted me to include this “intermission”.
The deployment framework has existed throughout quite a few versions of AX. when AX 2012 was released and we were all drooling over the Visual Studio projects in the AOT, one thing became clear: referenced DLLs within the project are not deployed like the DLLs built from the project. I tried quite a few options in the properties of the references to get the DLLs copied to the output folder etc, but nothing worked. Additionally, deploying other files from your project (images etc) doesn’t work either. But, one attentive reader of this blog, Kyle Wascher, pointed out a way to edit your Visual Studio project file to have it deploy files to the output folder. Interestingly, AX honors these settings as opposed to honoring the regular properties in the VS project file. So, here’s how you do it!
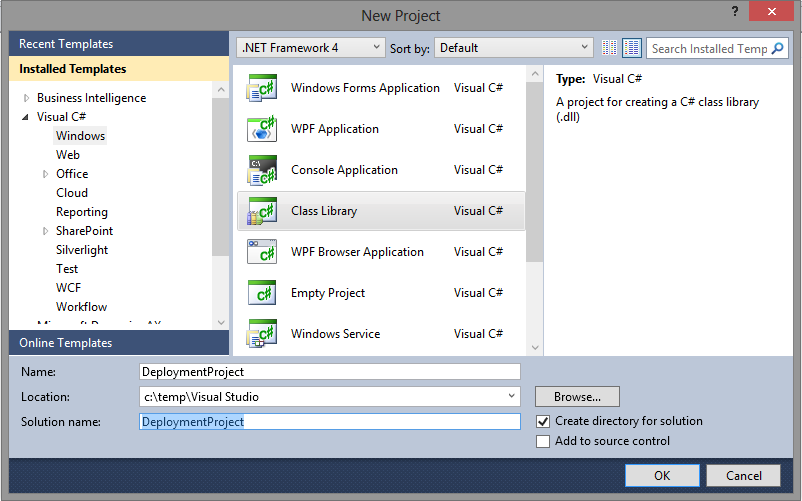
First, let’s create a new project in Visual Studio 2010. I’m choosing the Class Library project type, and I’m naming it “DeploymentProject”.
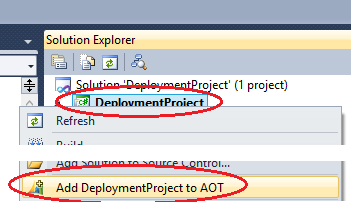
Once created, right-click the new project and select “Add DeploymentProject to AOT”.
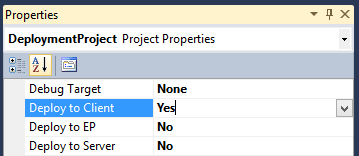
Right-click on your project and select “Properties”. Make sure to select “Deploy to client” (or deploy to server or client or EP or all of them, depending on your scenario). For this test I’ll just set Deploy to client to YES.
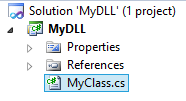
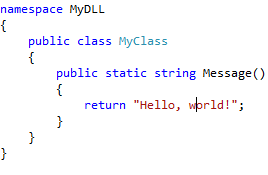
Of course, we need a DLL to deploy. I’m going to create a new project/solution but of course that is NOT a requirement, you can pick any DLL you have created anywhere or downloaded from third parties. Shift-click on Visual Studio in your Windows taskbar to start another instance of Visual Studio. Create new project,again I pick the Class Library project type, and I’m naming it MyDLL. After this, my project looks like this. Again, creating this new project is just an illustration of a DLL we’ll deploy, it’s not needed to make this work. As an illustration for later, MyDLL contains a public class MyClass with a public static method “Message” that returns the string “Hello, world!”. Since the code is irrelevant I’m just putting a screenshot up here. On a side note, it seems if you create another project within the solution where you create the AX VS project, the new project will also be added to the AOT, which of course defeats what we are trying to do here.
Make sure to build this DLL so we can use it.
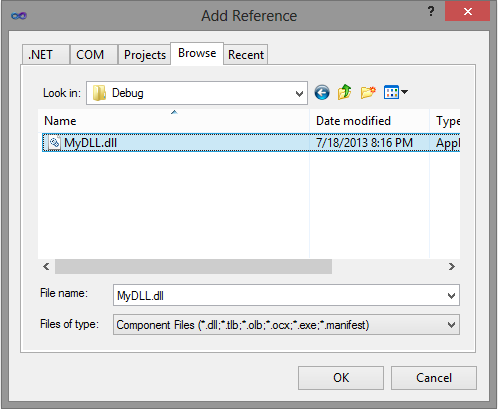
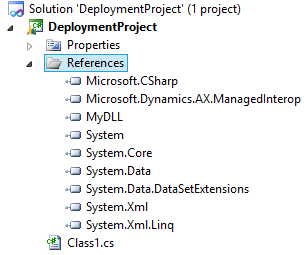
Ok, so now there are two ways to have the DLL be part of your project. One, you add it as an actual reference. Or two, you just add it to your project as a regular file. In this example, I will add the DLL as a reference in the project. This will allow me to actually also use the DLL in the project itself, which I will use further down as an example. This is also the most common scenario where one needs to deploy an extra DLL. So, go back to your AX VS Project “DeploymentProject”, right click the references node in your deployment project, and click “Add reference”. On the “Add Reference” dialog click the Browse tab and navigate to the MyDLL.dll we built in the other project. You’ll find that DLL file in your project’s folder under bin/debug or bin/release depending on which configuration you used to build.
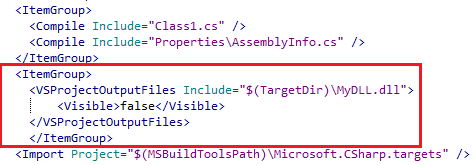
Ok, open the File menu and select “Save all” to make sure we’ve saved our project. Time to get our hands dirty and “hack” the Visual Studio project :-) Right-click on your project and select “Open folder in windows explorer” (or manually browse to your project folder). Find your .csproj file (in my case it’s DeploymentProject.csproj) and open it in notepad or your favorite text editor (depending on your OS you may or may not have a “Open with” option, you may have to right-click or shift-right-click, it all depends… if all else fails, just open notepad and open the file from within notepad). Find the XML nodes called ItemGroup and add your own ItemGroup as follows:
A few things there. By using $(TargetDir) as the path, we’re telling Visual Studio/AX to find our extra DLL in the folder where this CURRENT project’s DLL is being built. This is important, since it will make sure that wherever the project is compiled, we’ll always find MyDLL.DLL correctly. By default when you add a reference, VS will set the “copy local” flag to yes, which will make sure the referenced DLL is available. Save the csproj file and switch back to Visual Studio. You should get the following dialog:
This is exactly what we need. Click “Reload”. Now, we’ve edited the VS project on disk but it’s not in the AOT yet. Normally, VS updates the AOT any time you click save. Unfortunately, in this case you just reloaded the project from disk so VS doesn’t actually do anything when you hit save, as it doesn’t think you’ve changed anything. So, the easiest thing you can do is just click the “Add DeploymentProject to AOT” option again, as we did in the beginning. This will force an entire update of the project to the AOT. Ok, so now (remember I had “Deploy to Client” set to yes) I will just open the AX client. And as explained in my article on VS Project DLL deployment, you should see both the DeploymentProject.dll and the MyDLL.dll files appearing in your Users\youruser\AppData\Local\Microsoft\Dynamics Ax\VSAssemblies.
Now, as for using the code of MyDLL. Remember we added a class and method there. However, the DLL is referenced in the VS project, but not in the AOT. So, your code inside DeploymentProject.dll can use that class, but your X++ can only use the code from DeploymentProject.dll. If you need access to the MyDLL.dll code from X++, you will need to manually add a reference to that DLL in the AOT still. Now, at that point you point it to the location of the DLL, but at runtime (or after you deploy the code to a test or production environment using models) AX will just try to load the DLL from its known search paths, which will include the VSASSemblies folder in your appdata. So as long as you include the AOT reference as part of your model, this trick will work everywhere.
As a final note, you can use this to deploy ANY file. You can right-click your project and select “add / existing item” and select a JPG file for example. In the properties of the file, make sure to set the “Copy to Output Directory” flag to “Copy always”. Then, just add another VSProjectOutputFiles node in your csproj file.
There is no comment section here, but I would love to hear your thoughts! Get in touch!
Blog Links
Blog Post Collections
- The LLM Blogs
- Dynamics 365 (AX7) Dev Resources
- Dynamics AX 2012 Dev Resources
- Dynamics AX 2012 ALM/TFS
Recent Posts
-
GPT4-o1 Test Results
Read more... -
Small Language Models
Read more... -
Orchestration and Function Calling
Read more... -
From Text Prediction to Action
Read more... -
The Killer App
Read more...
 Menu
Menu
